Manage Tasks
📙 After a task is published, Task Admin can conduct task management actions on the My Tasks-My Tasks Management page. Team Admin/Owner can navigate to the Team Task Management tab to manage team tasks. Let's start to dive into the logic and system of managing tasks on BasicAI together!🧐
Task Management
For Task Admin, navigate to My Tasksand then click My Tasks Management. The page will display all the task information assigned to the Task Admin, along with single/bulk management tools.
For Team Admin/Owner, click the Team Task Management tab to manage all the team tasks.
My Tasks Management VS Team Task ManagementThe Team Task Management page displays a list of all team tasks for Team Admin/Owner. Team Admin/Owner can manage all team tasks here. Its display and functions are similar to My Tasks Management, but it has two additional operation options:
- For new tasks that have not been fully configured, team managers can view them on the Team Task Management page and click
Configureto continue configuration or clickDeleteto delete them.- In the bulk management toolbar, team managers can click
Link to Projectto bind multiple tasks to a project.
1. Task List Sheet
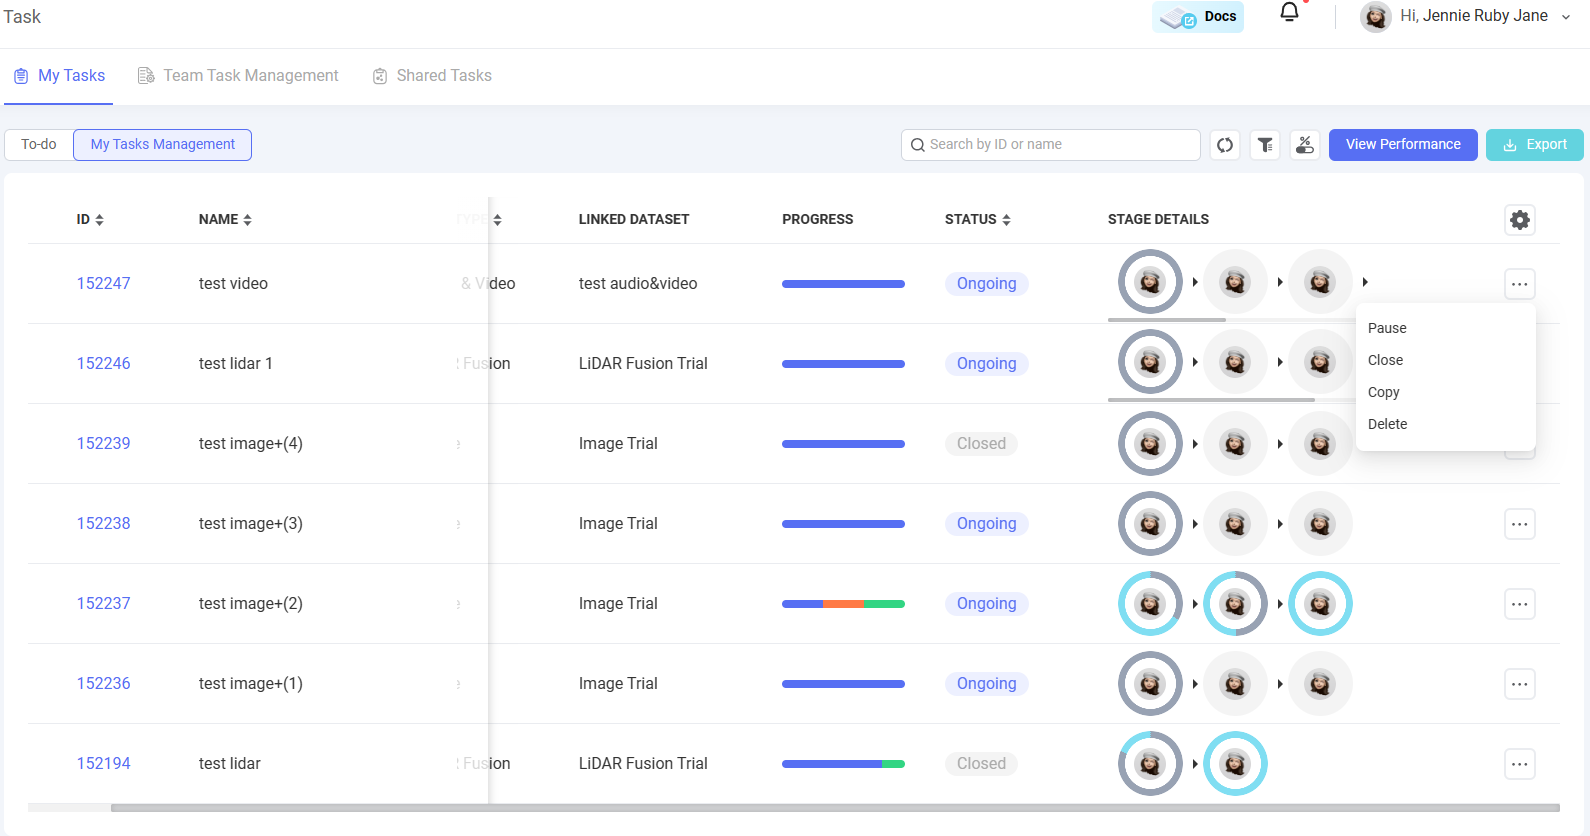
The task list sheet displays all of the task information and single-task operation buttons, such as:
Task ID, Task Name, Data type, Associated Dataset, Task Progress Bar, Task Status, Task Phase Details and Single-Task Operation Buttons (including Pause, Close, Copy, Delete)
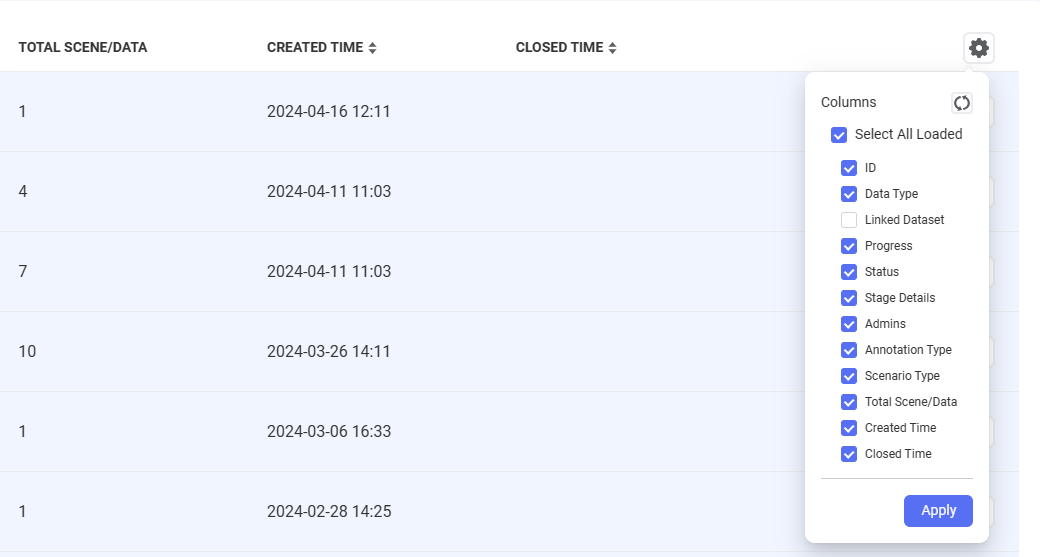
💡The ⚙ button at the right corner of the task list sheet allows users to configure the table to be displayed with selected columns as shown below. After selecting certain columns, please click
Apply.
2. Bulk Manage Tasks
Click the checkbox on the left side of each task, and then the Bulk Management Toolbar will display at the bottom of the page. This is a convenient way for Task Admin to manage several or all tasks at the same time.
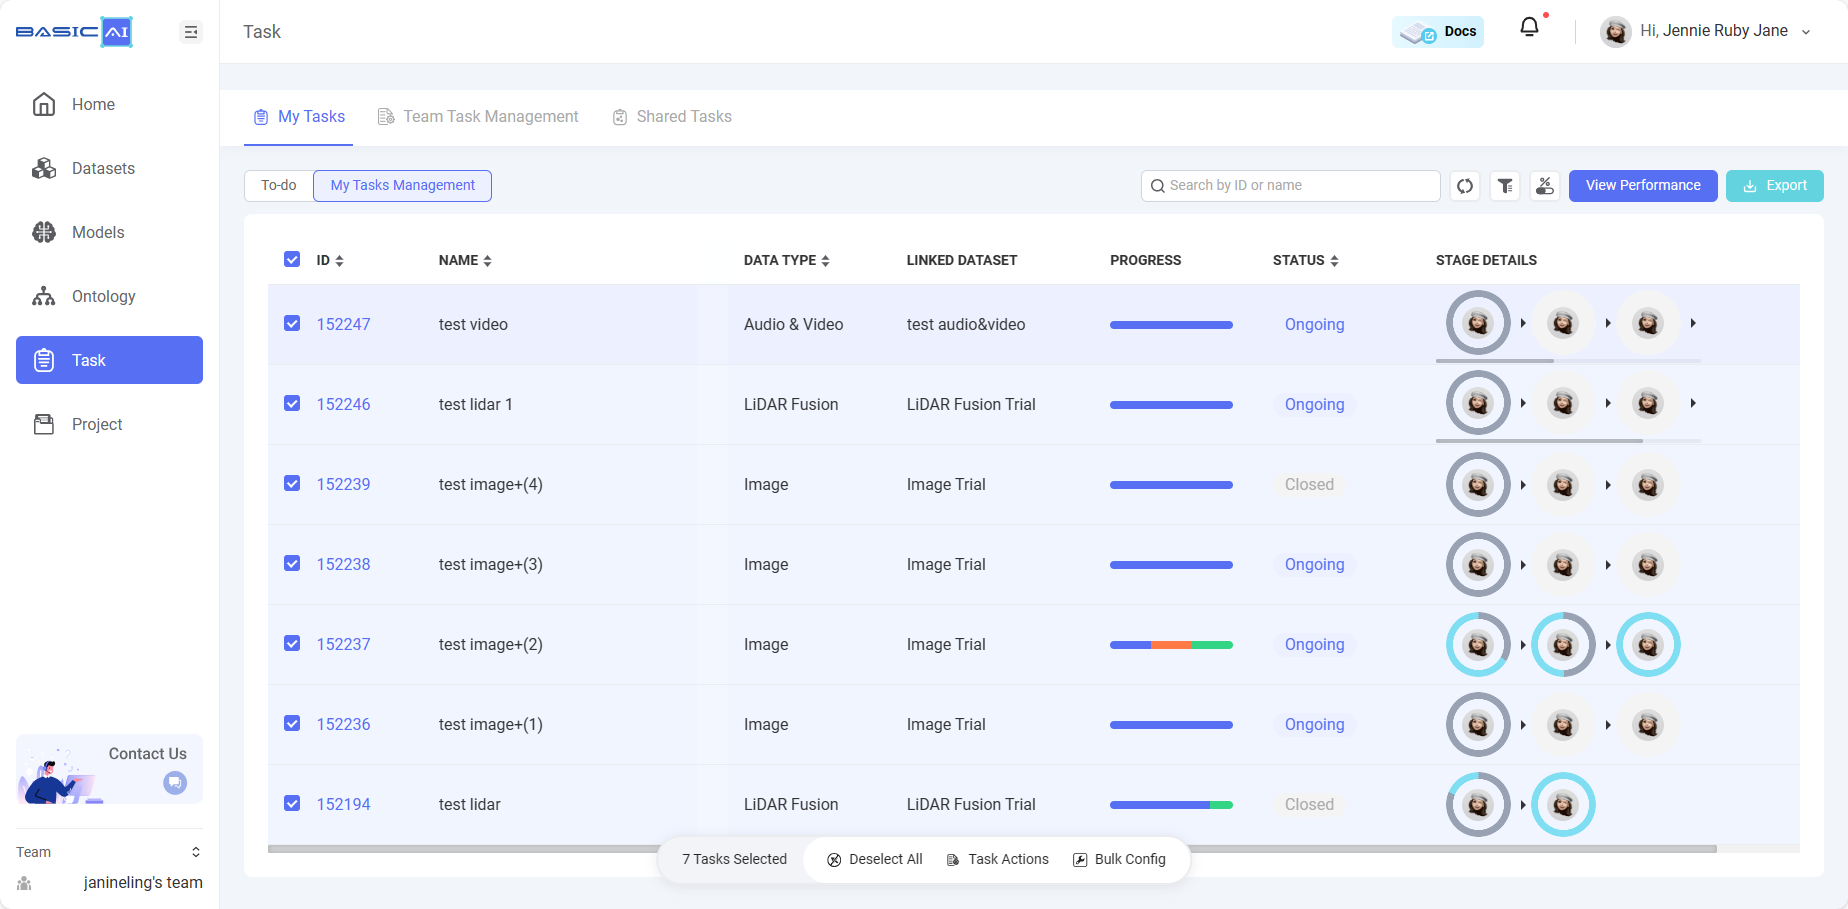
| Bulk Management Buttons | Sub- Buttons | Results |
|---|---|---|
| Deselect All | / | / |
| Task Actions | Pause | Pausing tasks will lead to the loss of annotation/reviewing access for all workers. |
| Continue | Resume the paused tasks, and then workers can continue working on the tasks. | |
| Delete | After clicking Delete, a warning window will pop up, indicating that all comments, rejections, and other data related to the tasks will be removed. However, the original data source of the tasks will not be removed, and all annotated results that have been accepted will not be removed. Only new tasks in the configuration stage and tasks that have been closed can be deleted. | |
| Restart | Restart tasks, and only completed tasks can be restarted. | |
| Close | After clicking Close, a warning window will pop up, indicating that all the tasks will not be able to restart and all unaccepted annotations will be discarded. | |
| Bulk Config | Basic Settings | Click Basic Settings, confirm the data type and annotation type of the tasks, and then jump to edit task basics settings |
| Ontologies | Click Ontologies, and jump to edit ontology classes and classifications. | |
| Workflows | Click Workflows, and jump to edit task workflow. | |
| QA Rules | Click QA Rules, confirm the data type and annotation type of the tasks, and then jump to edit QA rules. |
3. Task Info Summary
Clicking on any Task ID on the Task Management page will lead you to the task info summary page, which contains 5 tabs: Overview, Data, QA, Performance, and Setting.
3.1 Overview
The Task Overview page contains basic metrics and statistics for admins to track task progress and monitor the completion status of the task. The information on this page includes: Completed Data Counts,_ In-Acceptance Data Counts_, Rejection Counts, Comment Counts, Task Progress Detail Bar, Data & Object Accuracy Diagram, and Stage Breakdown Bar Chart.
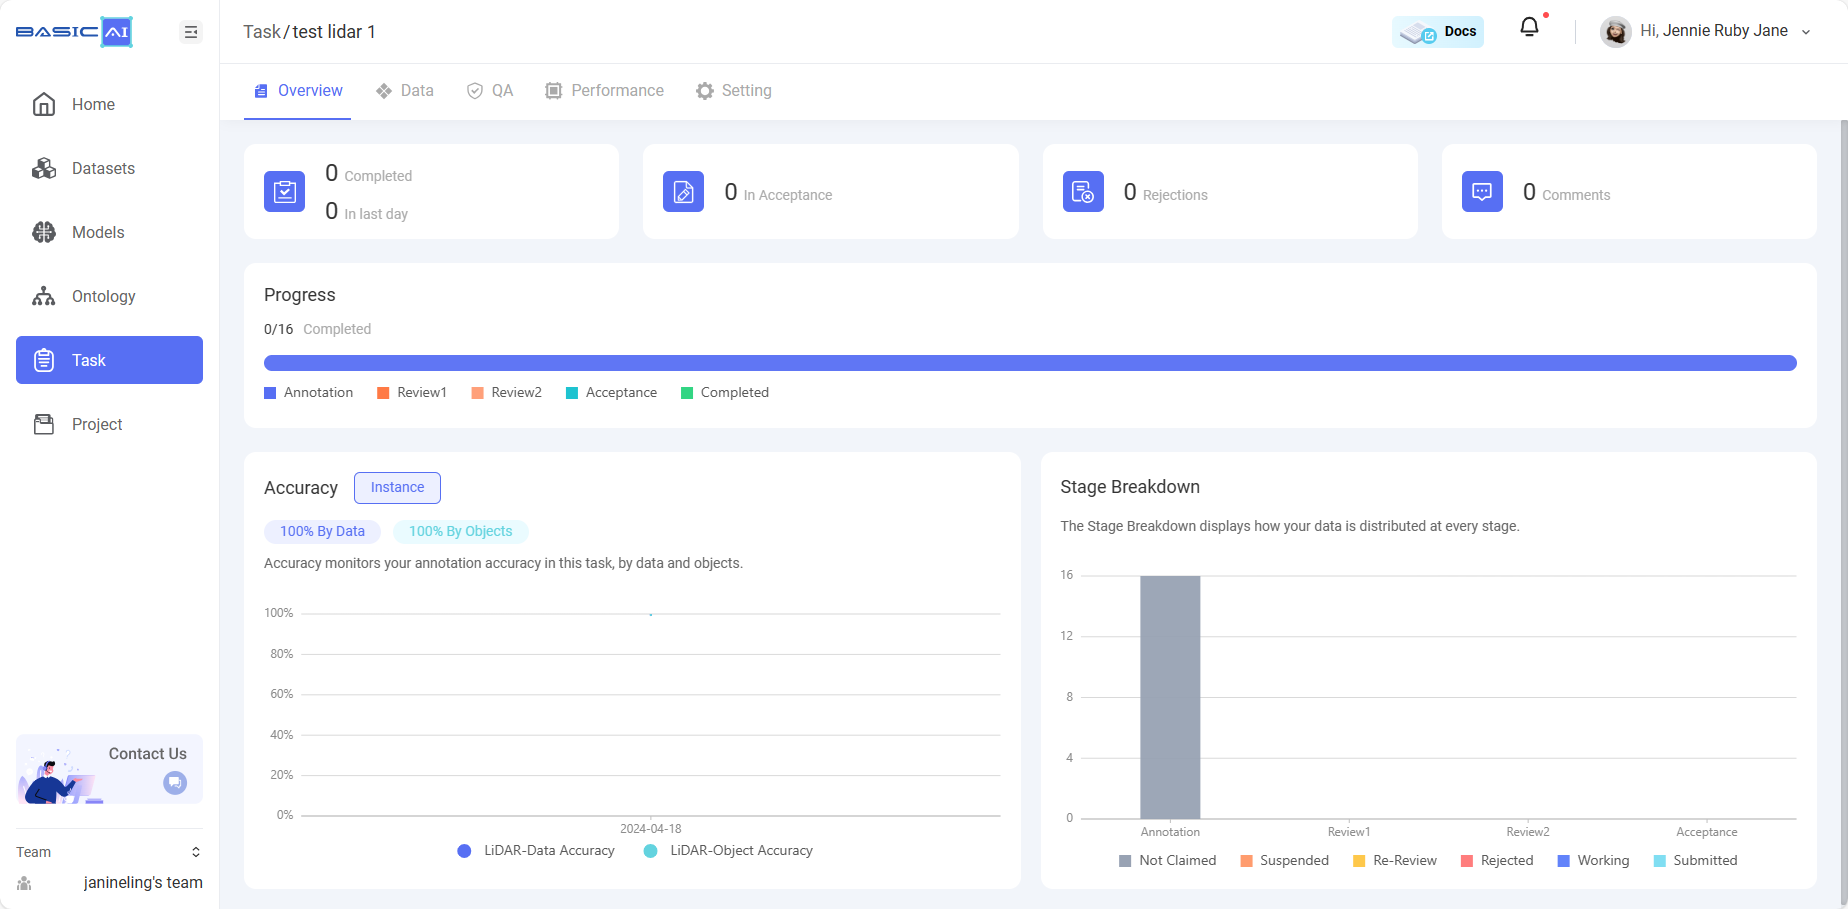
- Progress: The Progress bar indicates the specific counts of data which are in the stage of Annotation, Review, Acceptance or Completion.
- Accuracy: The Task Accuracy chart displays accuracy statistics in the dimensions of Data and Objects according to different data types (LiDAR Fusion or Image) and annotation types (Instance or Segmentation) of the task. In general, the indicators included in the chart (which might differ according to specific tasks) are as follows:
| LiDAR Fusion | Image | |
|---|---|---|
| Instance | LiDAR Data Accuracy, LiDAR Object Accuracy | Image Data Accuracy, Image Object Accuracy |
| Segmentation | LiDAR Data Accuracy, LiDAR Point Accuracy | Image Data Accuracy, Image Object Accuracy |
Only the data/objects with error comments will be defined as wrong data/objects when calculating LiDar Fusion Accuracy or Image Accuracy. The calculation methods of accuracy on BasicAI are:
By Data: Calculated in units of an image or LiDAR fusion data. Assuming that a user sets the data accuracy baseline to 95%, if there are 100 bounding boxes in the data, and less than 5 errors/comments, the data is considered accurate. Data Accuracy= accurate data counts/total data submitted counts.
By Objects: If a box is not marked with an error comment, it is considered accurate. Object Accuracy = 1 - object counts with error comments/total object submitted counts.
In addition, for Segmentation of LiDAR Data, LiDAR Point Accuracy= 1 - number of wrong Points/ total number of annotated Points.
- Stage Breakdown: The Stage Breakdown bar chart provides adequate information about how the data in the task are distributed at every workflow stage and every status.
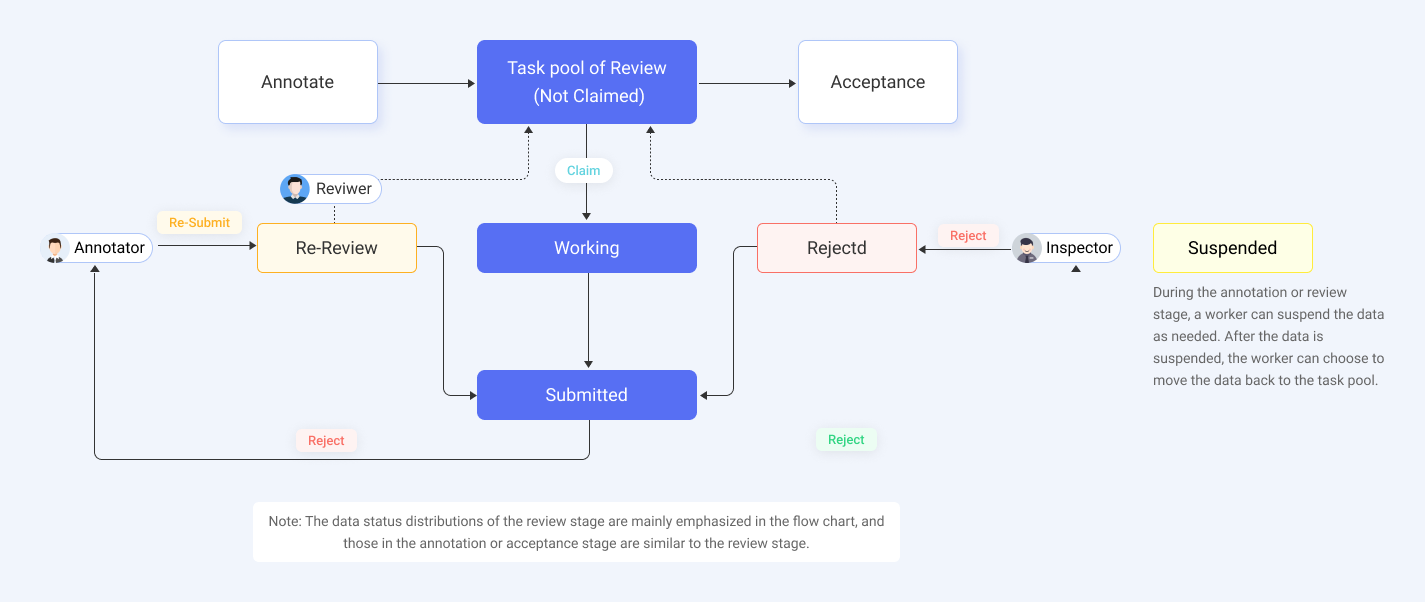
Data Status DistributionsThere are 6 statuses for data in a task, namely Not claimed, Suspended, Re-Review, Rejected, Working, and Submitted.
- Not Claimed: Data that have not yet been claimed by any worker in the task pool
- Suspended: Data that have been suspended by a worker
- Re-Review: When a reviewer receives the modified data from the same annotator again, the data will be in the Re-Review status
- Rejected: Data that have been rejected by others
- Working: Data that are currently being worked on by a worker during annotation, review or acceptance stage
- Submitted: Data that have been submitted by a worker
Please refer to the following flow chart for more information:
3.2 Data
The Data page allows admins to view all the data in the task, drill down to manage each piece of data, use useful attributes on the right sort&filter card to filter out problematic data, and then enter the data to add comments or re-assign it to other workers directly.
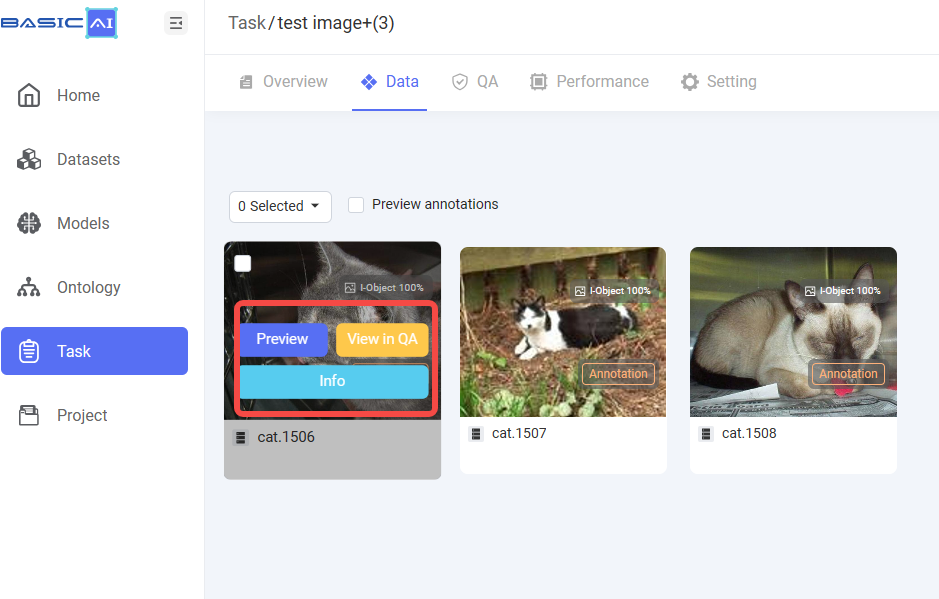
🔖 Data Card
Hover on the data card to preview, view in QA, and check information about the data. Click Preview annotations to see the annotation results on each data card if the data has been annotated. Task Admin and Inspector can see&click the view in QA button and enter the tool page to add comments to the previous worker's assignment.
🔖 Drop-down Select Box
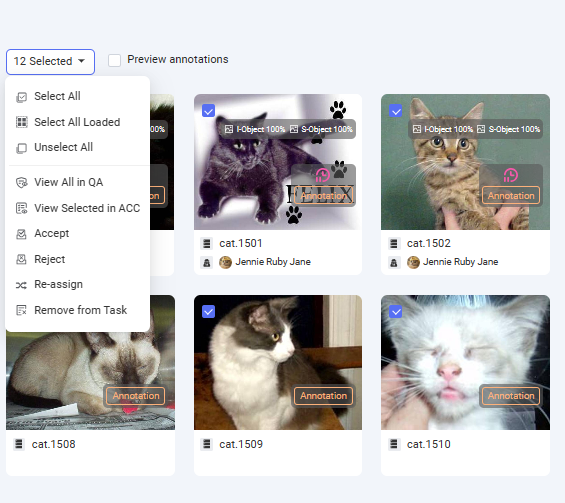
The drop-down box at the top left corner supports users to select/unselect all the data, accept/reject data, remove data from the task, view data in QA or ACC mode and re-assign the data to the original worker, a new worker or back to the task pool, etc.
🔖 Sort&Filter Card
The Sort&Filter Card on the right side of the page allows users to sort and filter problematic data according to the provided attributes.
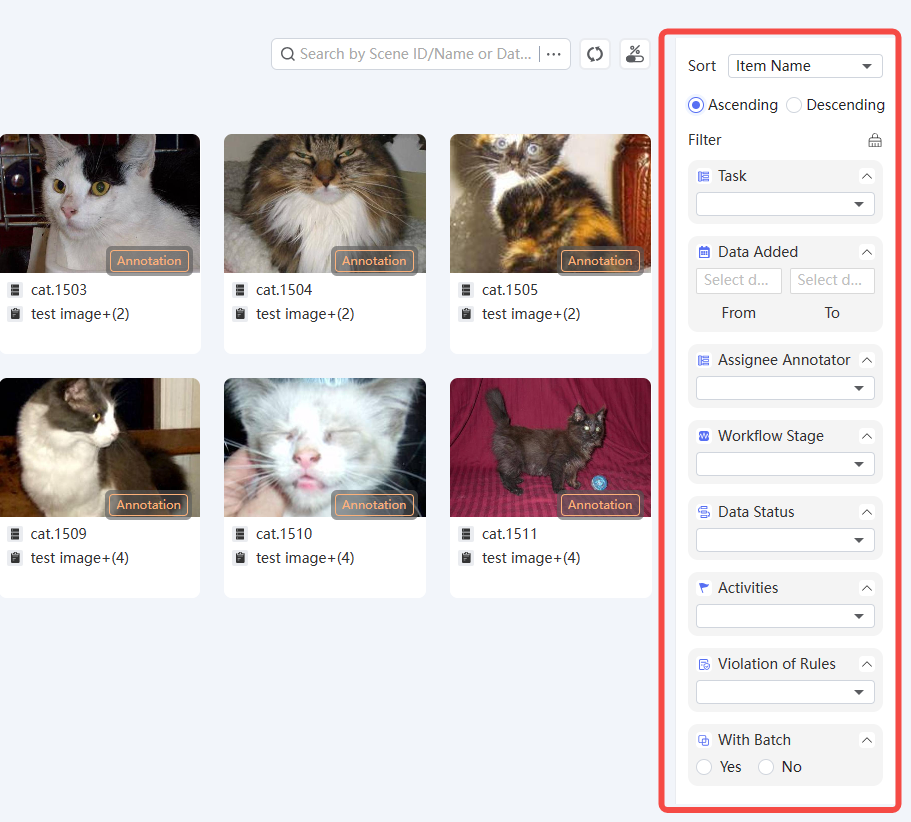
| Functions | Options | Remarks |
|---|---|---|
| Sort | Ascending by Item Name | / |
| Descending by Item Name | / | |
| Filter | Added Date | Select data-added dates from xxx to xxx. |
| Assignee Annotator | Select the name of the assignee annotator. | |
| Workflow Stage | Select the stage of the data: annotation, review or acceptance. | |
| Data Status | Not Claimed, Working, Re-review, Rejected, Suspended, Submitted. Please see the explanations for each data status in the 3.1 Overview section above. | |
| Activities | With Comments, With My Comments, Marked as Invalid (which means on the tool page, a worker marked the data as Invalid under the Validity tab), With Workflow Rejections (which means a reviewer rejected the data), With ACC Rejections (which means an inspector rejected the data), With Revise (Task Admin/Inspector revised the data), Paused for an Hour | |
| Violation of Rules | Violation of auto QA rules if configured and applied to the data before | |
| With Batch | Select data with or without a batch. |
3.3 QA
Please jump to the Automated QA guide for this part of information.
3.4 Performance
Please jump to the Performance guide for this part of information.
3.5 Setting
The configuration options on the 'Task-Setting' page are consistent with the ones when setting up or creating a new task, including Ontology-Class&Classification, Instructions, Workflow, Comments, Workflow Settings, and Annotation Settings. Using logic is also consistent. For more details, please refer to the task creation guide.
The Workflow Parameters setting can be slightly different than the one during the task creation stage. Here, only two options can be edited and saved, including "Allow worker to view submitted data" and "History Access Permissions".

Workflow Parameters
- History Access Permissions
If you would like to give workers access to view / restore history result versions on the tool page, you can click on the worker roles to grant permissions: Annotator, Reviewer, or Inspector. Multiple selection is supported here.
- Data Accuracy
This is the object accuracy threshold used to determine if the data are accurate. Set the accuracy threshold as needed, and the default threshold is 95%. It cannot be edited here for now.
- Allow workers to view submitted data.
If clicked on, all workers in the task can view submitted data.
- Include group results in accuracy and missing rate calculations.
This determins whether to include group results when calculating accuracy and missing rates. It cannot be edited here for now.
- Allow the same worker to work on the same data at different stages
This is clicked on as default and cannot be edited here for now. It means there are no restrictions on whether a worker has participated in certain data when assigning tasks at different stages.
How to invite new members to a task?If you would like invite a new worker to a task which you have created before, simply follow the steps below
-
Head to the **Team ** center on the top right corner of the page -> click
Invite Member-> fill in email ids -> choose role type -> clickInvite.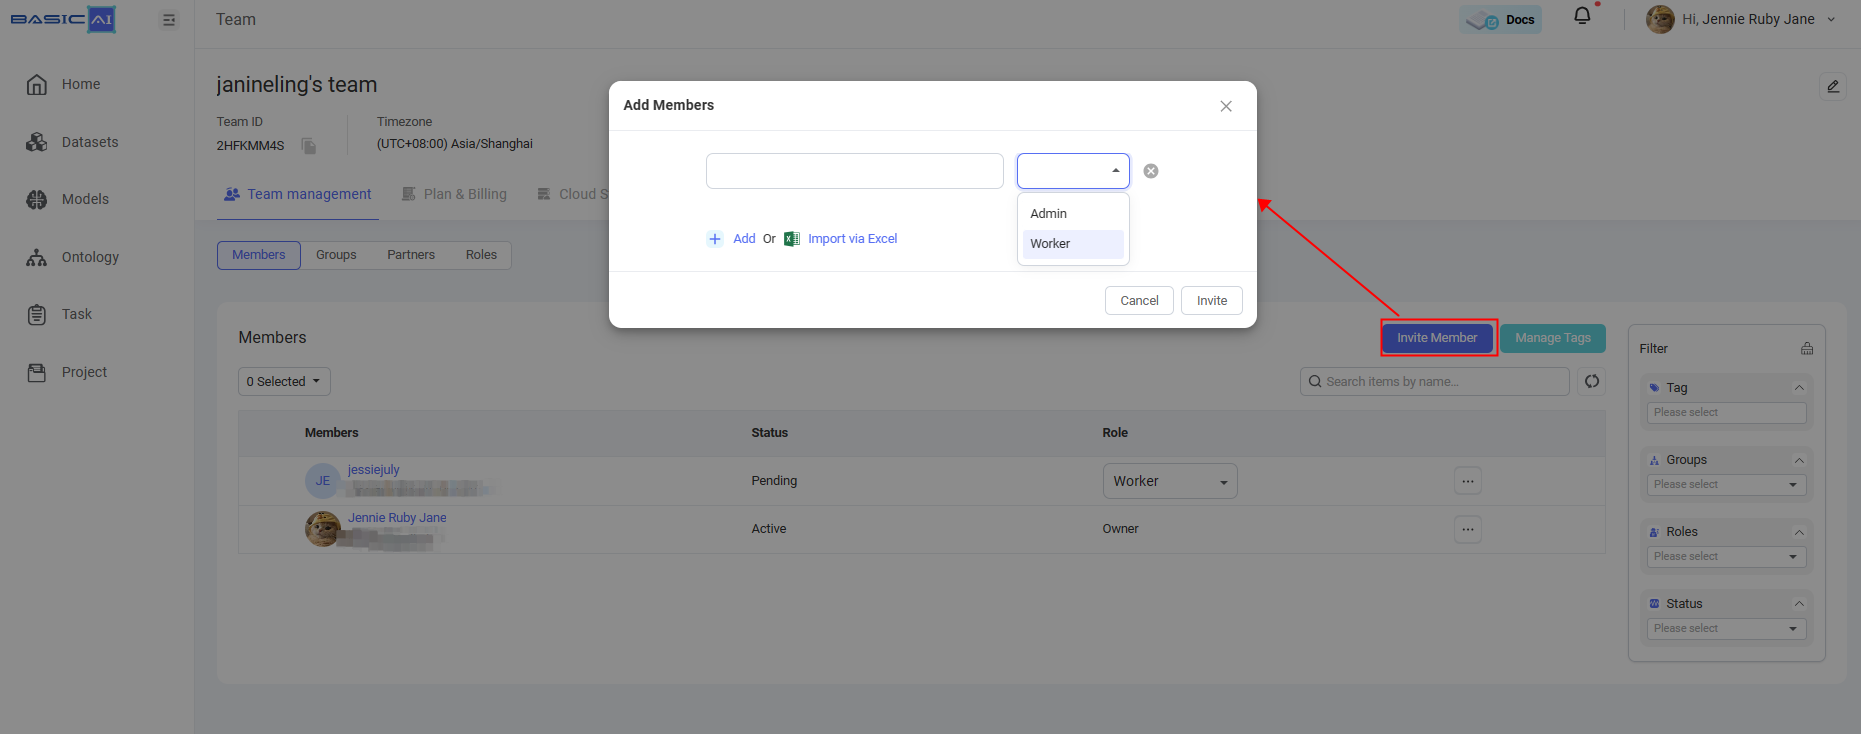
-
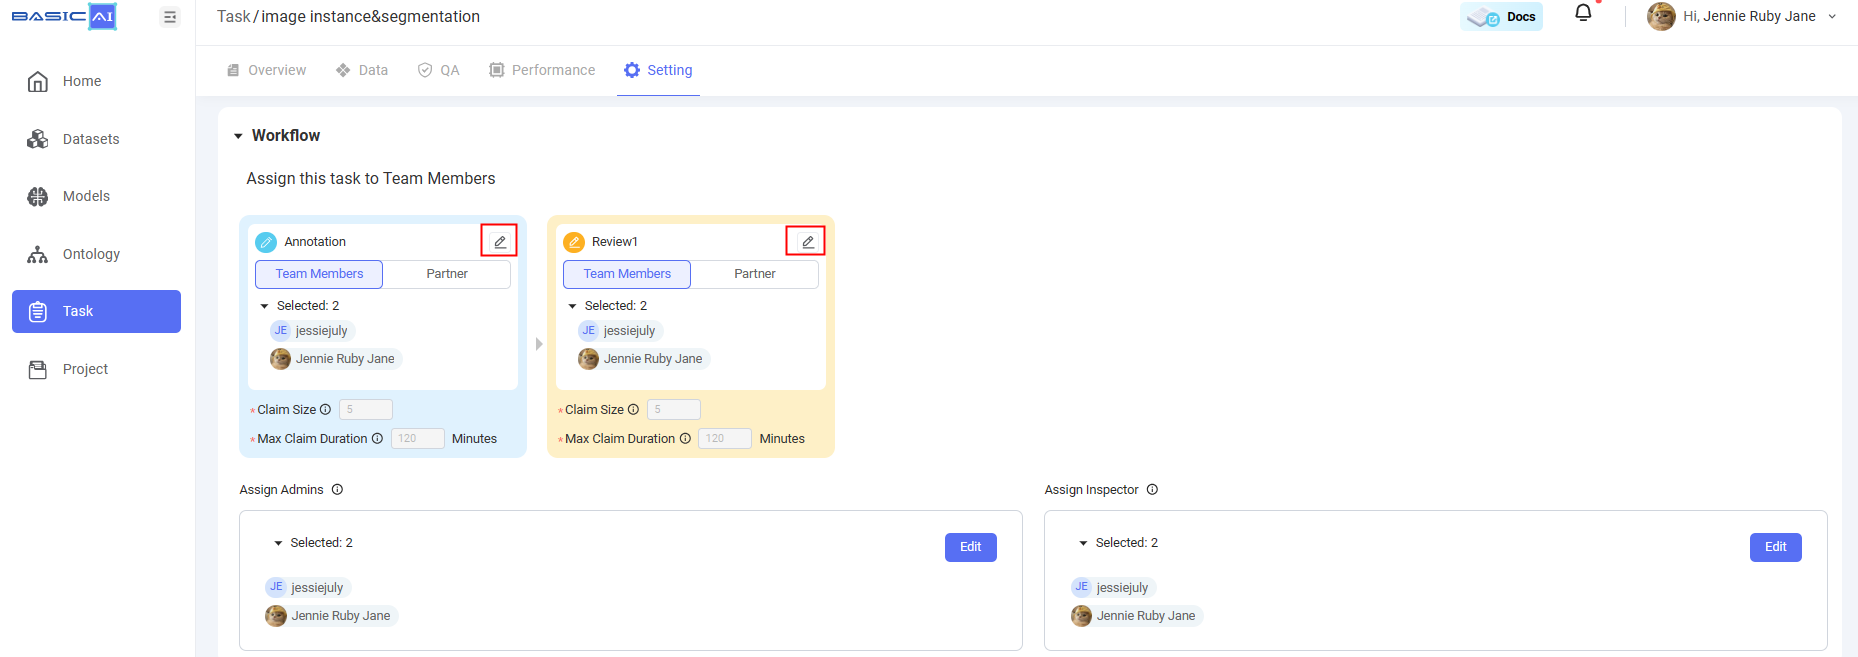
After successfully inviting, you can add the new worker to the task in the Workflow section on the Task-Setting page by editing the assignee annotators/reviewers of the task. In this way, the newly added worker can find and receive this task on his To-do page.
Shared Tasks
External Partner Admin who receives and accepts shared tasks can browse and manage tasks shared with them under the Shared Tasks section. The page information and operational logic are similar to 'Task Management'.

Updated 9 months ago

