Data and Folder Structure
📁 Guide to form a data for different datatypes
This article guides you on organizing folder structures into Data for different data types of datasets in BasicAI formats. You can find our sample datasets here.
Video Tutorial
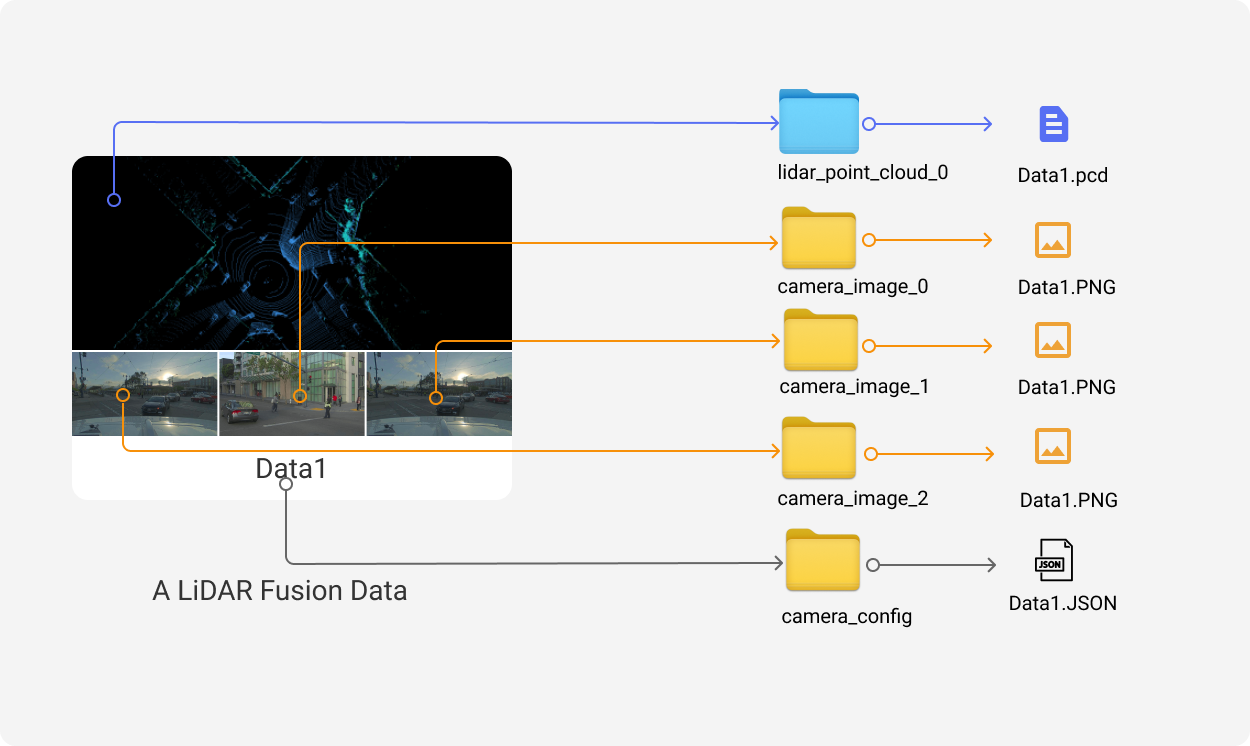
LiDAR Fusion 🌌
3D Point Cloud folder structure
We designed our folder structure to separate different types of sensors, such as camera_image and lidar_point_cloud. When multiple sensors exist for each type, we differentiate them by adding "_" followed by an index number. Therefore, the final folder names will be camera_image_0 and lidar_point_cloud_0.
A LiDAR Fusion data is linked and combined by multiple files by the same file name across all sensors' folders like below:
Additionally, different sensors may have configurations, and each type has a separate folder for configurations. camera_config, for example, will affect all projection-related features
In some scenarios, you may have pre-label results, which should be organized in a result folder. As a consequence, our LiDAR Fusion folder should be organized as follows:
├── camera_config // Camera config, more details can reference the "Camera Config" section
│   ├── data1.json
│   └── data2.json
├── camera_image_0 // Camera image 0, optional
│   ├── data1.jpg
│   └── data2.jpg
├── camera_image_1 // Camera image 1, optional
│   ├── data1.jpg
│   └── data2.jpg
├── camera_image_2 // Camera image 2, optional
│   ├── data1.jpg
│   └── data2.jpg
├── lidar_config // Lidar config, optional
│   ├── data1.json
│   └── data2.json
├── lidar_point_cloud_0 // Lidar point cloud 0
│   ├── data1.pcd
│   └── data2.pcd
├── result // Annotation result, more details can reference "Data Annotation Result" section
│   ├── data1.json
│   ├── data1_lidar_point_cloud_0_segmentation.pcd
│   ├── data2.json
│   └── data2_lidar_point_cloud_0_segmentation.pcd
├── scene_1 // Scene, optional, the structure is similiar to the root directory
│   ├── camera_config
│   ├── ...
│   ├── data
│   └── result
└── batch_1 // Batch, optional, the structure is similiar to the root directory
    ├── camera_config
    ├── ...
    ├── data
    ├── result
    └── scene_1
If you are going to organize your data in Batch or Scene , please refer to
LIDAR Fusion folder structure tips
- lidar_point_cloud_0 folder is mandatory for LiDAR datasets. Images without related LiDAR files will be ignored
- If your images are not shown, please check your image folder names. It is camera_image_0, not image_0
- If your 2D image results don't project or project wrong, please check your camera configs
- BasicAI offers an additional camera callibration feature; if you have a wrong projection, feel free to calibrate online!
Camera config
All projection-related features will be disabled when you have a wrong or empty camera configuration or calibration parameter.
Camera_config is an array of all your camerasCamera parameters is an object of the array ordered by index. Eg: the parameters of camera_image_0 is the object of [0] in the camera config file
The parameters of each camera in the Camera config file are:
-
camera_intrinsic or camera_internal: a dictionary of the camera intrinsic matrix with four keys: fx, cx,fy, and cy.
-
camera_extrinsic or camera_external: a list of the camera extrinsic matrix obtained by converting a 4x4 extrinsic matrix into a list
-
distortionK: a list of radial distortion coefficients, only needed when your images have distortion, supports up to 6 parameters. It is optional. Delete this key when you don't need it
-
distortionP:a list of tangential distortion coefficients, only needed when your images have distortion, supports up to 2 parameters. it is optional. Delete this key when you don't need it
The camera configs for the 2D images corresponding to the same PCD file are stored in a JSON file.
❗If there are multiple images for one data, the index of cameraimage0 should correspond to the order of the objects in the array of the JSON
Here is a sample of the camera_config.JSON file:
Notes for camera_conf doesn't work
- Use VScode to see if your JSON has syntax errors.
- Please don't use comments in the camera config JSON
- Camera configs is an array, even if you only have one camera
- Camera extrinsic is a 4x4 matrix, not 3x3. Don't forget [0,0,0,1]
- Check the format of your camera_intrinsic and camera_extrinsic, they are easily messed up
[
  {
    "camera_external": [
      0.76866726,
      0.04361939,
      0.63815985,
      -1.59,
      -0.63870827,
      -0.00174367,
      0.76944701,
      0.91,
      0.03467555,
      -0.9990467,
      0.02651976,
      0.96,
      0,
      0,
      0,
      1
    ],
    "camera_internal": {
      "fx": 382.06535583,
      "cx": 326.66902661,
      "fy": 421.05123478,
      "cy": 254.70249315
    },
    "rowMajor": true,
    "distortionK": [
      -0.30912646651268,
      0.0669714063405991
    ],
    "distortionP": [
      0.00262697599828243,
      0.00106896553188562
    ],
    "width": 1920,
    "height": 1280
  },
  {
    ....//Camera parameters of camera_1. DELETE this comment and "..." before uploading
  }
]
Camera config references
- For more details about camera_intrinsic and camera_extrinsic, please refer camera intrinsic and extrinsic
- For more details about distortion, please refer camera calibration
Compatible with LiDAR Basic
Images and camera configurations are optional for LiDAR Fusion and compatible with deprecated LiDAR Basic. The folder structure of the LiDAR Fusion dataset that only has LiDAR data should be organized as below
.
├── lidar_point_cloud_0 // Lidar point cloud 0
│   ├── data1.pcd
│   └── data2.pcd
├── result // Annotation result, more details can reference "Data Annotation Result" section
│   ├── data1.json
│   ├── data1_lidar_point_cloud_0_segmentation.pcd
│   ├── data2.json
│   └── data2_lidar_point_cloud_0_segmentation.pcd
RGB colored PCDs
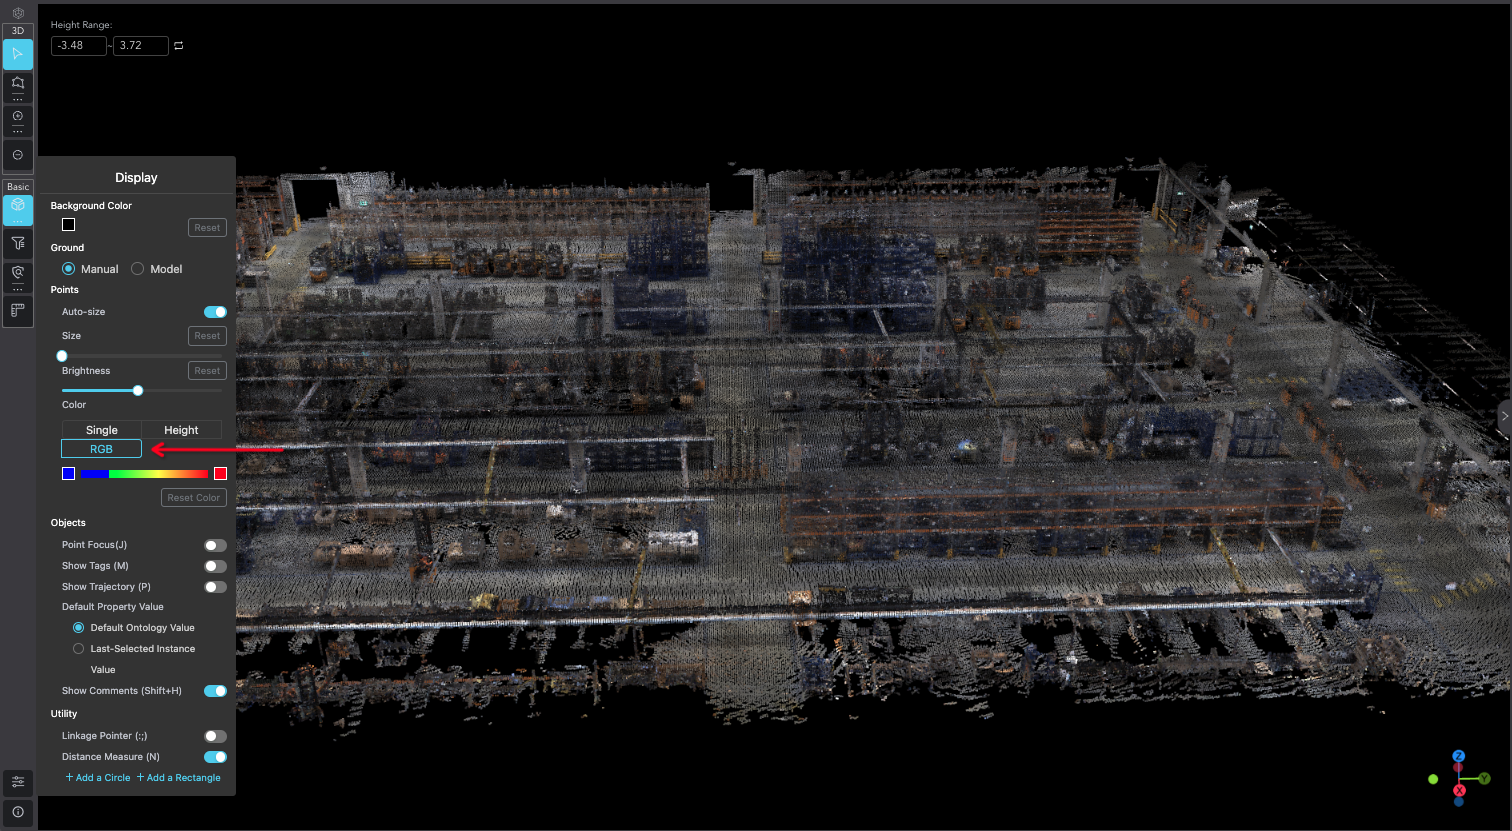
PCDs in the LiDAR Fusion dataset support RGB color values. You can change the render mode to RGB. If the PCDs you upload have an extra rgb field. Please view the sample below.
# .PCD v0.7 - Point Cloud Data file format
VERSION 0.7
FIELDS x y z rgb
SIZE 4 4 4 4
TYPE F F F U
COUNT 1 1 1 1
WIDTH 1877075
HEIGHT 1
VIEWPOINT 0 0 0 1 0 0 0
POINTS 1877075
DATA ascii
30.976604 -0.63041502 -3.4124653 4285229679
30.999643 -0.67684662 -3.4000406 4285492592
12.957853 -68.076241 -2.4851601 4285690998
13.038503 -67.850151 -2.4753263 4285494398
13.031118 -67.778465 -2.4981151 4285165947
12.97576 -67.642067 -2.5326648 4285626750
13.014338 -67.527512 -2.5141547 4286349446
13.04153 -67.413116 -2.4968615 4285494913
13.053127 -67.361099 -2.4970944 4285429118
13.000272 -67.278008 -2.5389211 4286086016
13.028088 -67.22789 -2.5274782 4285494913
How to convert RGB values to decimal
RGB field is an RGB value in decimal. Python code below demonstrates how to convert RGB values like (255,255,255) to decimal 16762879.
rgb = (255, 255, 255)
decimal = (rgb[0] << 16) + (rgb[1] << 8) + rgb[2]
print(decimal)
Change to RGB mode in the LiDAR Fusion tool
After RGB PCDs are uploaded successfully, you will see an extra option under the color selection of Setting in the LiDAR tool. Switch to RGB to render the point cloud in RGB.
4D BEV folder structure
4D BEV is a data type between Scene and Data. Multiple images from different sensors and timestamps construct the image party of the data, while their PCDs will be constructed into a single PCD offline. We will construct data like:
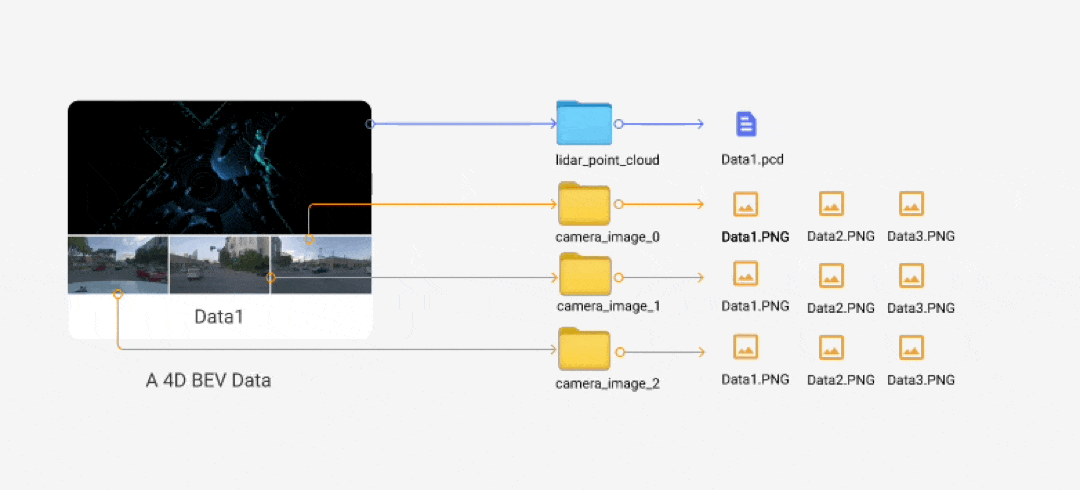
The camera_config folder is for projections, and the result folder is for the pre-label results. Our final folder structure will be like the following:
.
├── data1 // Data, directory name is the data name
│   ├── global_pose // The pose offset parameters used for each frame during synthesis
│   │   └── data1.json
│   ├── camera_config // Camera configs of each frame, more details can reference "Point Cloud Camera Config" section
│   │   ├── data1_01.json
│   │   └── data1_02.json
│   ├── lidar_point_cloud // Synthetic point cloud obtained by merging multiple frames
│   │   └── data1.pcd
│   ├── camera_image_0 // Camera 0's images of each frame
│   │   ├── data1_01.png
│   │   └── data1_02.png
│   ├── camera_image_1 // Camera 1's images of each frame
│   │   ├── data1_01.png
│   │   └── data1_02.png
│   └── ...
├── data2 // Data
├── meta // Meta info, optional, only for importing, it will be exported in the data info as is, can be any data structure, and the platform will not use it.
│   ├── data1.json
│   └── data2.json
├── data // Data info, only for exporting, more details can reference "Data Info" section
│   ├── data1.json
│   └── data2.json
├── result // Annotation result, more details can reference "Data Annotation Result" section
│   ├── data1.json
│   └── data2.json
└── batch_1 // Batch, the structure is similiar to the root directory
    ├── data1
    ├── data2
    ├── ...
    ├── data
    └── result
4D BEV folder structure tips
- There is NO "_0" after lidar_point_cloud folder
- Only the first LiDAR data will be parsed under a lidar_point_cloud folder; others will be ignored
- All images across different timestamps are aligned based on their names under image folders such as camera_config and camera_image_0. For example, data1_01.png will be the previous frame's image of data1_02.
- Scene level is not supported in 4D BEV
Image🌄
Images can be directly uploaded to the Image dataset, as video can be treated as a Scene after frame extraction.
Both a zip with or without image_0 folder level are supported.
If you want to upload data with pre-label results, you must put all images inside the image_0 folder. Pre-label results in the result folder correspond to image files by name.
.
├── image_0 // Image 0
│   ├── data1.jpg
│   └── data2.jpg
├── image_1 // Image 1, temporarily not support multimodal
├── ...
├── meta // Meta info, optional, only for importing, it will be exported in the data info as is, can be any data structure, and the platform will not use it.
│   ├── data1.json
│   └── data2.json
├── data // Data info, only for exporting, more details can reference "Data Info" section
│   ├── data1.json
│   └── data2.json
├── result // Annotation result, more details can reference "Data Annotation Result" section
│   ├── data1.json
│   ├── data1_image_0_labelmap.png
│   ├── data2.json
│   └── data2_image_0_labelmap.png
└── scene_1 // Scene, the structure is similiar to the root directory
│   ├── image_0
│   ├── ...
│   ├── data
│   └── result
└── batch1 // Batch, the structure is similiar to the root directory
    ├── image_0
    ├── ...
    ├── data
    ├── result
    └── scene_1
Upload video as a Scene
If you are going to process a segmentation or instance task on a video, you can upload a video with a frame extract configuration. After extraction, each video will be treated as a Scene, while each frame will be treated as a Data. Since The video itself will be treated as a Scene, additional scene level beyond the video is prohibited.
.
├── Video.MP4     ## will be treated as a Scene
│   ├── First_frame   ## will be treated as a Data
│   ├── Second_frame  ## will be treated as a Data
Audio & Video 🎥
Suppose you plan to annotate the video's or audio's timeline or audio track instead of the imaginary annotation. In that case, you need to upload your data to the Audio & Video dataset as shown:
.
├── av_0 // Audio & video 0
│   ├── data1.mp4
│   └── data2.mp4
├── av_1 // Audio & video 1, temporarily not support multimodal
├── ...
├── meta // Meta info, optional, only for importing, it will be exported in the data info as is, can be any data structure, and the platform will not use it.
│   ├── data1.json
│   └── data2.json
├── data // Data info, only for exporting, more details can reference "Data Info" section
│   ├── data1.json
│   └── data2.json
├── result // Annotation result, more details can reference "Data Annotation Result" section
│   ├── data1.json
│   └── data2.json
└── batch1 // Batch, the structure is similiar to the root directory
    ├── av_0
    ├── ...
    ├── data
    └── result
Notes:
- Each audio and video is Data; they cannot break each frame.
- For single-modal data with only
av_0, theav_0directory can be omitted when importing/exporting.
Text 📄
If you want to annotate text entities and relationships, you can upload your data to the Text dataset as shown:
Directly upload
.
├── Text1.txt  ## will be treated as a Data
├── Text2.csv  ## Each row in the first column, except for the first row, will be treated as a Data
├── Text3.xlsx
├── Text4.xls
Each .txt file will be considered as a Data. For .csv/.xlsx/.xls files, only the text in the first column will be parsed, and each row, excluding the first row, will be regarded as a single Data.
Upload as compressed files with results
If you want to upload data as compressed files with pre-labeled results, you can follow the format below. Both a zip with or without text_0 folder level are supported. However, the file type must be .txt.
.
├── text_0 // Text 0
│   ├── data1.txt
│   └── data2.txt
├── text_1 // Text 1, temporarily not support multimodal
├── ...
├── meta // Meta info, optional, only for importing, it will be exported in the data info as is, can be any data structure, and the platform will not use it.
│   ├── data1.json
│   └── data2.json
├── data // Data info, only for exporting, more details can reference "Data Info" section
│   ├── data1.json
│   └── data2.json
├── result // Annotation result, more details can reference "Data Annotation Result" section
│   ├── data1.json
│   ├── data2.json
└── batch1 // Batch, the structure is similiar to the root directory
    ├── text_0
    ├── ...
    ├── data
    └── result
Generative AI 🤖
For LLM annotation, such as annotating human-model dialogue contents including texts and images, you can upload the related data to a Generative AI Dataset . For now, our platform supports uploading Generative AI data with the following formats: .json , .xlsx/xls/csv , and .zip/gzip/tar/rar .
Upload JSON File
Each JSON file will be treated as one single data, and the name of the JSON file is regarded as the DataName. The file is parsed according to the following fields:
- "Role": the role in a dialogue, which is "user" or "bot", affecting the display outcome on the tool page.
- "Type" (Optional): text or image, distinguishing the data content.
- "Content": the dialogue content between the roles, including texts or image urls.
Here is an example of the data structure within a JSON file:
[
    {
      "role": "user",
      "type": "Text",
      "content": "Generate an approximately fifteen-word sentence that describes all this data: Midsummer House type restaurant; Midsummer House food Chinese; Midsummer House price-range moderate; Midsummer House customer rating 3 out of 5; Midsummer House near All Bar One"
    },
    {
      "role": "bot",
      "type": "Text",
      "content": "Midsummer House is a moderately priced Chinese restaurant with a 3/5 customer rating, located near All Bar One."
    },
    {
      "role": "user",
      "type": "Image",
      "content": "images/pic1.jpg"
    }
]
Upload Excel File
This kind of file has the format of .xlsx/xls/csv. Each Excel file will be regarded as one Batch, which will be parsed into multiple single data. In the Excel file, there should be four columns: DataName, Role, Type (Optional), and Content (of which the concepts are explained above).
Here is an example of the standard Excel file: Download📁

Upload Compressed File
If you would like to upload compressed files with the format of .zip/gzip/tar/rar, please follow the folder structures below:
- Upload Batch with JSON as Single Data:\
- Image and Batch at the same level:
. ├── images // images │ ├── pic1.jpg │ └── pic2.jpg ├── batch_0 // batch 0 │ ├── data1.json │ └── data2.json ├── batch_1 // batch 1 │ ├── data1.json │ └── data2.json- Image under Batch:
. ├── batch_0 // batch 0 │ ├── images // images │ ├── pic1.jpg │ └── pic2.jpg │ ├── data1.json │ └── data2.json ├── batch_1 // batch 1 │ ├── images // images │ ├── pic1.jpg │ └── pic2.jpg │ ├── data1.json │ └── data2.json - Upload Excel as Batch (Parsed into Multiple Single Data):
.
├── images
│   ├── pic1.jpg
│   ├── pic2.jpg
├── batch_0.xlsx
├── batch_1.xlsx
├── batch_2.xlsx - Upload JSON as Single Data:
.
├── images
│   ├── pic1.jpg
│   ├── pic2.jpg
├── data1.json
├── data2.json
├── data3.json
Updated about 1 year ago
What’s Next
Learn how to upload data with batch and scene.