Object Detection & Tracking - LiDAR Fusion
Guide for Instance Annotation Mode.
Guides on object detection and tracking with BasicAI LiDAR Fusion Tool, a powerful tool designed for labeling fused data from 3D LiDAR point clouds and 2D images.
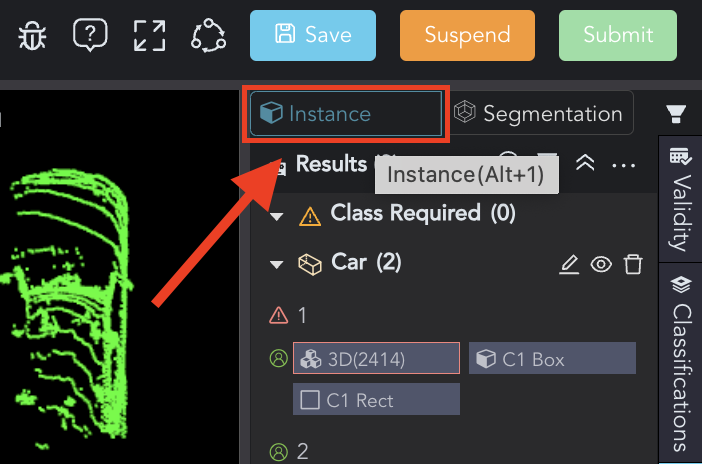
To detect objects from LiDAR Fusion Data or track them in a Scene, you need to choose Instance (Alt+1) in the Mode Switch.
Recommended Workflow for Object Detection & Tracking

1. Preparation
Before starting the annotation, you may need to adjust the view and display settings first.
The point cloud's focal range is often not at the coordinate origin. You can continuously press the hotkey Y multiple times to reposition it.
Clicking on the eye icon on the image data will highlight the camera's field of view on the Point Cloud Data.
Press the hotkey :; to show/hide the Linkage Pointer.
When you move the mouse over images, a line will appear in the point cloud canvas, indicating the direction of the pointer. Conversely, a linkage point will appear on the image when you move the mouse over the point cloud data.
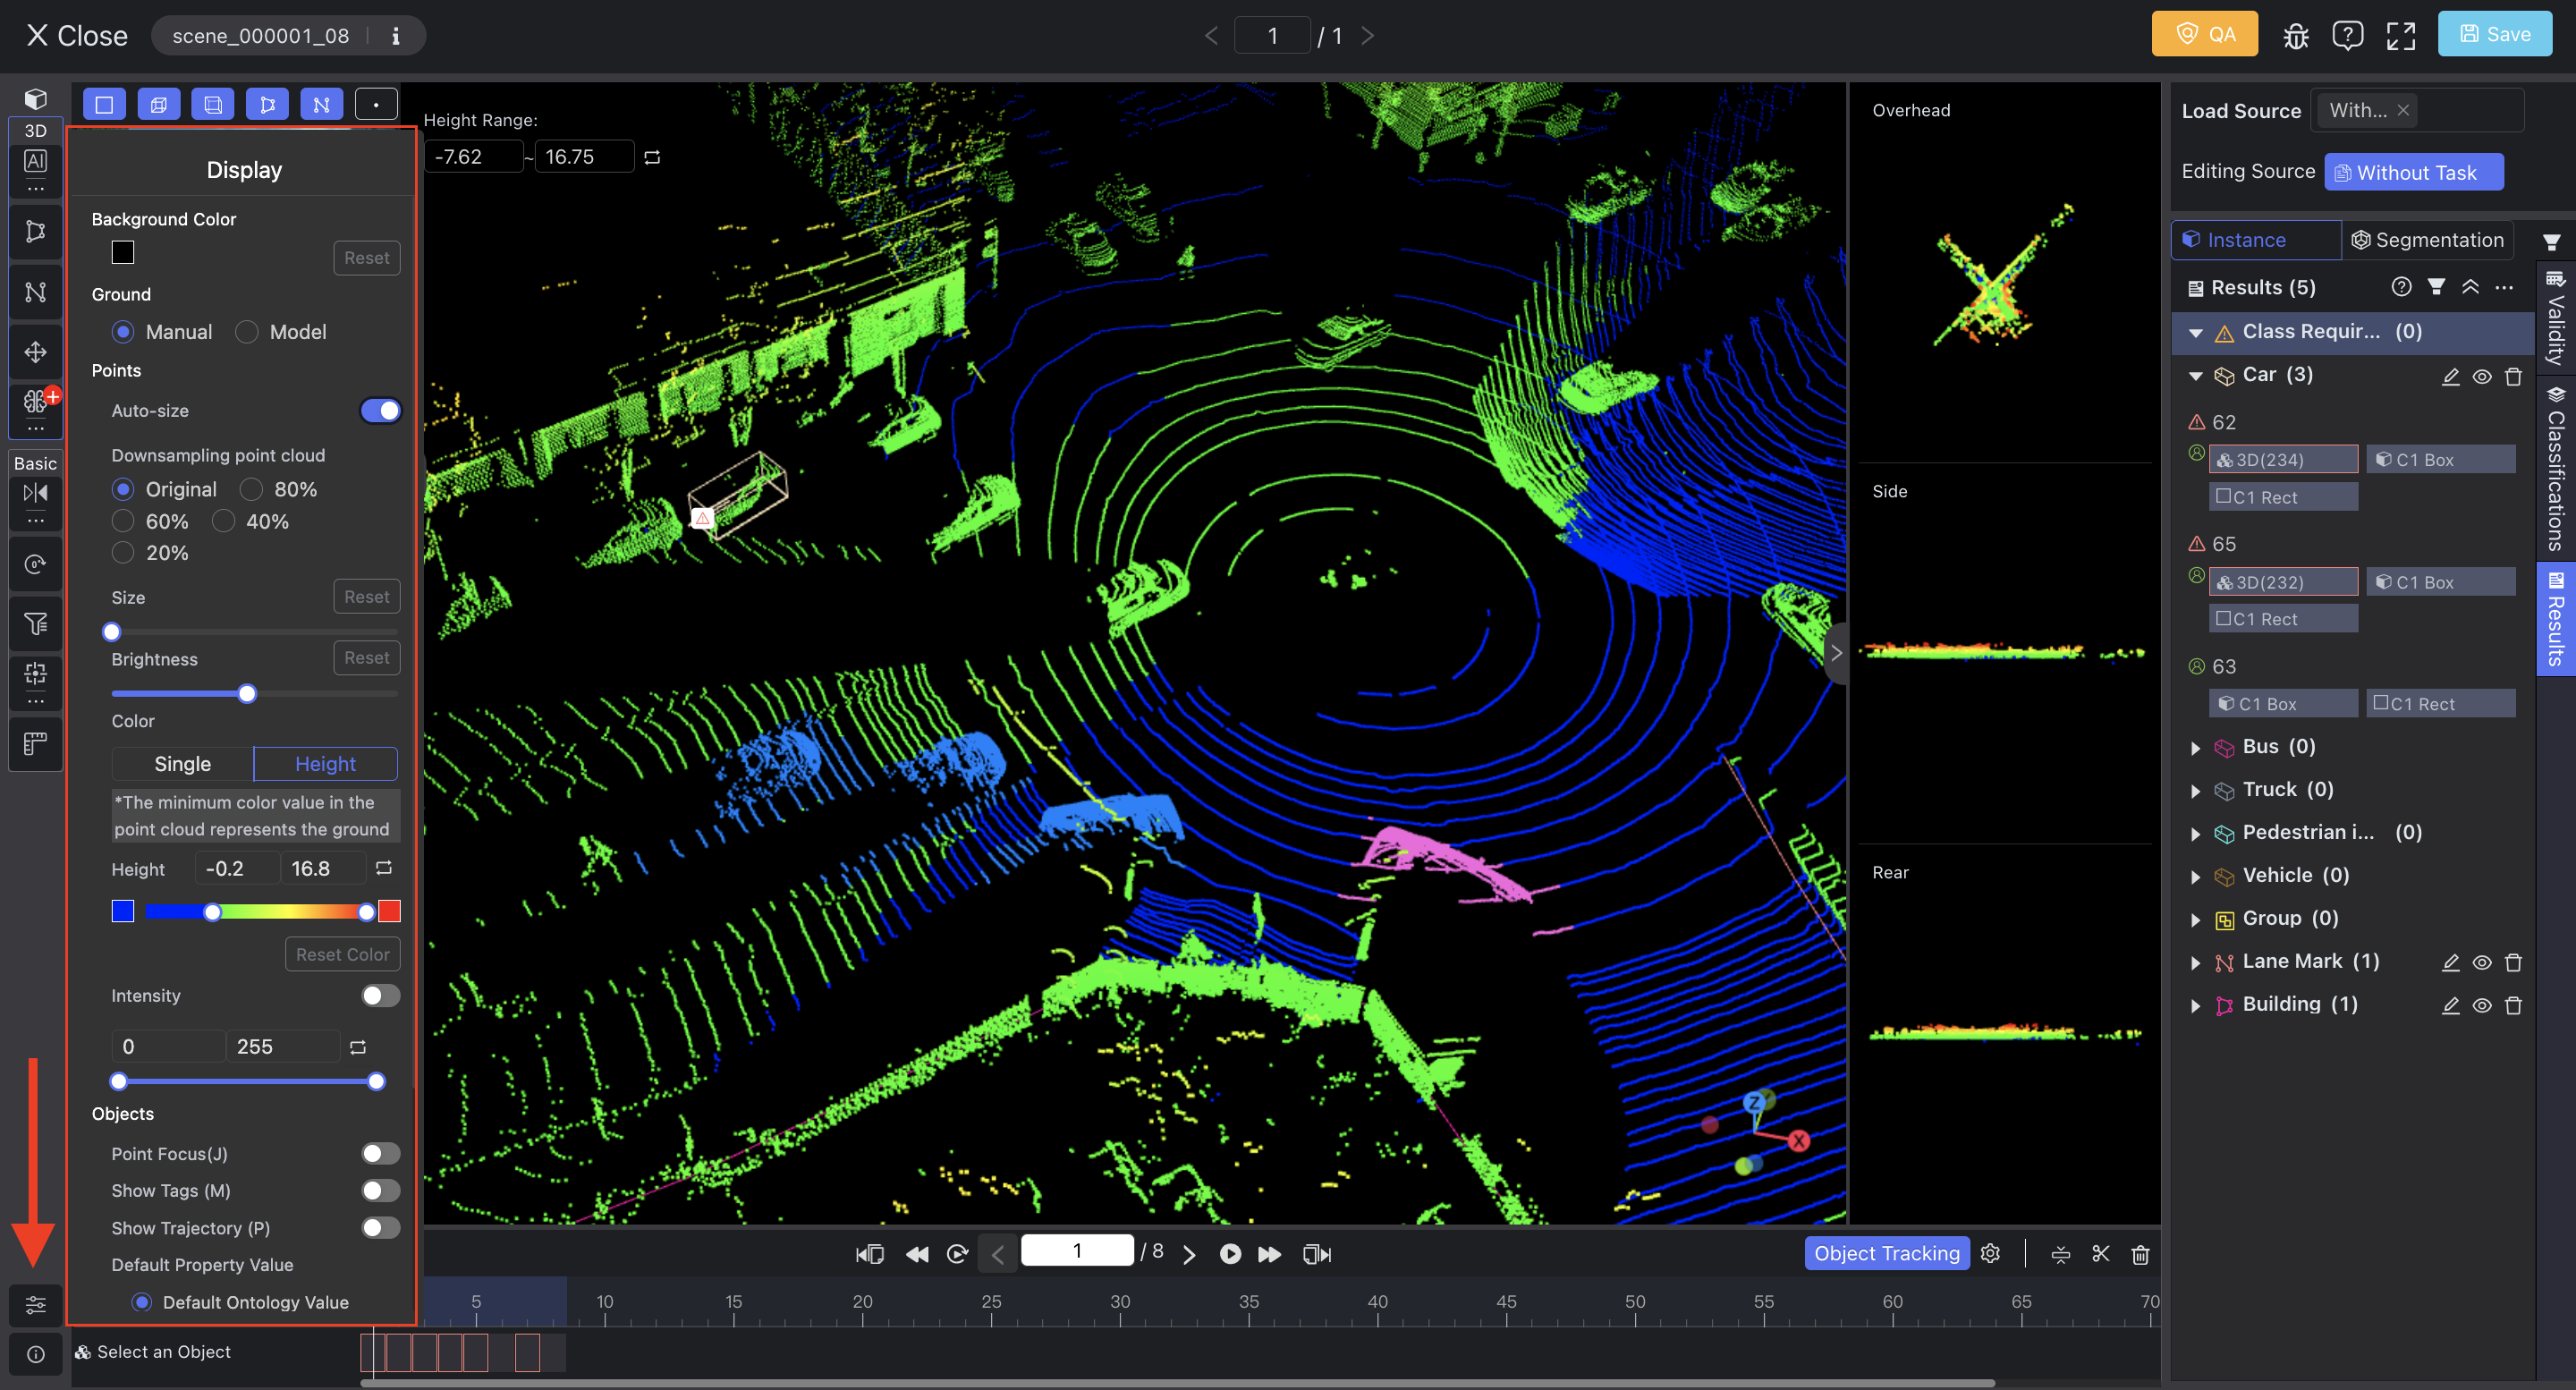
At the bottom of the Toolbar, you can adjust the display settings, including the background color, ground of the point cloud data, point and object display, and other utilities to help identify objects more accurately.
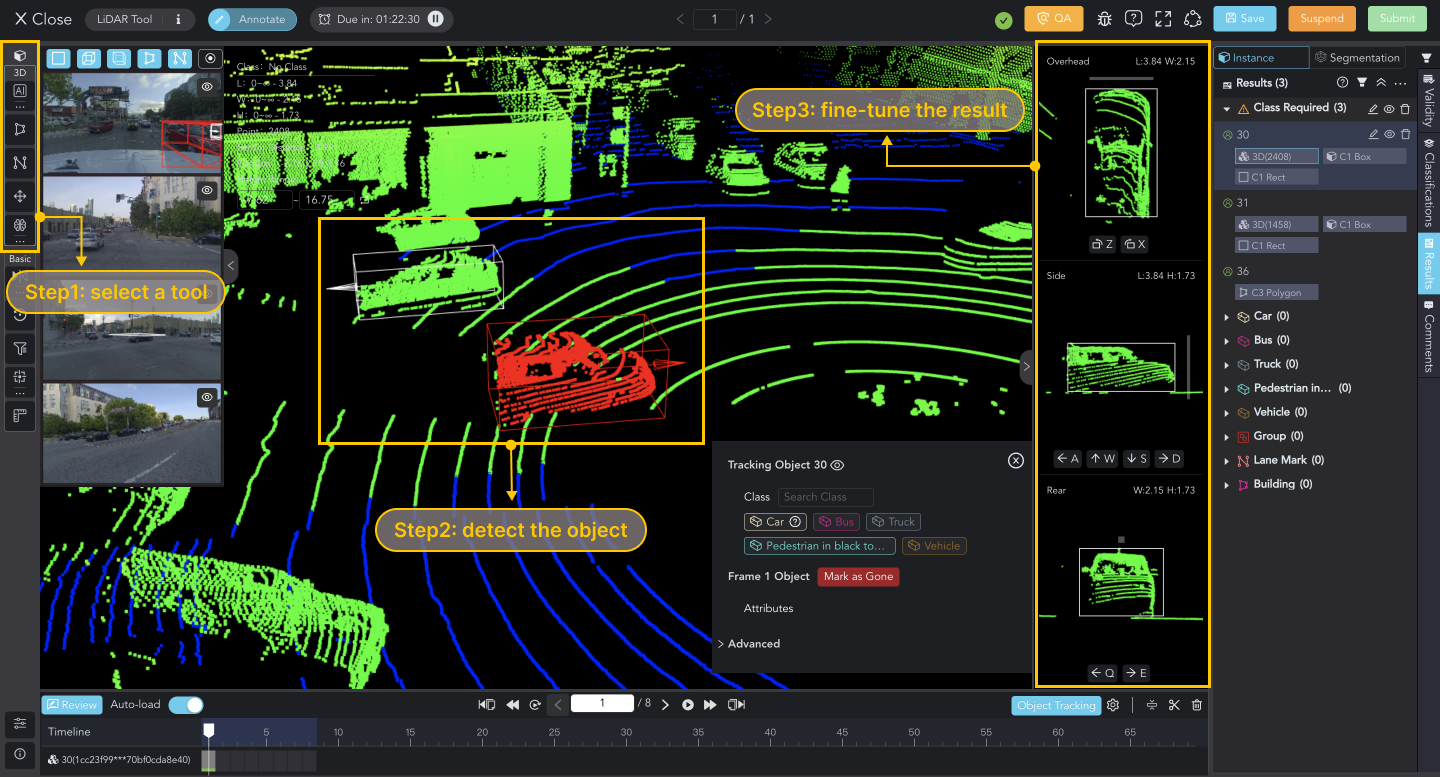
2. Detection in 3D
Select tools from the Toolbar to detect objects on the Point Cloud Data. You can modify the results in Orthographic Views.
Cuboid
Select the 3D Box tool (F) to create a cuboid. You can click ... below the icon or hit the U key to switch between two methods.
- AI-assisted Boxing: Click on the point cloud data to anchor the starting and ending points. AI will automatically detect the object and create a cuboid around it.
- Manual Boxing: Anchor three points to generate a cuboid.
The orientation (head) of the cuboid is determined by the starting and ending points. You can hit the hotkey C or Shift+C to rotate or flip it.
On the right are three views of the target object, allowing independent scaling and translation. You can drag the box to rescale the result or adjust its position using buttons/shortcuts.
| Hotkey | View | Function |
|---|---|---|
| Z/X | Overhead | Rotate the cuboid clockwise / counterclockwise |
| W/S/A/D | Side | Move the cuboid up/down/backward/forward |
| Q/E | Rear | Move the cuboid left/right |
To adjust the cuboid position, you can also click on Translate (G) in the toolbar. Move the cuboid by dragging it or translating it along the coordinate axes.
Polygon
Select the Polygon tool from the toolbar. Click on the canvas to add points that will be connected sequentially to form the polygon. You can quickly snap to a point by pressing the I key. Hit the Space/Enter key to finish drawing and close the shape.
If the number of polygon sides is specified, you can find a new tool labeled ‘polygon+number’ by clicking … below the tool icon. When drawing, the shape will automatically close once you reach the number of sides.
In the initial state, the drawn polygon will be on a plane that remains parallel to the ground.

Press the K key to enter Shared-Edge-Polygon Mode. When creating a new polygon, you can connect two points on an existing shape to share edges. Use L to switch the shared edges.
The result has three views on the right side, allowing independent scaling and translation. You can use the shortcuts Q/A/D/E to fine-tune the polygon position in the Overhead view and adjust its height above the ground using W/S in the Side view.
Polyline
Select Polyline from the toolbar. Click on the canvas to add nodes. You can quickly snap to a point by pressing the I key. Press the Space/Enter key to finish drawing.
The result has three views on the right side, allowing independent scaling and translation. You can use the shortcuts Q/A/D/E to fine-tune the polyline position in the Overhead view and adjust its height above the ground using W/S in the Side view.
To split a polyline, select a point (non-endpoints) on it and press Shift+F. The original polyline will be split into two separate polylines, inheriting the original's class, attributes, and group information.
To merge two polylines, hold down Shift to select them and click Merge at the top left corner.
Merge 2 into 1: Merge the start of the 2nd result with the end of the 1st, using the class, attributes, and hierarchical relationships from the 1st result.
Merge 1 into 2: Merge the start of the 1st result with the end of the 2nd, using the class, attributes, and hierarchical relationships from the 2nd result.
To create a centerline from two polylines, you can hold down Shift to select them and press the . key.
Keypoint
Click on the edges of an existing polygon or a polyline to add nodes. After selecting these key points, you can annotate (T), delete (Bks), or drag them individually in the three views.
Shortcuts can only adjust the entire polygon or polyline but not the keypoint.
Group
To group multiple results, hold down the Shift key to select them and then press Ctrl / ⌘+G.
The same result can belong to different groups
You can remove a specific object from a group by clicking UnGroup in the Results List. To dissolve the entire group, select it and press Ctrl / ⌘+Shift+G.
Measuring Tool
Click on the point cloud data to place the starting point, and click again to add nodes. Press the Space/Enter key to finish measuring.
To delete, select the measuring line and press the Bks key.
Measuring lines are not results; they will not be saved upon exiting the Tool page.
Run Model
It is advisable to utilize a model for quicker object detection.✨ You can click ... below the icon to configure it. Select the model, set the confidence, distance, and model classes as needed, then apply the settings and run.
Click the model icon again. The data canvas and the results list will show the AI annotation results.
You can manually conduct class labeling and true-value assessment on these AI model results. The following sections provide detailed instructions.
3. Projection & 2D Annotation
By default, annotation results on Point Cloud Data are automatically projected onto 2D Camera Data in real-time.
You can also manually project them by selecting the 3D results and clicking the Projection button. To change the Projection Type and Auto Projection, click ... below the Projection button.
If the camera parameters or projection are incorrect, please have your admin check the camera calibration.
Above the 2D Camera Data list, you can select the result types you want to display.
Due to inaccurate camera parameters, annotators may need to adjust 2D results manually. Double-click on the image to enter 2D Annotation Mode. Then, you can modify the size and position of the results on the canvas.
It's important to note that the modified 2D results will no longer update in real-time with the 3D results. If you want to re-project the new 3D results to 2D, click the Re-projection button.
2D results are independent of each other across different images. Therefore, you may need to adjust the results for each image separately.
In 2D annotation mode, you can also utilize tools to detect objects directly on the image. Check the Image Tool page for detailed drawing methods.
Clicking the Track Line icon will display the auxiliary line and circle while drawing with the tool. You can adjust the settings for these auxiliary elements by clicking on the ... icon below.
4. Class & Attributes
After detecting an object, choose its Class and provide the corresponding Attribute information. Press T to show/hide classes and attributes pad.
Exercise caution when changing an object's class to avoid losing its attributes.
Class
Select an appropriate Class for the object. You can use the search function to find the Class quickly.
Hovering over a class tag with a question mark displays the constraints and standards. A "Class Invalid" error appears if the result fails to meet these limits.
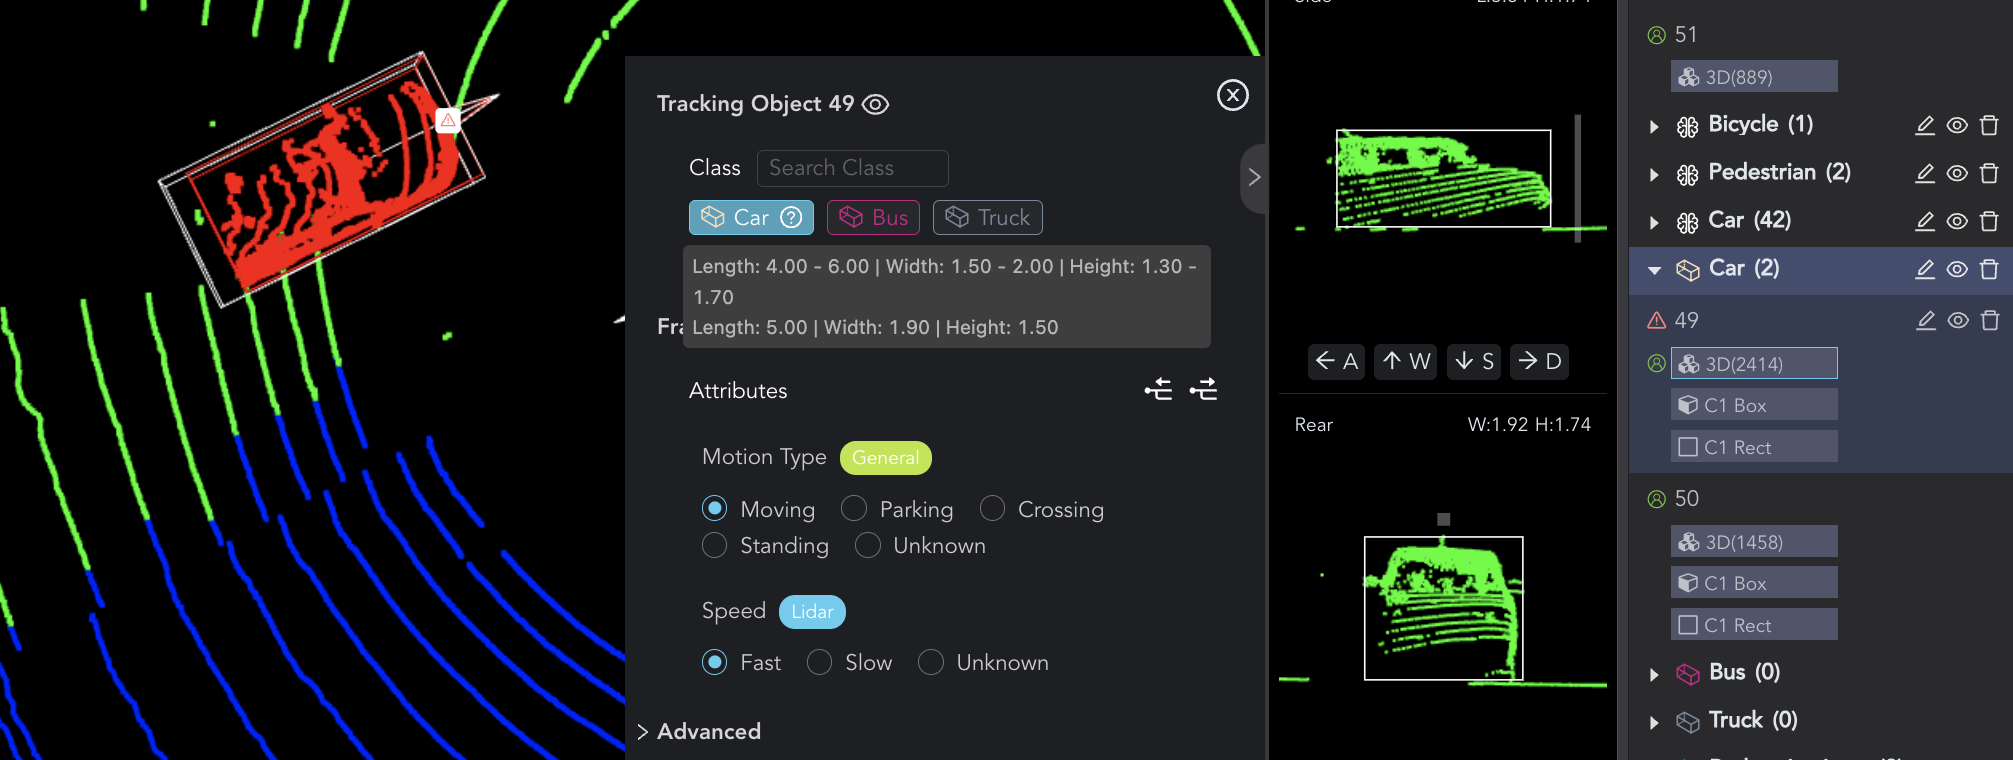
By clicking the Set as Standard button, you can rewrite the Length, Width, and Height of the selected object to meet the required standards.
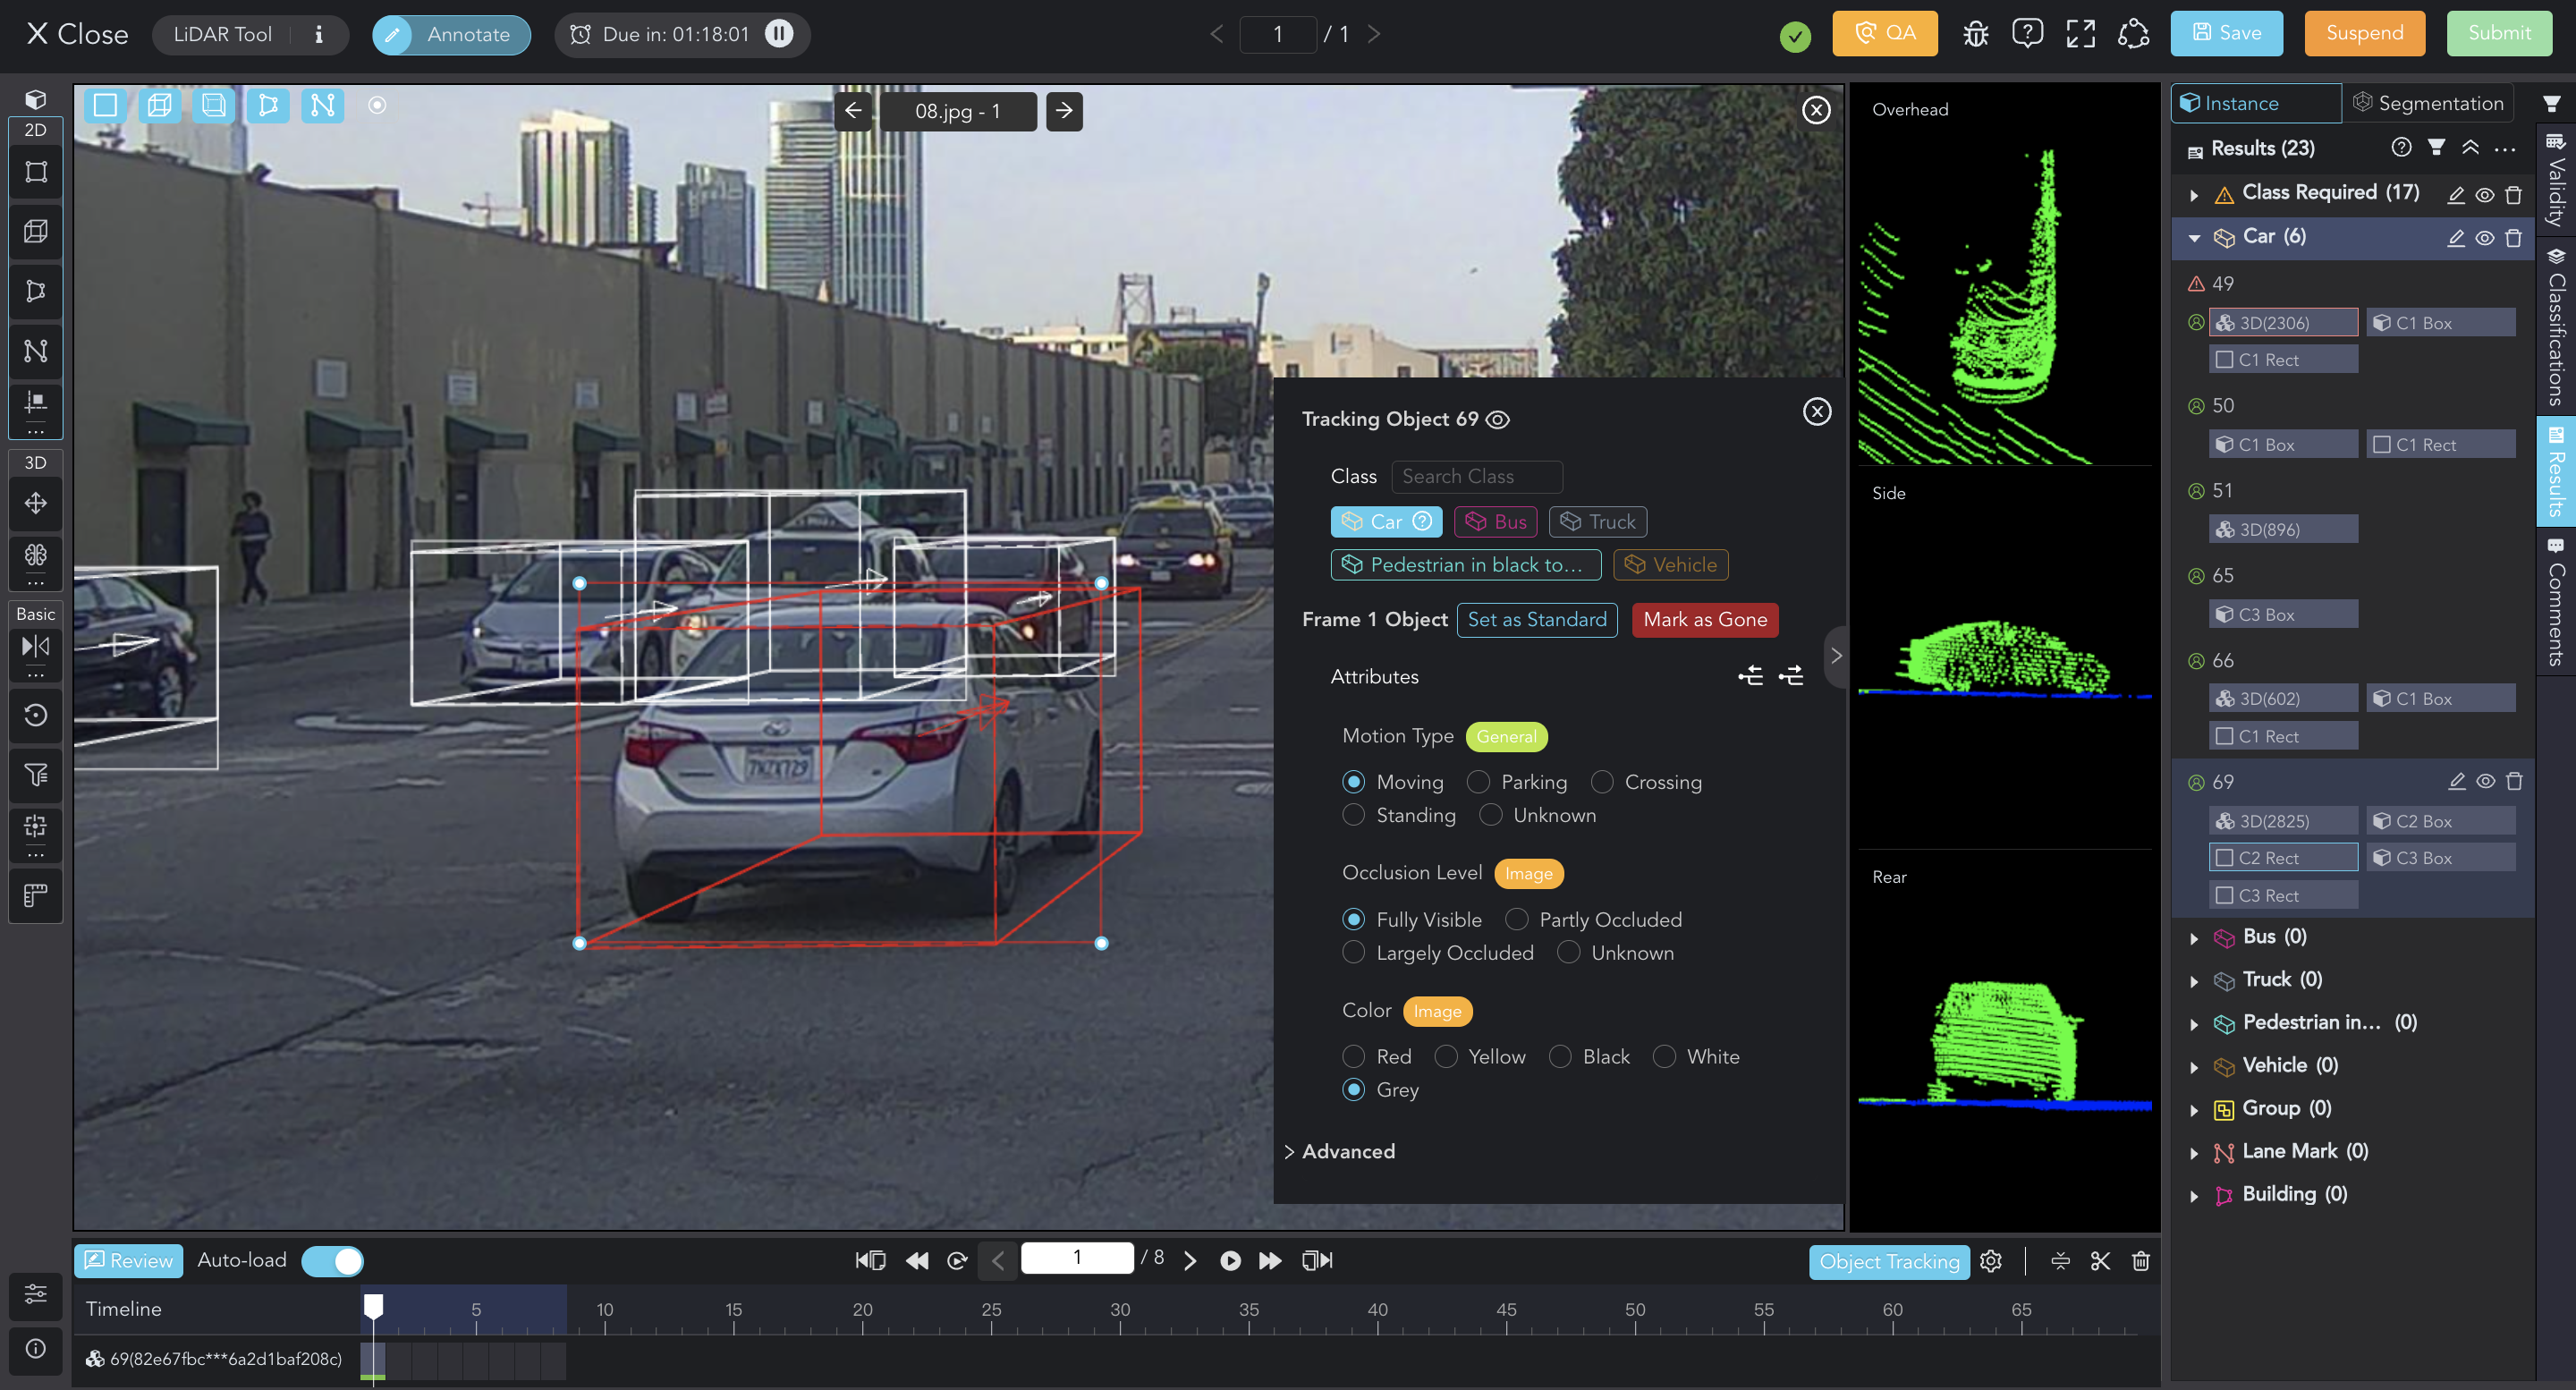
Attributes
After selecting the Class, you need to fill in its Attributes, including the General attributes, the LiDAR attributes for the point cloud result, and the Image attributes for the 2D camera result.
Each 2D result in distinct images has independent Image attributes that should be provided separately.
Attributes for Point Cloud Results
Attributes for Image Results
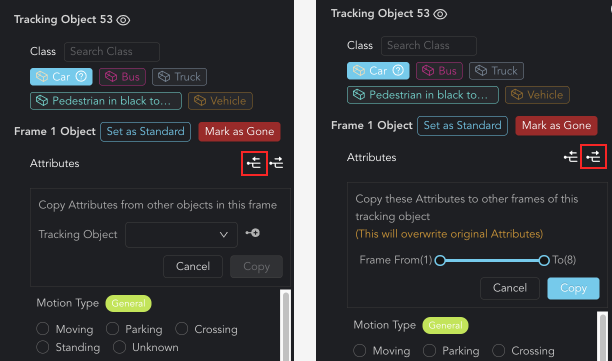
As for tracking objects in a Scene (series frames), you can either copy attributes from other objects in the same frame or apply the current attributes to other frames of this object.
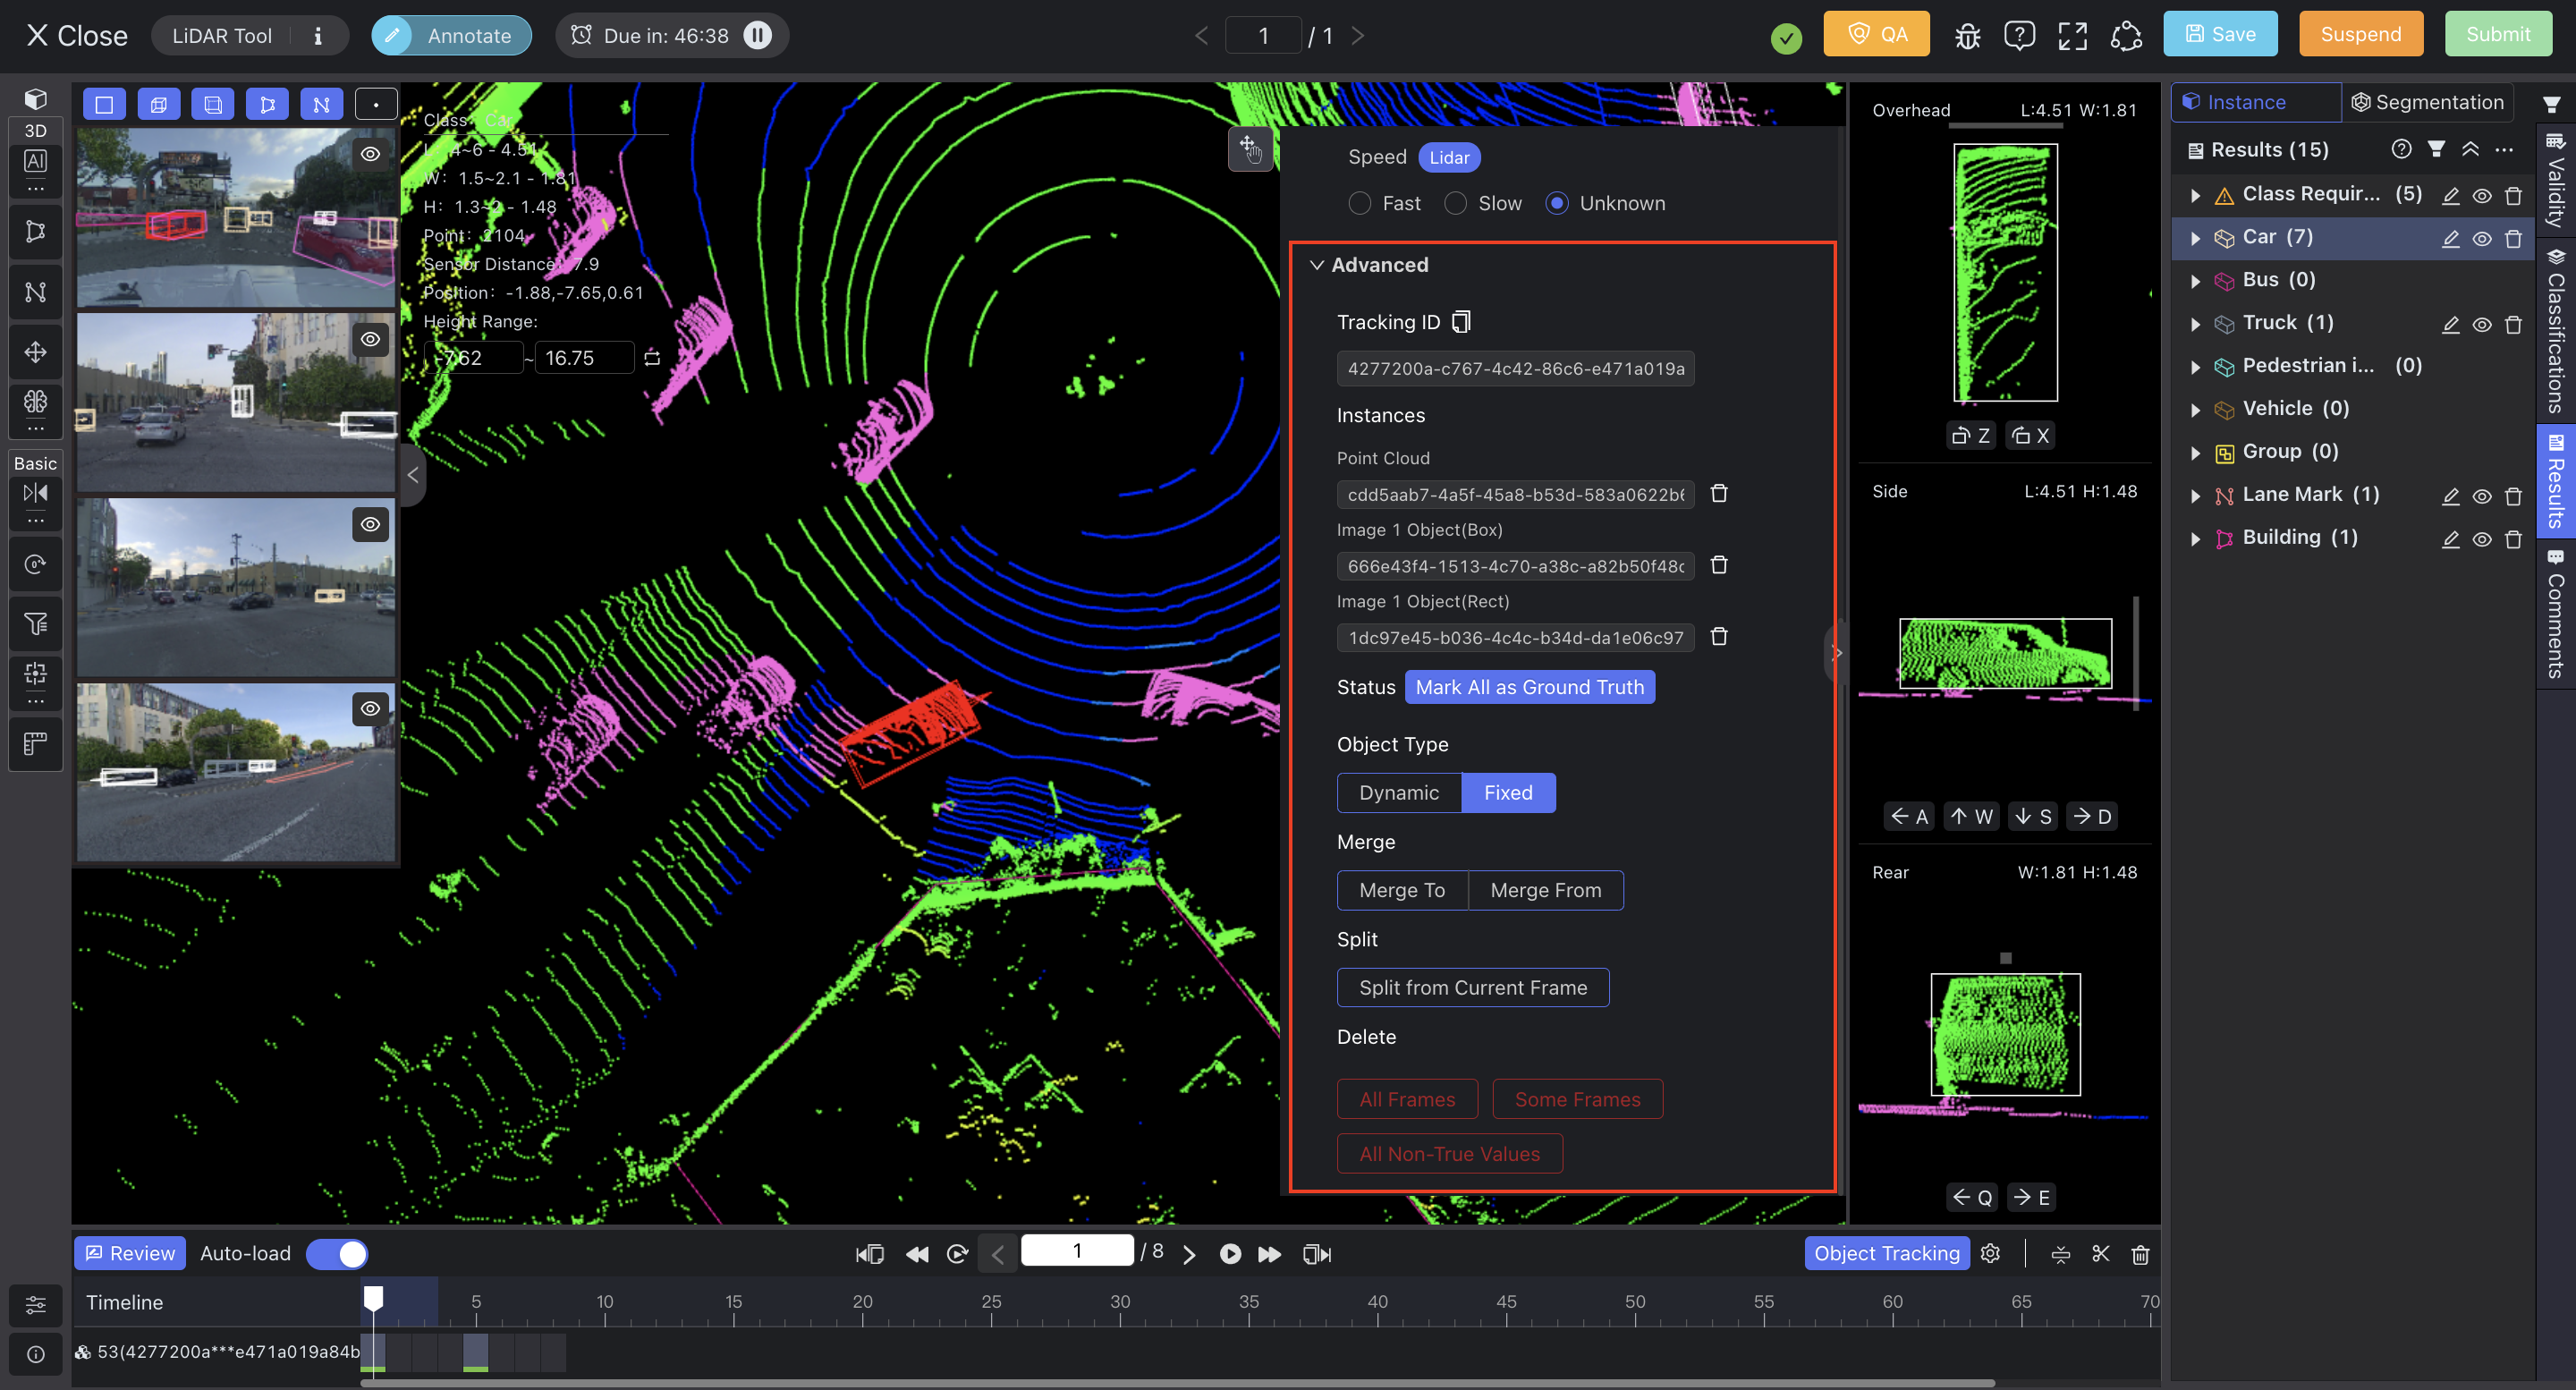
Advanced
In the advanced section, you can easily update information for the selected object across all frames, including marking all results as ground truth, switching the object type, merging & splitting, and deleting.
Object Type applies to scene tracking: Fixed only changes position info without altering the box size, while dynamic changes both size and position.
5. Result Management
Result List
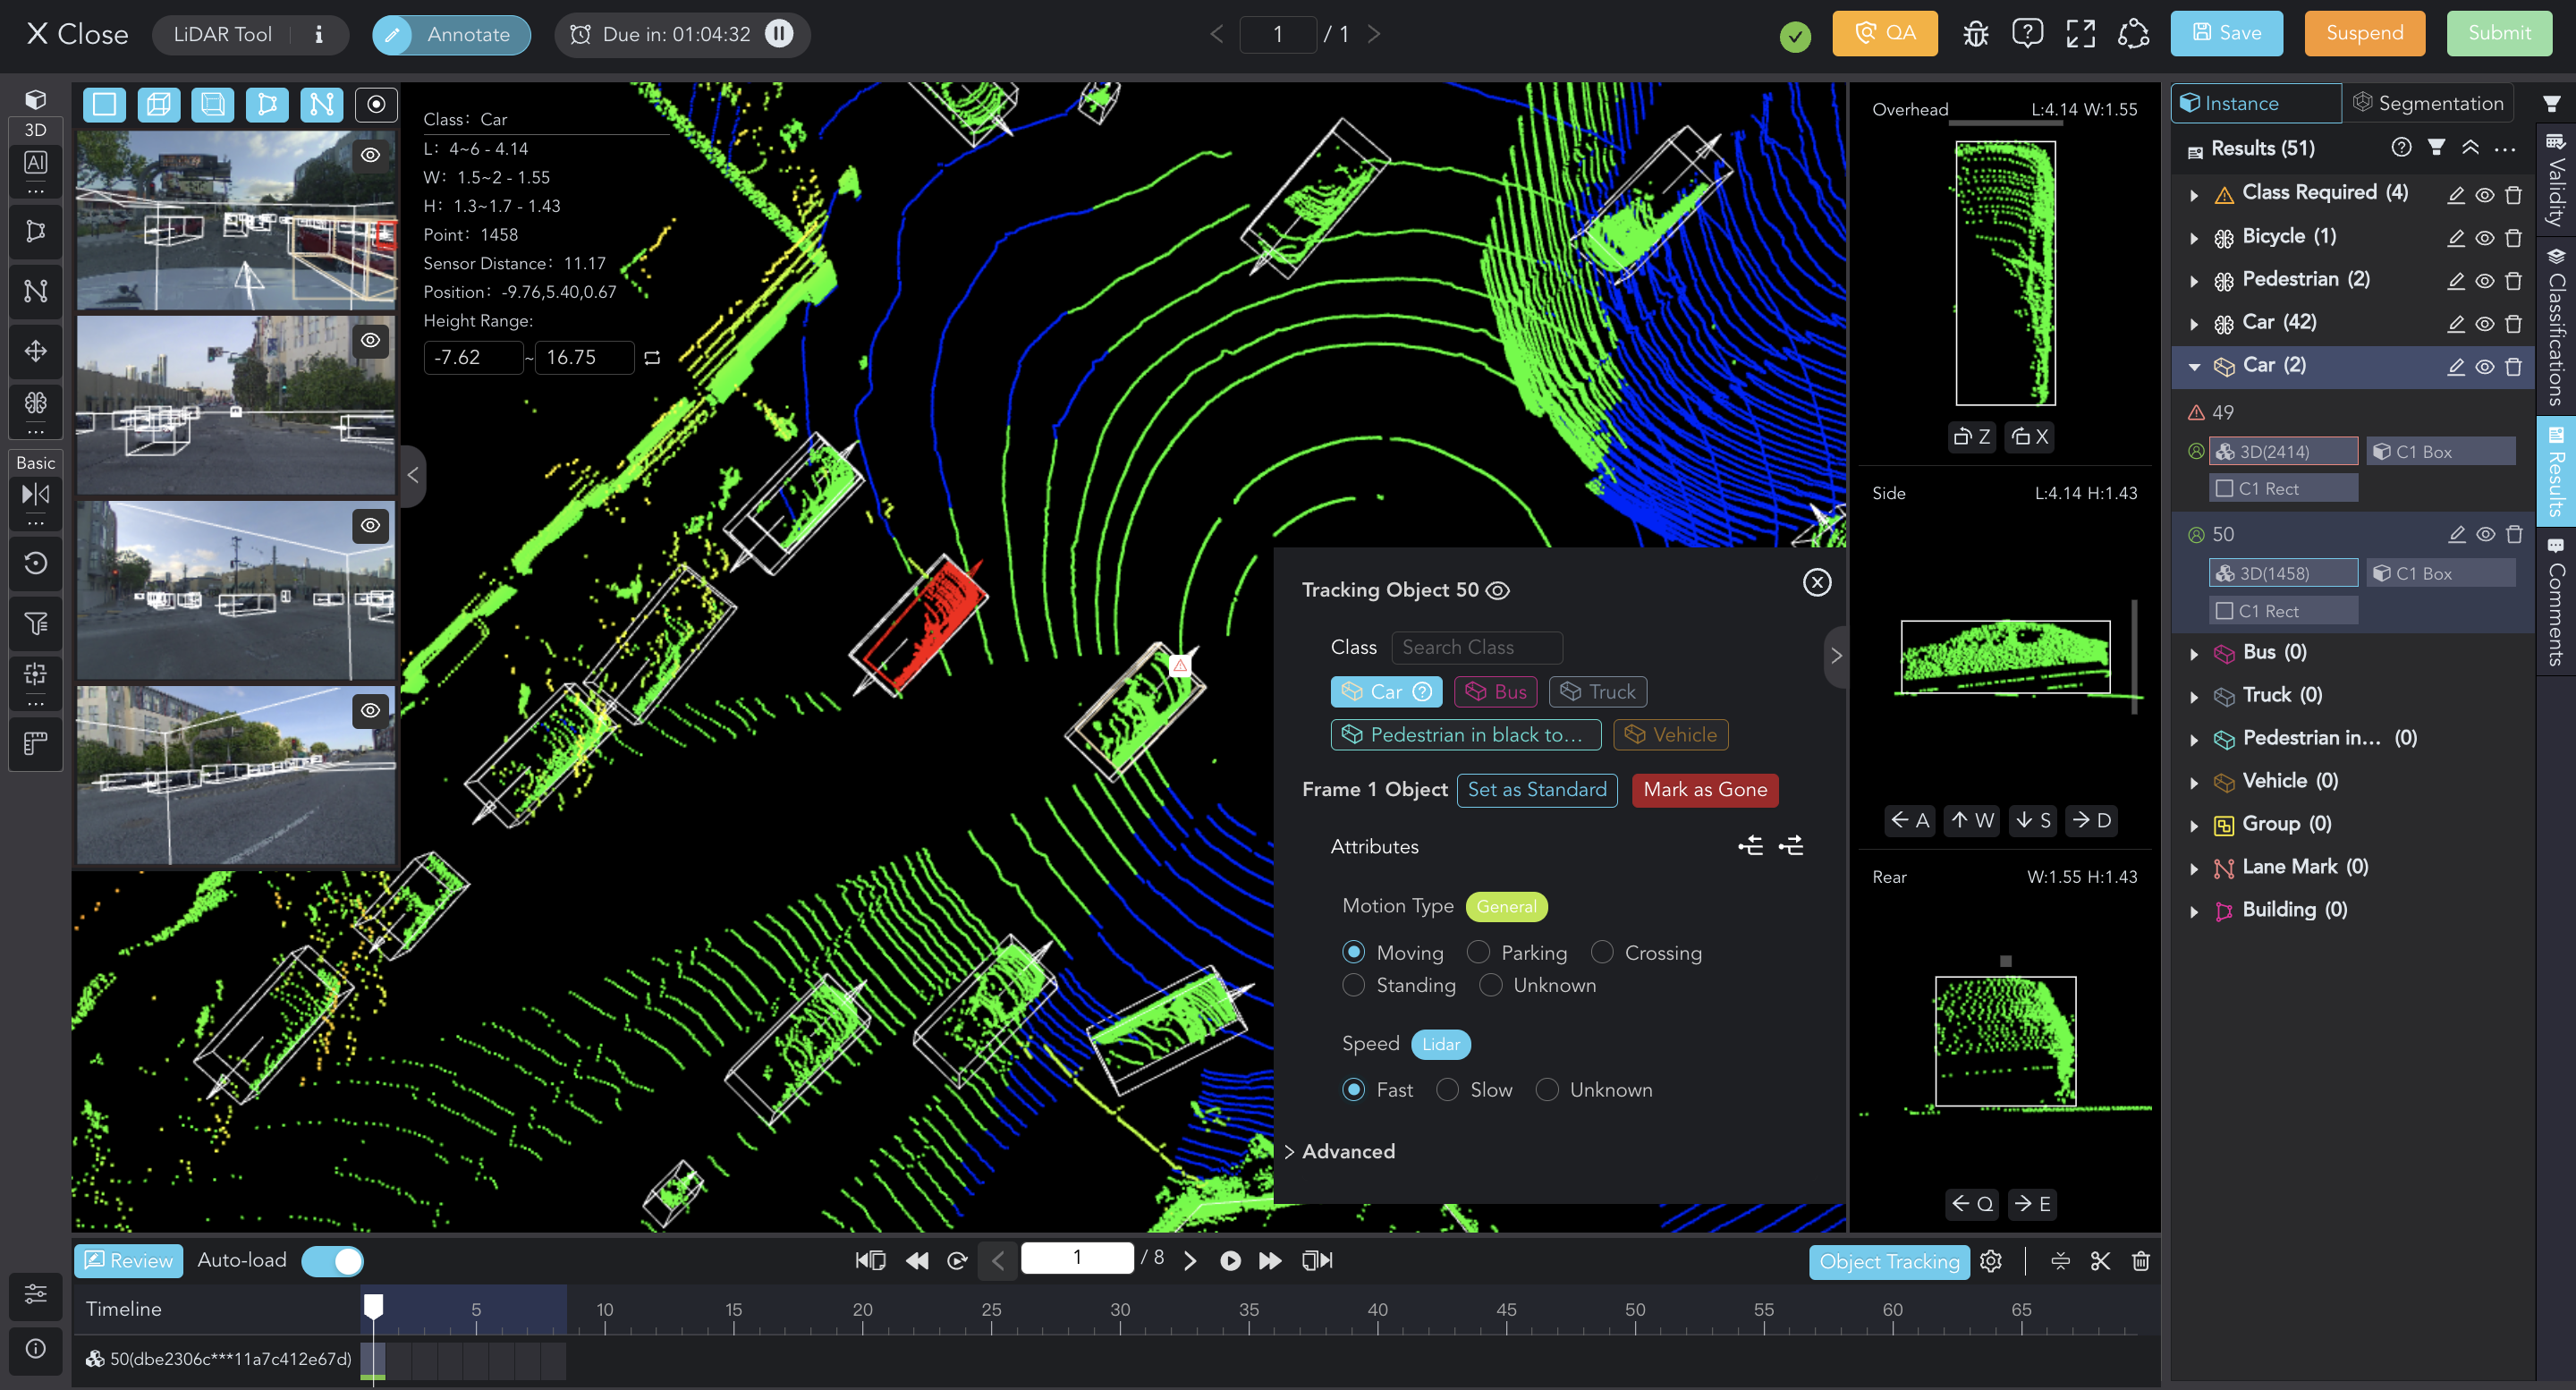
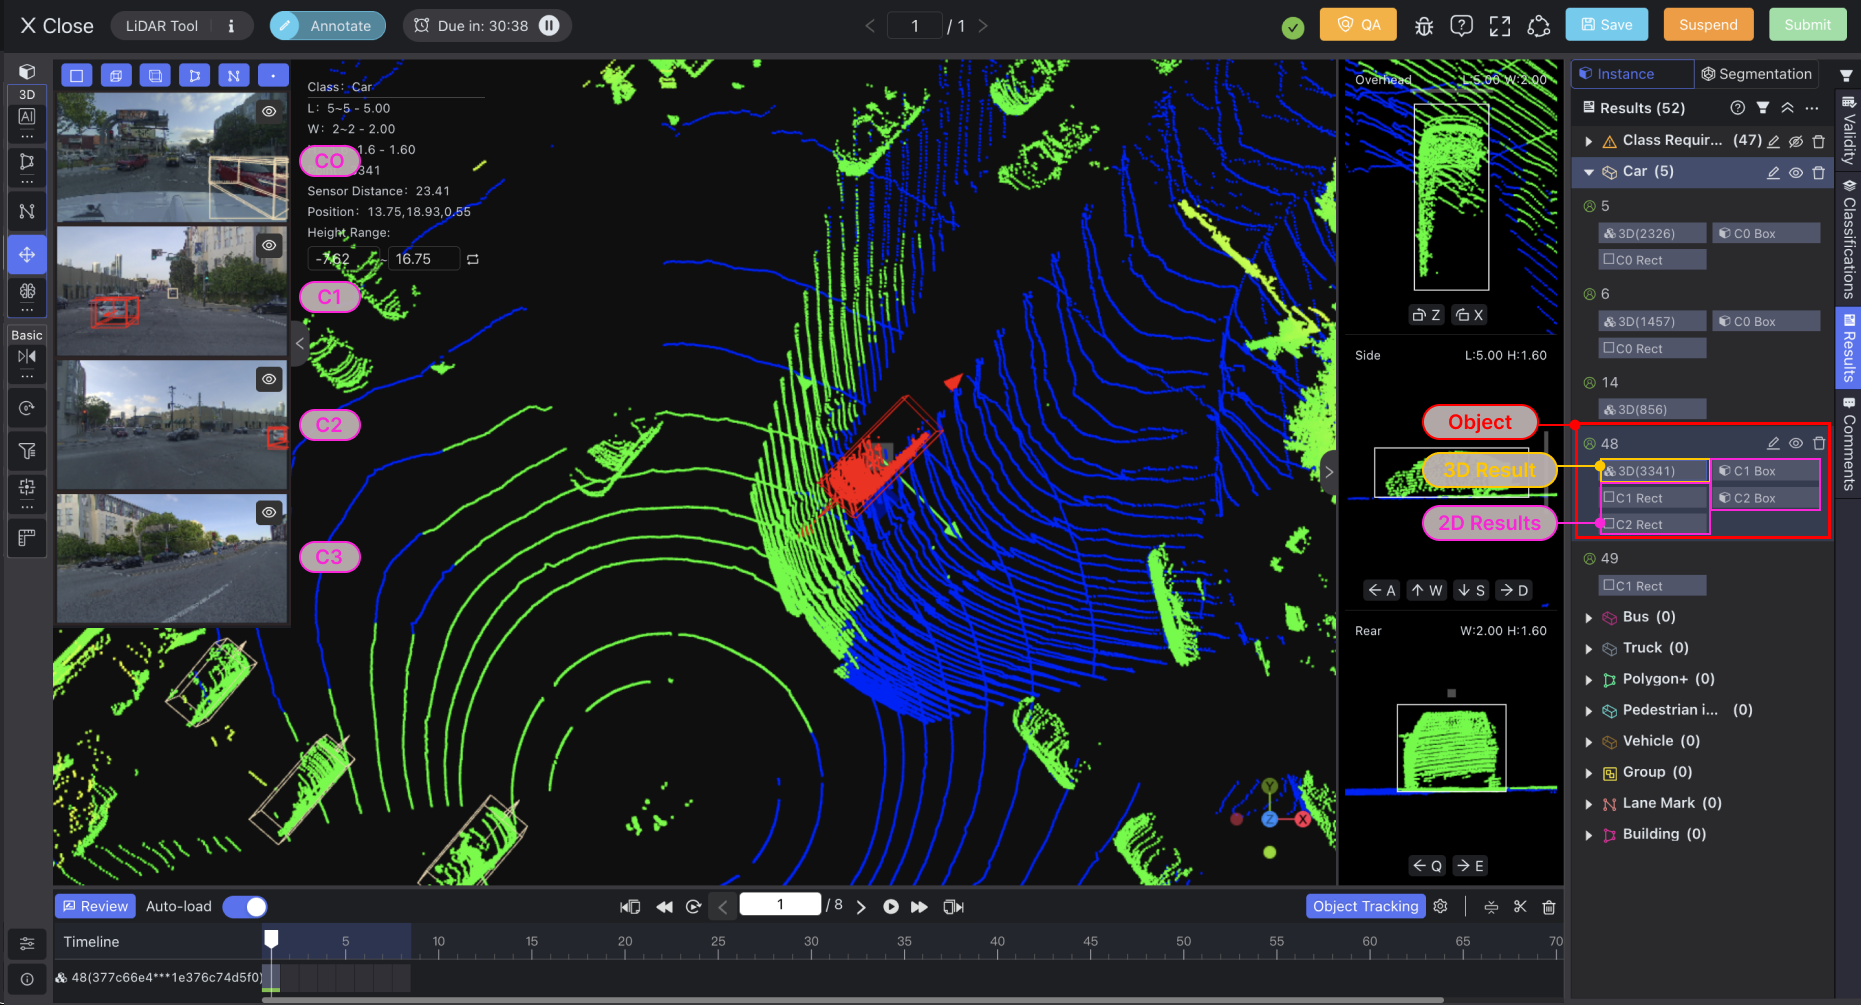
The annotated objects will be automatically numbered and categorized by Class in the Result List. You can click on an object to view all 3D and 2D results or select a specific 3D/2D result within it for editing. Press Esc to cancel selection.
An ExampleIn the image below, "3D(3341)" represents the 3D result containing 3341 points for Object #48, "C1 Box" represents the Box on the 2nd camera data, and "C2 Rect" represents the Rectangle on the 3rd camera data.
💡Note that the C0 represents the 1st camera data.
You can edit the entire Class, including quickly deleting objects within it, toggling visibility, or switching to another Class (the same tool type is required).
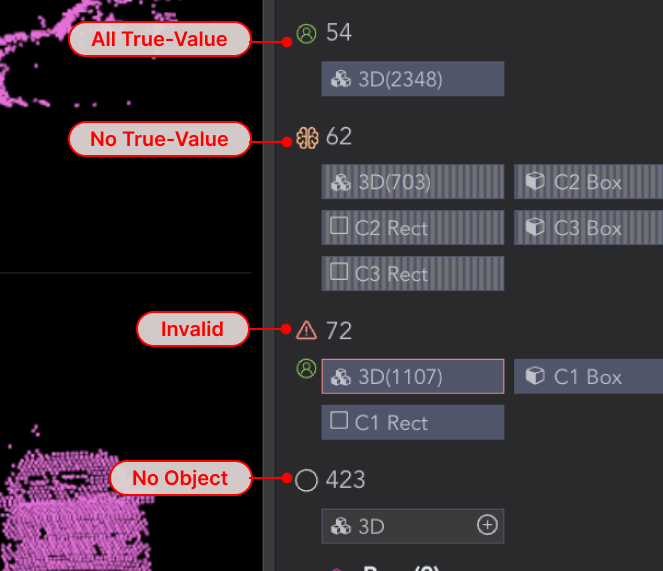
The results will display different validity statuses. Model-generated results marked "No True-Value," and manually processed results marked "All True-Value."
You can also filter results by Class, tool, and frame at the top of the result list.
Validity, Classifications, and CommentsOn the right of the results list, you can switch to the Validity, Classifications, and Comments lists.
These properties and comments are specific to the entire Data or Scene. For more details, you can visit the Annotation Tools Commons page.
Filter Other Object
When the Filter Other Object option in the Toolbar is enabled, other objects will be filtered while selecting or drawing an object.

Result Focus
When the Result Focus option in the Toolbar is enabled, only point cloud data around the selected object (polygon or polyline) will be displayed. You can customize the Focus Range by clicking ....
6. Object Tracking in Scene
When annotating a Scene, you can track objects across frames in the Timeline area.
Auto Object Tracking
Start by selecting an object of interest within a labeled frame, usually the default first frame, and configure the object tracking process.
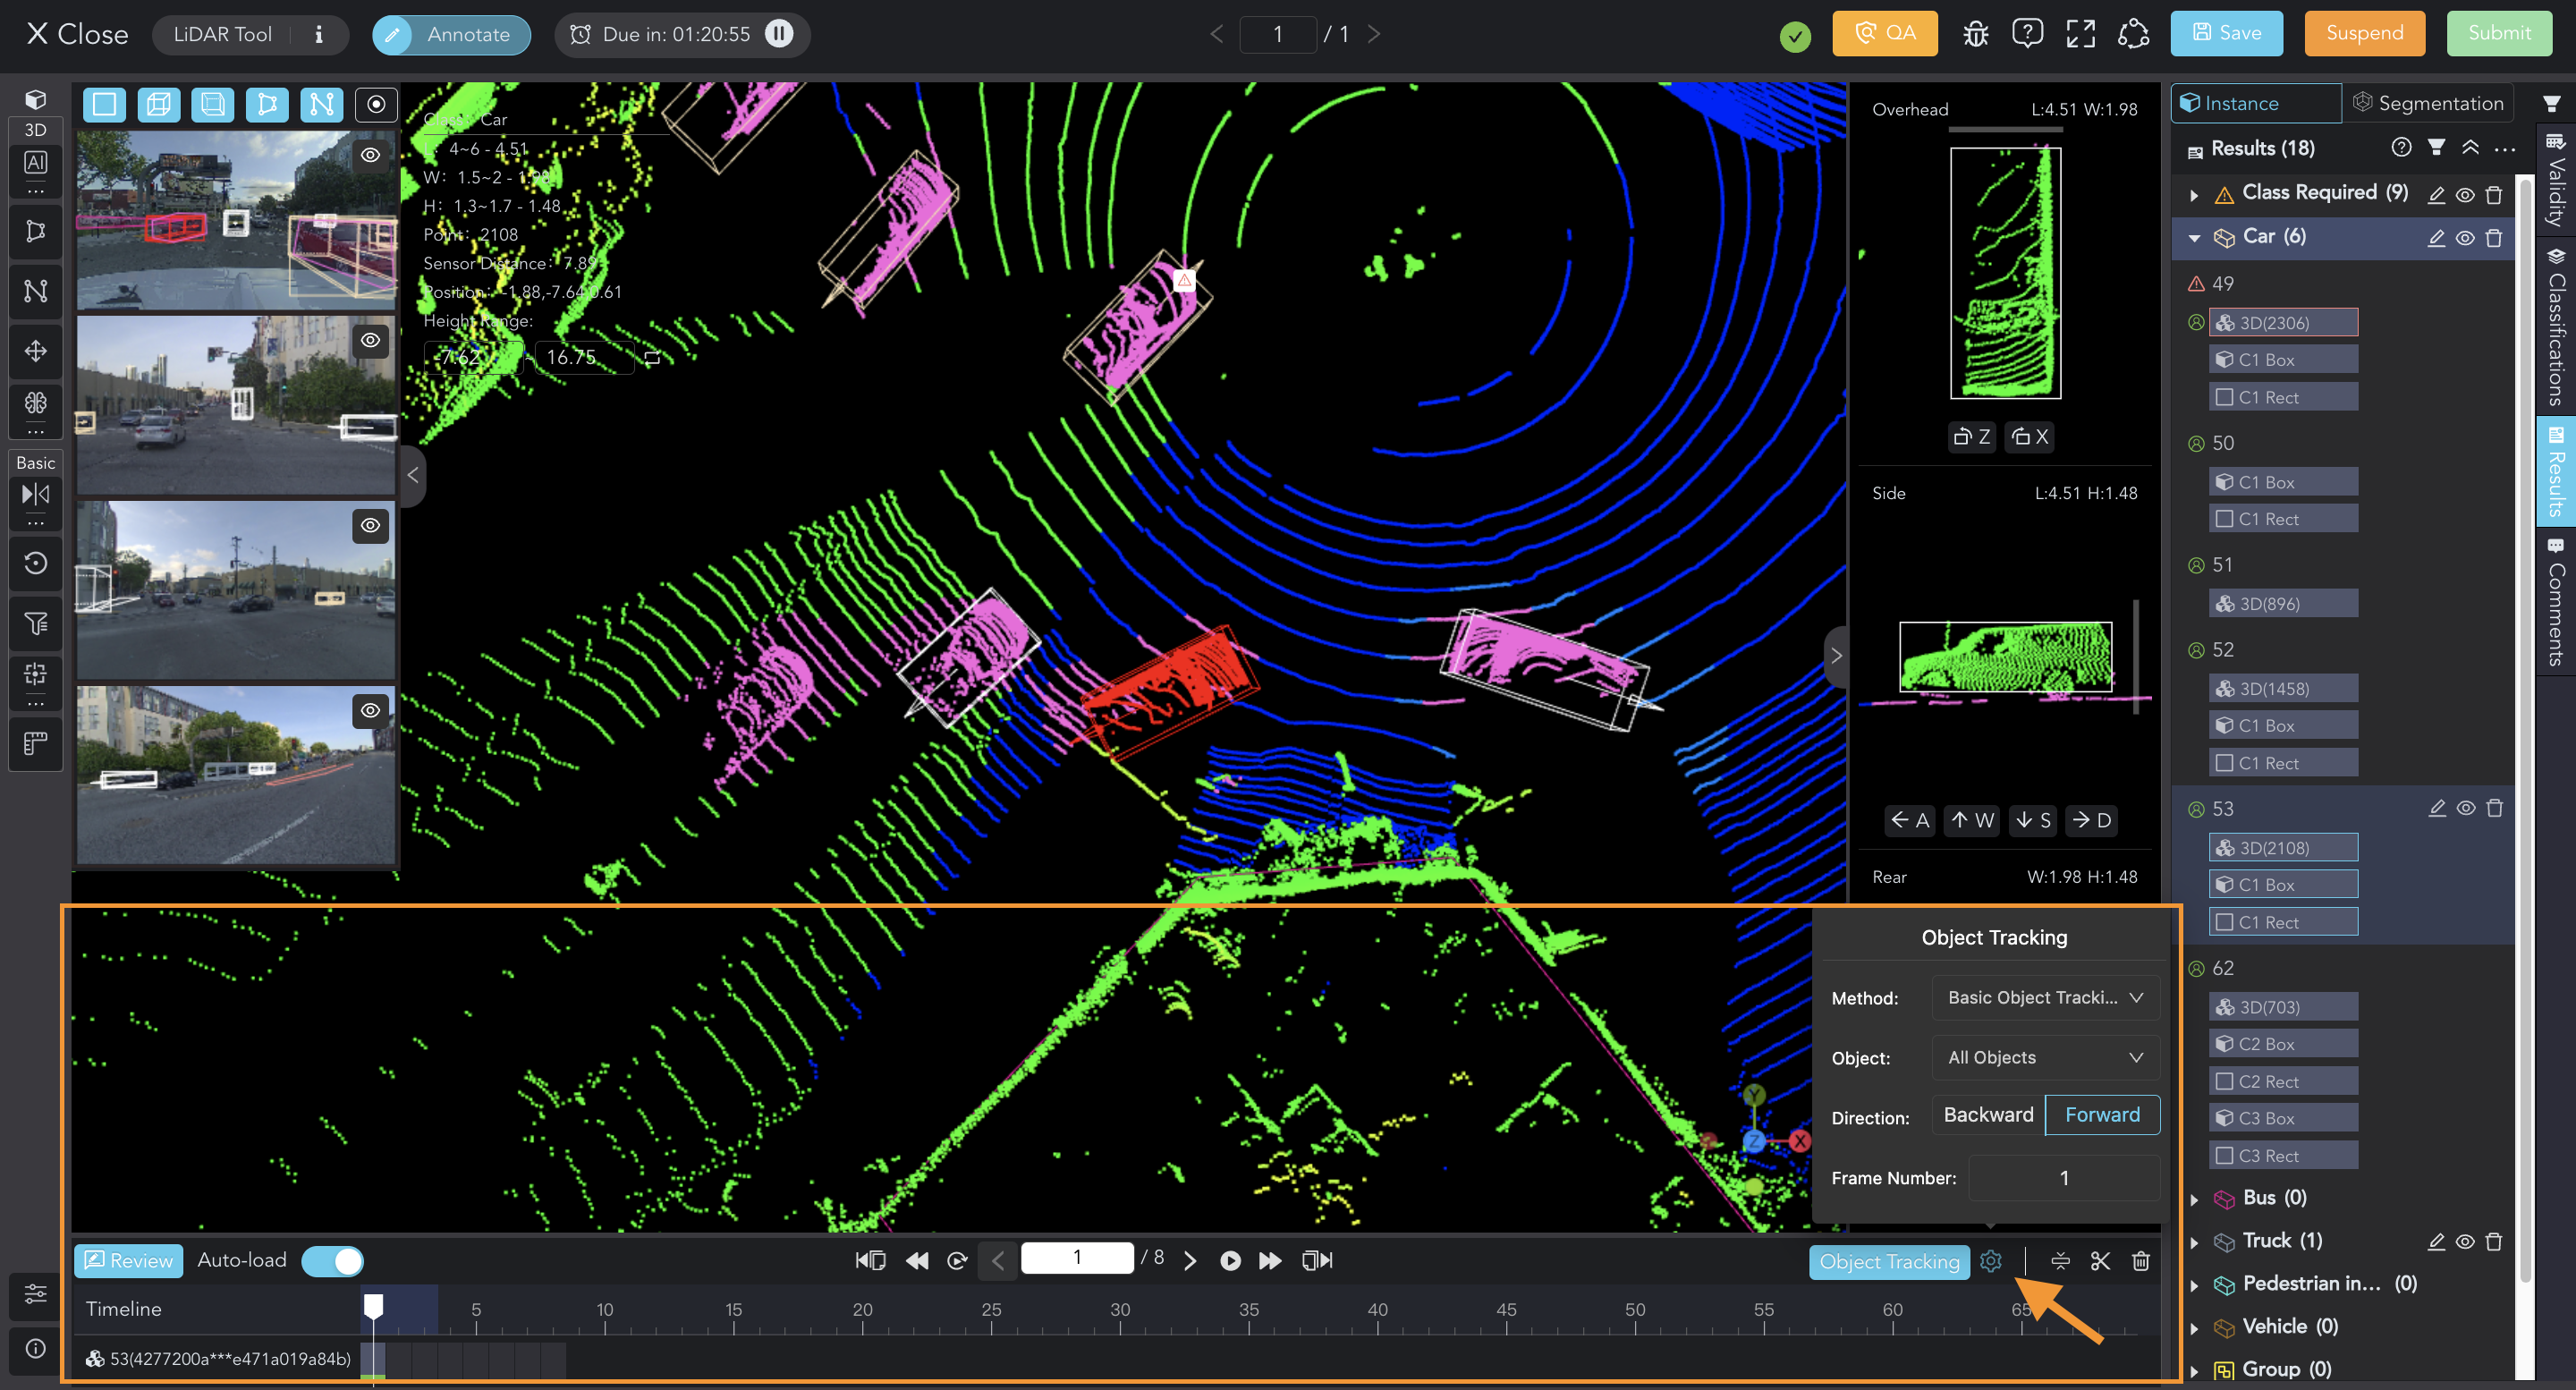
There are three methods to identify the object and predict its position:
- Basic Object Tracking Model: Predict the object position in each frame by model.
- Copy: Duplicate the result to other frames with identical positions.
- Interpolation Tracking: Calculate the object position in specific frames based on the current results. At least two ground truth values on the timeline are required; otherwise, errors may arise.
You can choose options for applying to the selected object/all objects, tracking in forward/backward/custom frames, and specifying frame number (Increased runtime for more results and frames).
Then, click the Object Tracking button. The tracking results will be applied to Point Cloud and Image Data across frames a few seconds later.
Model & Copy Tracking
Interpolation Tracking
Review in Batch
After tracking, you can click the Review button to batch review and edit results in all frames.
For Point Cloud Data, you can switch between different views to adjust the results of the selected object, such as moving and scaling the cuboid or flipping the head.

Results of the same object in different frames share the same class and attributes. You can check the Show Attributesoption to modify them quickly.
A "Class Invalid" error will occur on the timeline if the result fails to meet the class limits.
You can also perform Interpolation Tracking here. Multi-select the frames you want to track (including at least one ground-truth value), or choose all frames, and then click the Interpolation button.
Switch to Camera Data. You can choose different sensors to check results (but modifications should be made in 2D Annotation Mode).
No results for the Camera Data?You may need to complete the projection operation first.
If there are still no results, it's possible that no objects are within the current camera's field of view or that there are errors in the camera parameter settings.
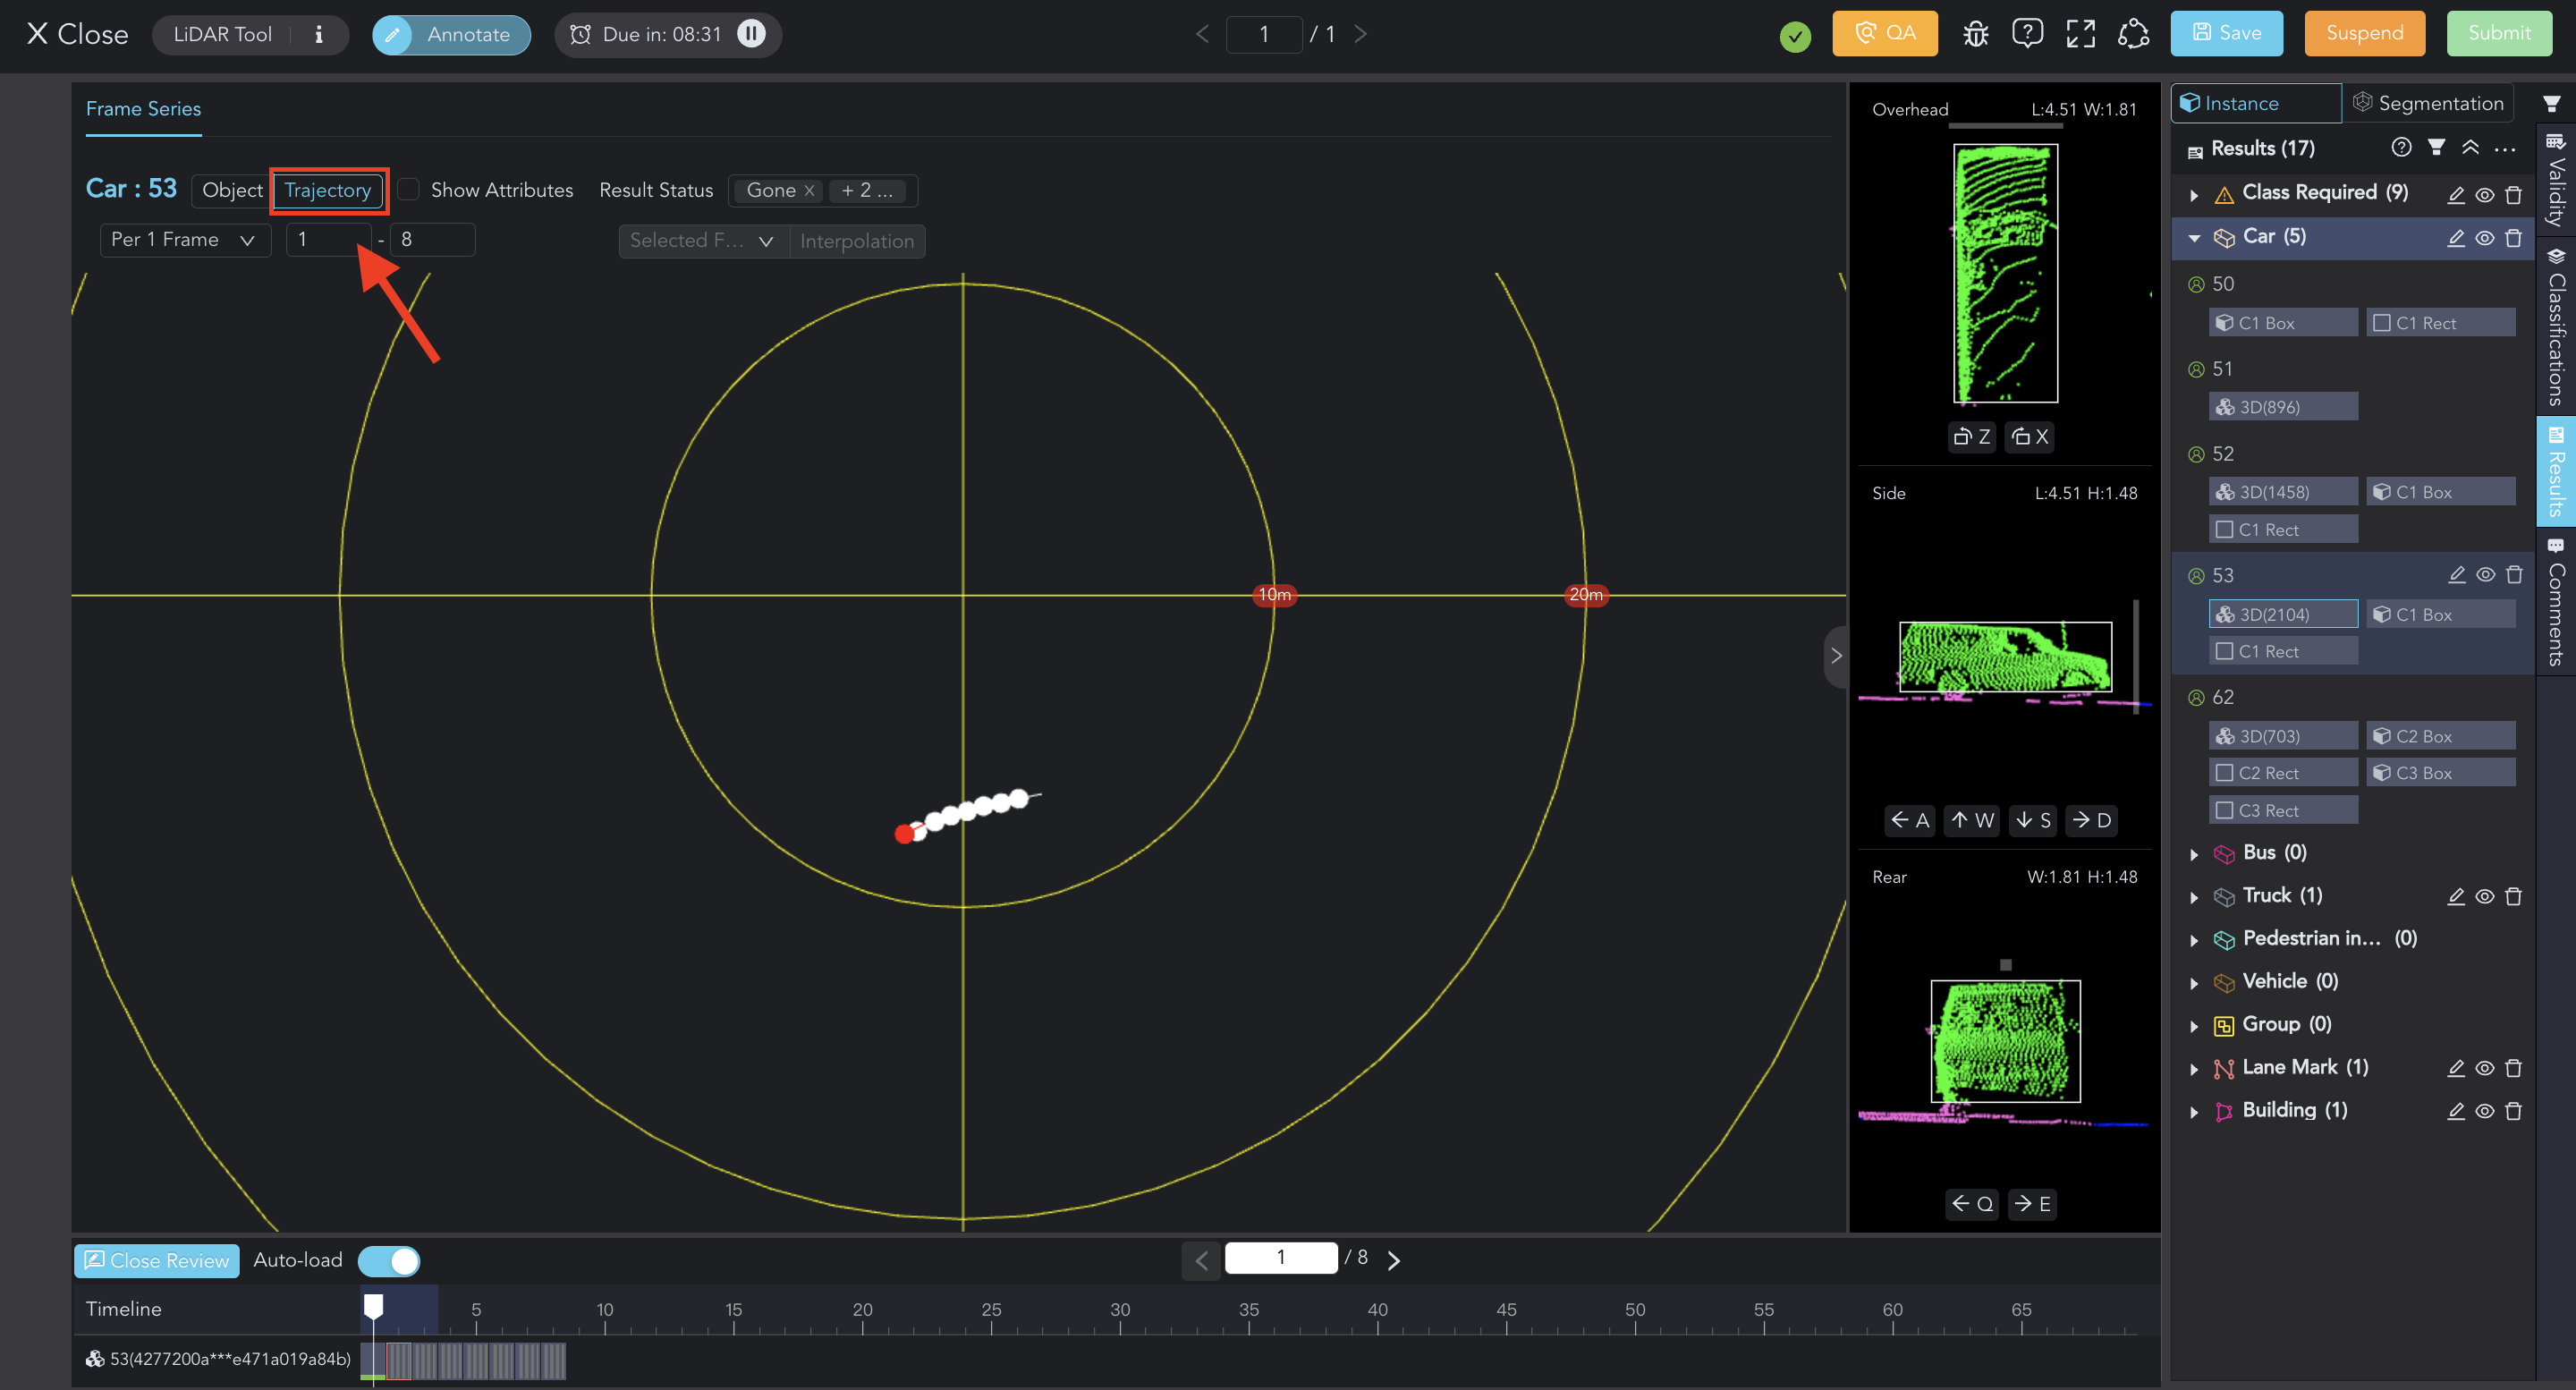
By clicking the Trajectory button, you can view a trajectory line composed of a series of frames, which aids in analyzing object tracking.
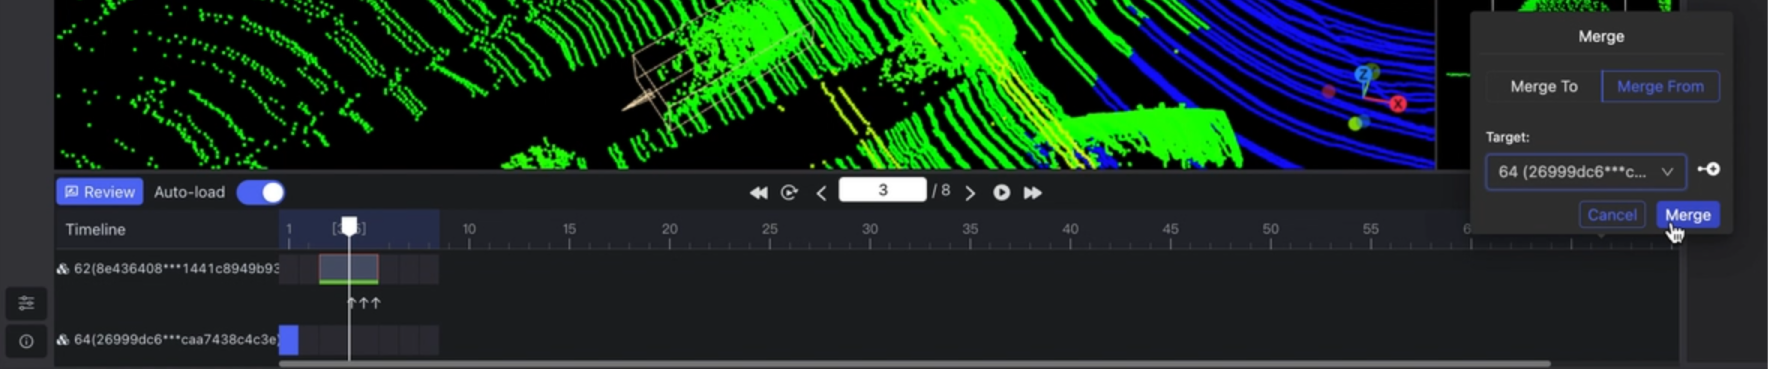
Merge
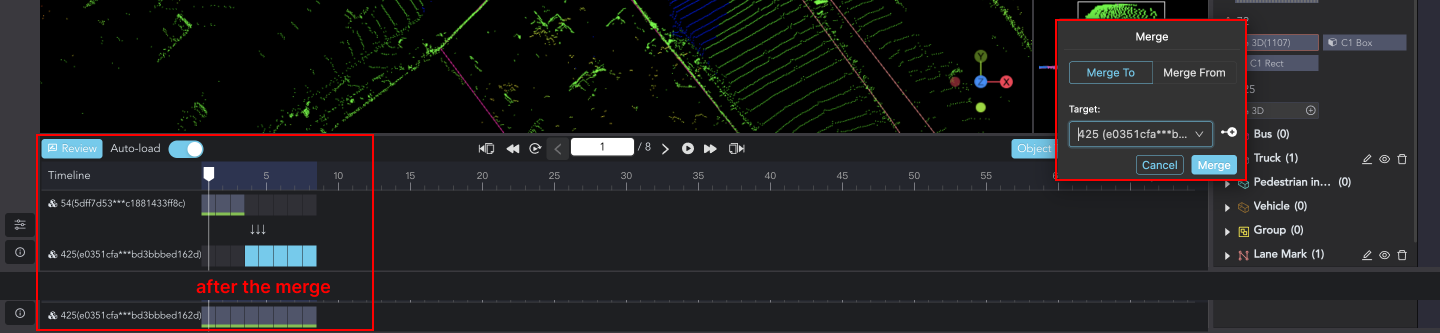
Select an object (X) and click the Merge icon above the Timeline. Choose the Merge Type and the Target (Y).
- X Merge From Y: Merge Y to X, keeping the Tracking ID and Class of X and deleting Y.
- X Merge To Y: Merge X to Y, keeping the Tracking ID and Class of Y and deleting X.
You can either select a target from the dropdown menu or use the icons beside it to click on the object directly in the Point Cloud Data.
NOTICE:The frames of X and Y must not overlap.
X and Y must have the same class.
Objects cannot be merged with themselves.
For example, if result #54 (in frames 1-3) and result #425 (in frames 4-8) pertain to the same object, we can merge them to maintain the consistent Tracking ID and Class. Select result #54 and merge to the target #425. Then, result #54 will be deleted, and its information will be merged into result #425.
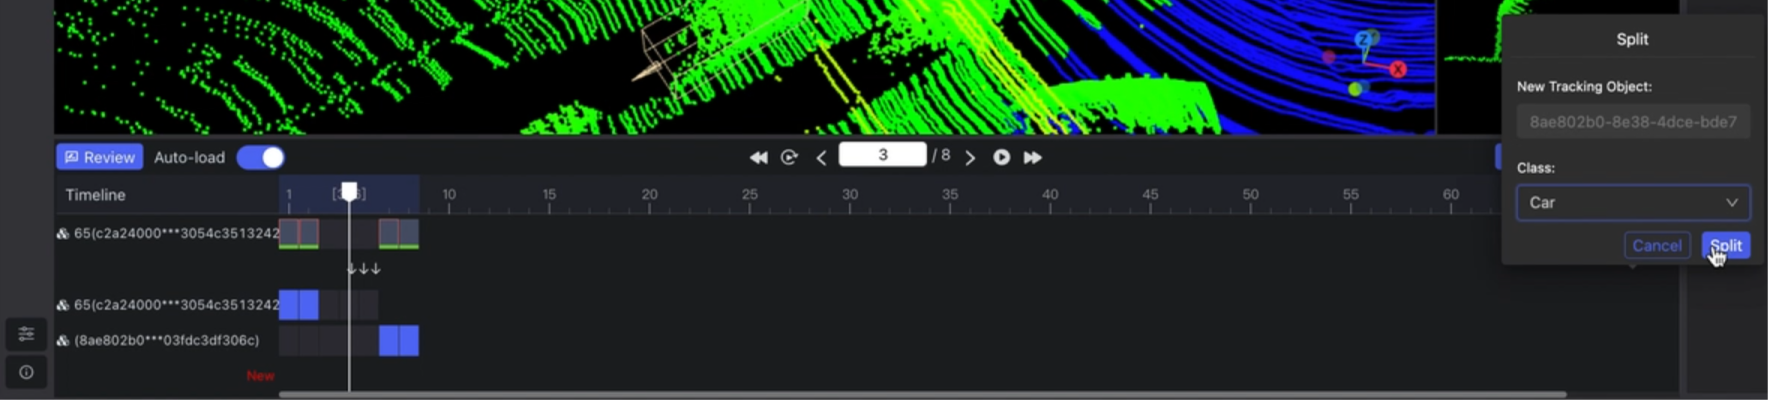
Split
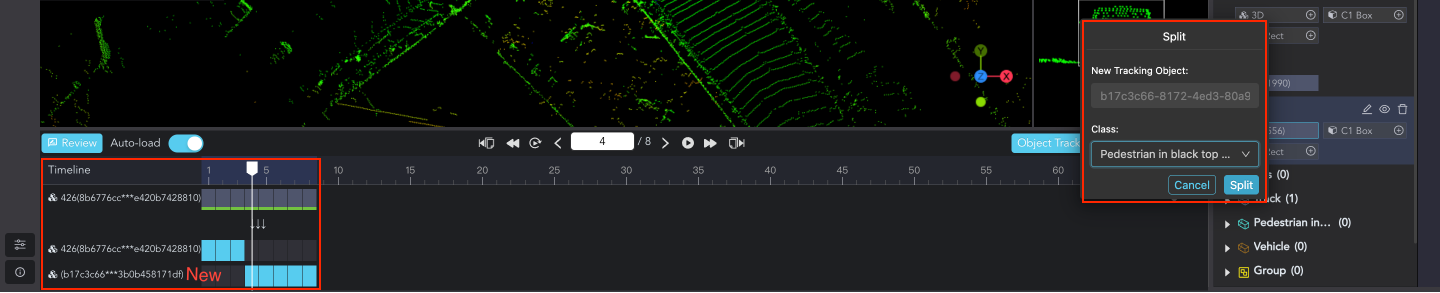
Like the reverse of merging, an object can be divided into multiple parts.
Select an object (X) and choose a specific frame. Click the Split icon and set the Class for the new object (Y). X and Y will be separated from the selected frame.
Fold
You can fold frames to check objects' stationarity and annotate across multiple frames rapidly.
PrerequisiteFolding is only possible when the point cloud's coordinate system doesn't move with the ego vehicle during data collection. Otherwise, errors may occur like this:
Click on the starting frame and hold down the Shift key to select the ending frame. Then click the Fold button.
All results existing in the selected frames will be combined into the folded frame for display only. You cannot select individual results or edit their class attributes, and the results list will be cleared. (Unfolding will restore the original state.)
You can directly create new results on the folded frames and edit class attributes. Upon unfolding, the newly created results will be applied to each frame.
Merging and splitting will be simultaneously applied to each frame within the folded frames. The folded frames can also be further folded with other frames.
Merge
Split

Fold with other frames
Please noted that folded frames are NOT a distinct result type.Batch review, switching instance/segmentation mode, submitting, and other task-related operations will automatically split them.
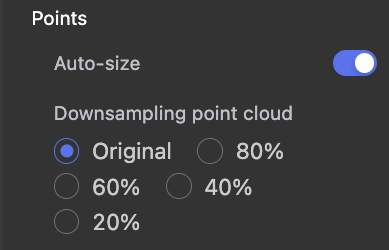
Folding frames may result in excessive points, requiring a sparse display. You can downsample point clouds in the display settings, located in the bottom left corner.
7. Shortcut Keys
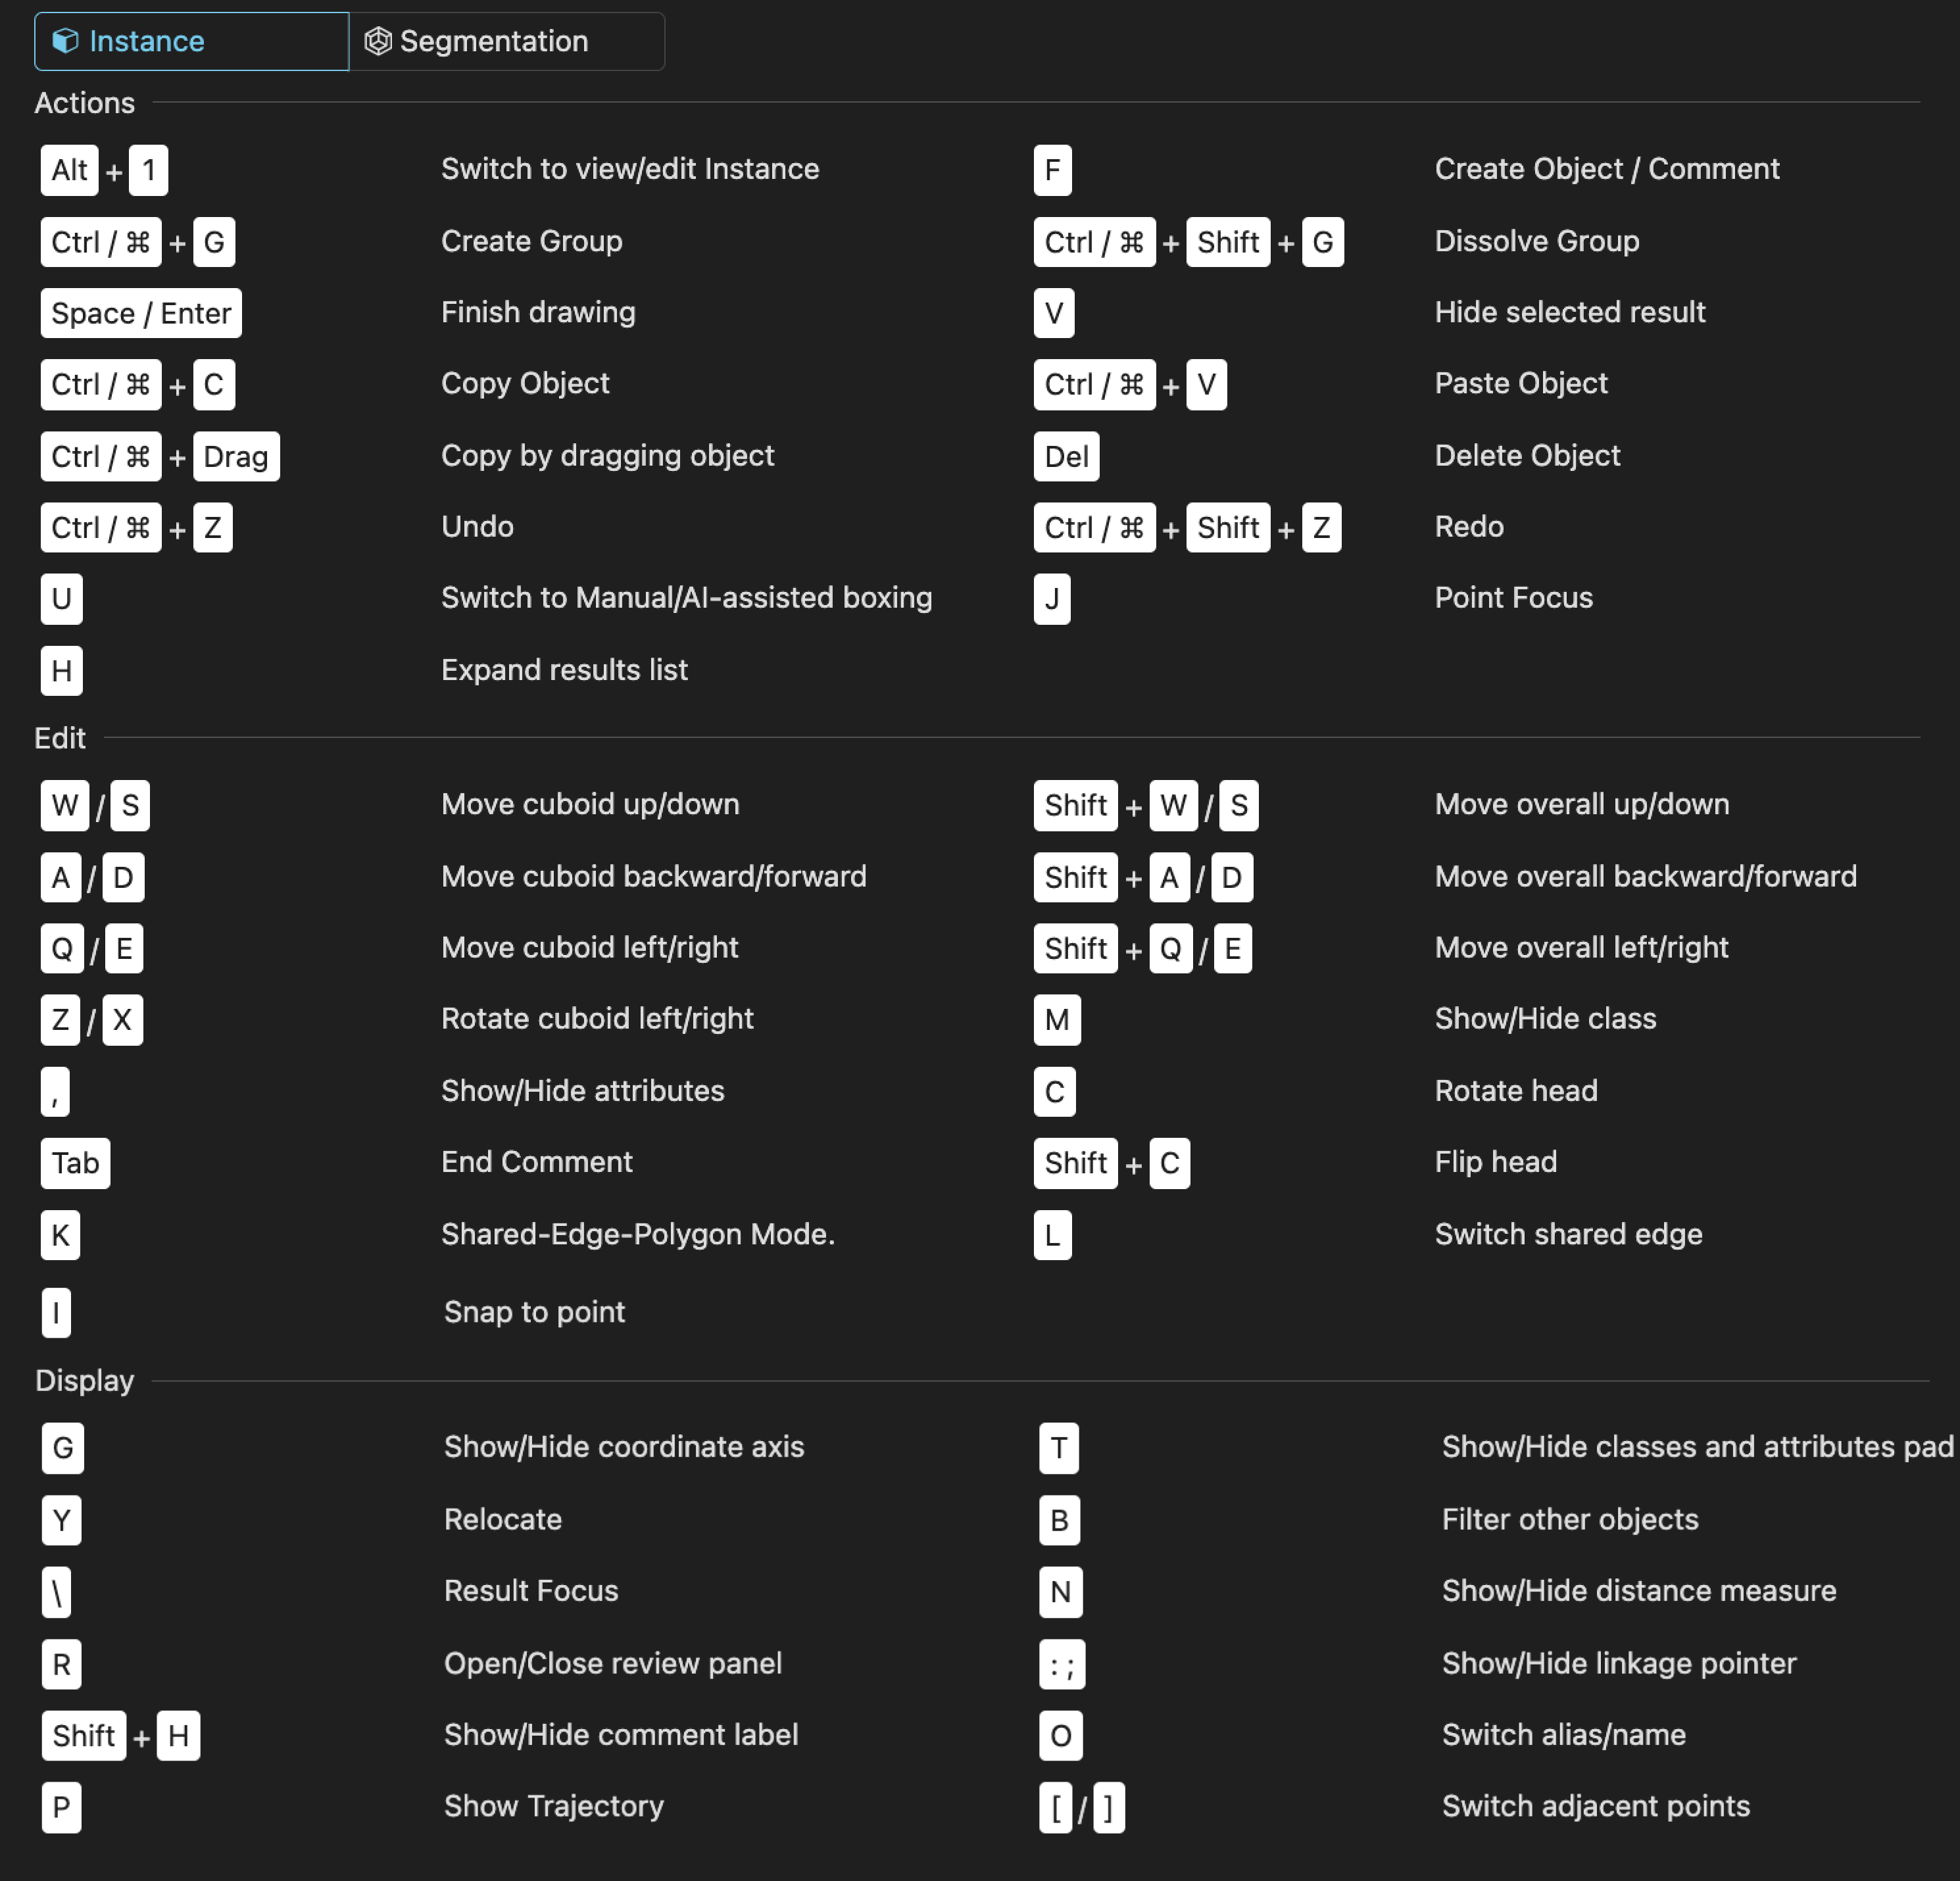
Updated about 1 year ago