Generative AI Annotation Tool
🤖 Guides on the concept explanations of Generative AI annotation and how to use Generative AI annotation tools to perform LLM annotation work on BasicAI.
To meet users' ever-developing demands regarding LLM (Large Language Model) annotation, our platform has developed a new annotation/dataset/tool type called Generative AI on top of our traditional textual data annotation features. 🎉
Conduct your LLM training more efficiently and conveniently on BasicAI through RLHF dialogue evaluation or SFT dialogue response annotation tools. SFT provides the model with suggested answers, while RLHF fine-tunes the model's output to align with human preferences through a reward-punishment mechanism (via scoring or ranking).
What is Generative AI annotation?
On BasicAI, Generative AI annotation includes two common types of LLM annotation work for now, which are SFT (Supervised Fine-tuning) Dialogue Response and RLHF (Reinforcement Learning from Human Feedback) Dialogue Evaluation. It can involve multiple-round human-model dialogue annotation with the content of texts and images, such as evaluating, scoring or sorting model responses, and adding a response to a prompt as a user or a bot, etc.
SFT Dialogue Response
RLHF Dialogue Evaluation
Supported LLM Annotation Types on BasicAI
- SFT Dialogue Response: SFT is short for Supervised Fine-tuning. In this field, a pre-trained LLM is further adjusted (fine-tuned) by humans to fit a specific task. Humans give answers to the model directly. This fine-tuning is done within a manually supervised learning framework. In SFT Dialogue Response annotation, the dataset generally includes one round of human-model dialogue with both a prompt and response or just a prompt, and a worker needs to manually add a response as a user or a bot.
- RLHF Dialogue Evaluation: RLHF is short for Reinforcement Learning from Human Feedback. A LLM gives answers to questions. Humans make reward or punishment judgments towards the answers, rendering the model more in line with human preferences. RLHF Dialogue Evaluation annotation includes annotating, sorting or scoring LLM responses among multiple rounds of human-model dialogues.
Prerequisites
Before starting the annotation process, it is essential for you (or your project manager) to upload a dataset and configure the ontology.
📖 Click to view quick steps
1️⃣ Create aDataset or Task with the type of Generative AI and upload data.
In the Dataset Center, create a dataset with the type of Generative AI, and upload related data into the dataset. If you would like to create a Generative AI task, please refer to the Task Creation guide.
At present, our platform supports users to upload Generative AI data in the following formats:
- Data files: .csv / .xlsx / .xls / .json
- Compressed files: .zip / .gzip / .tar / .rar
The file size limit is 1 GB. For files larger than this, we recommend uploading via URL or Object Storage. For specific details about how to upload Generative AI data, please navigate to Data & Folder Structure.
2️⃣ Configure theOntology based on project requirements.
After creating a Generative AI Dataset and uploading related data, the next step is to configure ontology classes or classifications linked with the dataset. Under the Dataset-Ontology tab, click Create and fill out the configuration options to create a new class. For classification configuration, please navigate to the Classification guide.
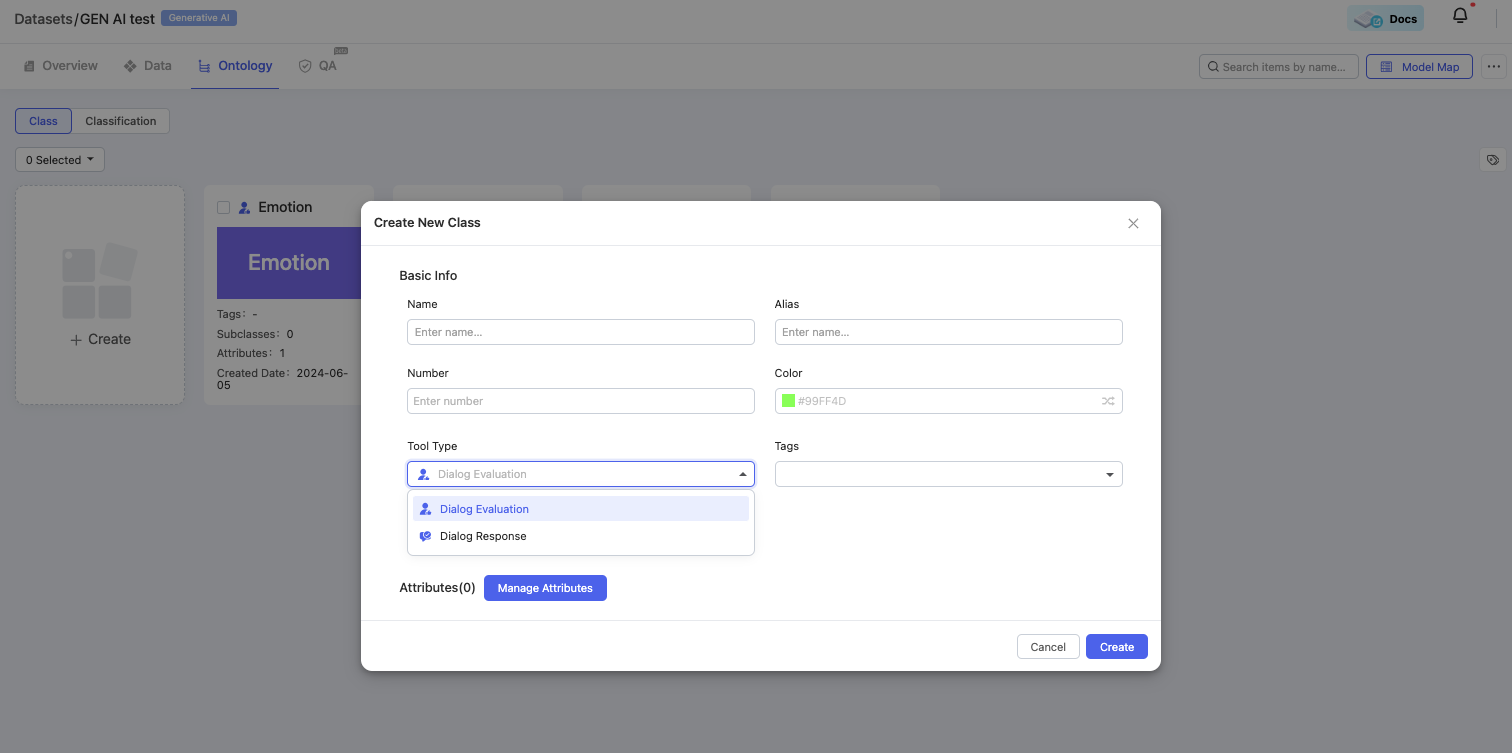
Besides the basic options such as Name, Alias, Number, Color and Tags, two new tool types are designed specifically for Generative AI Dataset: Dialog Evaluation and Dialog Response. For detailed explanations regarding these two tool types, please navigate to the Tool Type guide.
Start Annotation
Now let's take a look at the Generative AI annotation tool page display and get familiar with the common tools on the tool page first. Human-model dialogue contents are displayed in the central canvas area aligned to the left. Texts and images are wrapped in the conversation bubbles. Operations in the top workflow toolbar as well as Validity, Classification & Comments panels on the right are explained in the Annotation Common Tools guide.

Dialogue Evaluation

Dialogue Response
On top of basic operation options similar to the Text Tool Page, such as text searching box, view/edit switch button, and text size slider, there are some new buttons specifically designed for Generative AI annotation work.
| Button | Description | Screenshot/GIF |
|---|---|---|
| Hide Avatar | Located at the top right corner. After clicking this button, the avatar of the roles on the data canvas will be hided. |  |
| Expand Attributes | Located at the top right corner. In Dialogue Evaluation annotation, after clicking this button, all the class attributes of created results will be automatically unfolded. When you have created annotation results on the tool page, you can switch on/off this button. It is more convenient to modify results if you turn on |  |
| Open in New Tab | Hover on each conversation bubble on the data canvas, and then two icon buttons will appear: Open in New Tab and Pin. Click the Open in New Tab icon on one bubble, and then the content will display on a new tab. |  |
| Pin | If you would like to pin some of the dialogue contents on the top of the data canvas, please click the pin icon after you hover on one conversation bubble. 4 bubbles at most are supported to be pinned on the top. After pinning, the pinned bubbles will appear at the top of the data canvas. You can unpin them in the top pinning area or open the pinned bubbles on a new tab. |  |
| Class Inheritance | Located at the top left corner. For instance, if you already choose a class X for a Bot's conversation bubble, when you click the other Bot bubbles, the class X is automatically chosen on the attribute panel, and it won't work on the User's bubbles because the class targets are different. Vice versa for the User's bubbles. Please refer to the GIF at the right for a better understanding of the |  |
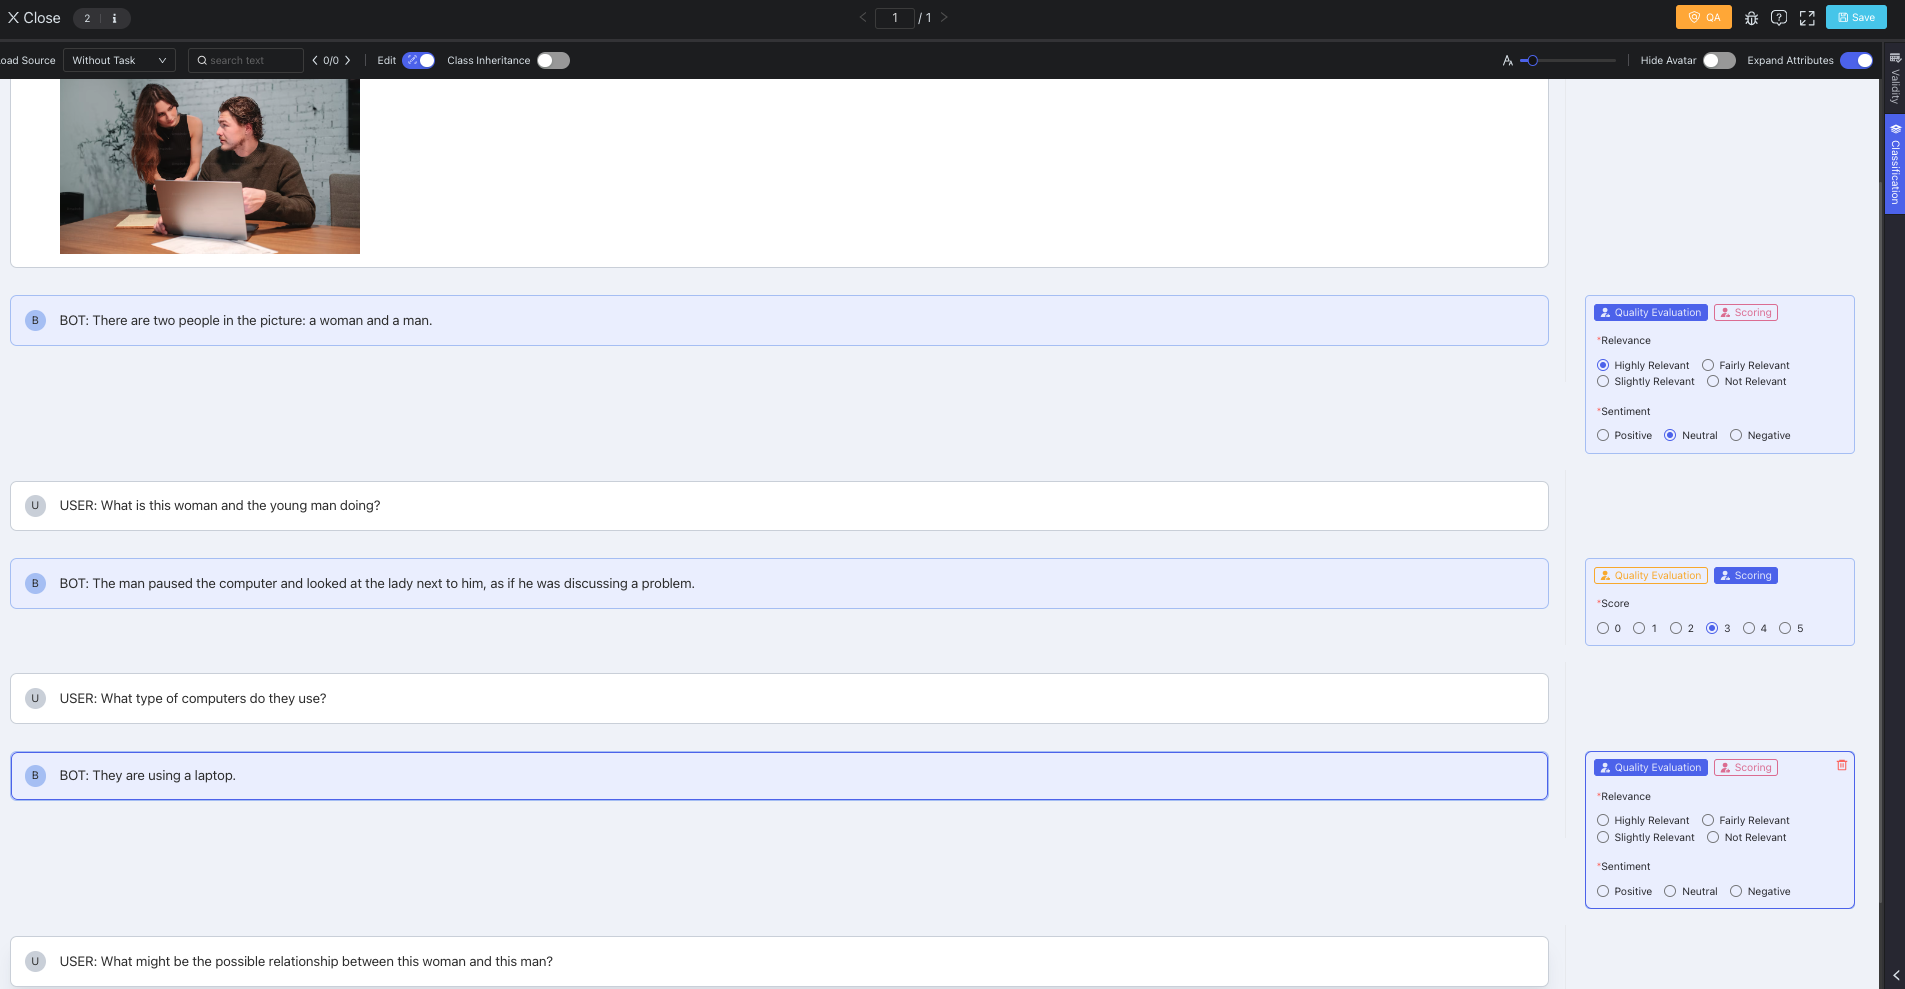
RLHF Dialogue Evaluation
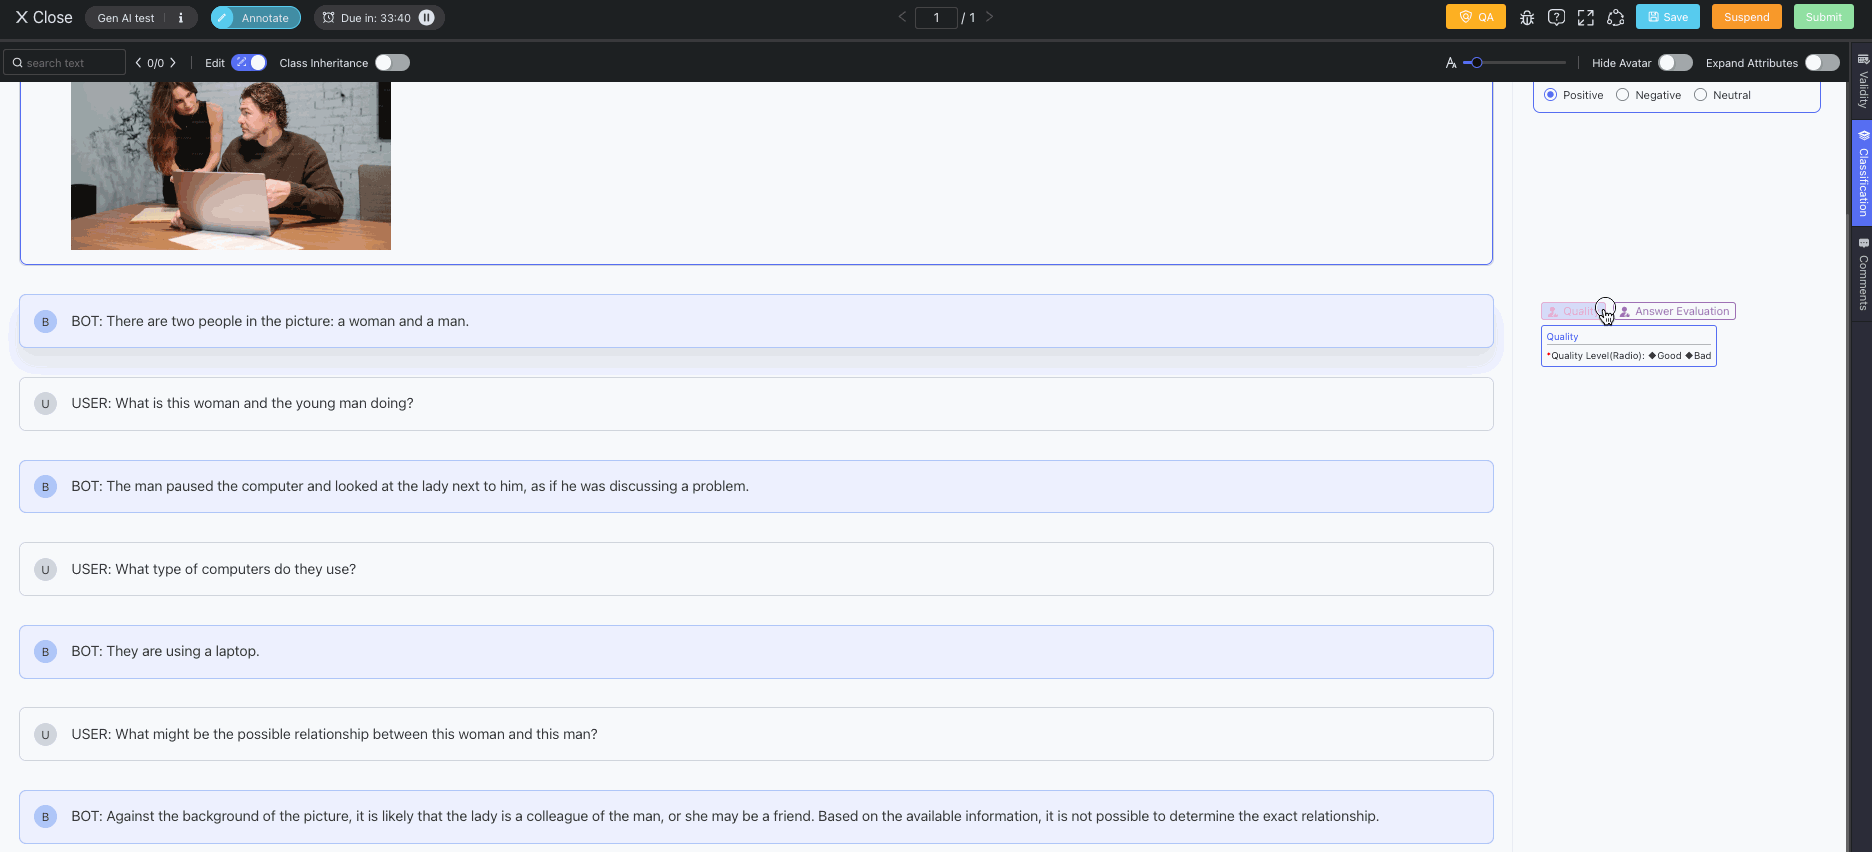
This kind of annotation usually involves multiple rounds of dialogues between User and Bot. Annotators need to perform dialogue content evaluation work such as scoring, sorting or tagging some of the dialogue contents by selecting classes & attributes related to the contents. For RLHF Dialogue Evaluation, you can follow the detailed steps below to conduct annotation work.
-
Check if you are under the Edit mode or View mode on the tool page first. When you enter the Generative AI annotation tool page, the
Editbutton is automatically enabled by default. If you just want to view the data instead of operating anything, you can turn off theEditbutton and switch to View mode.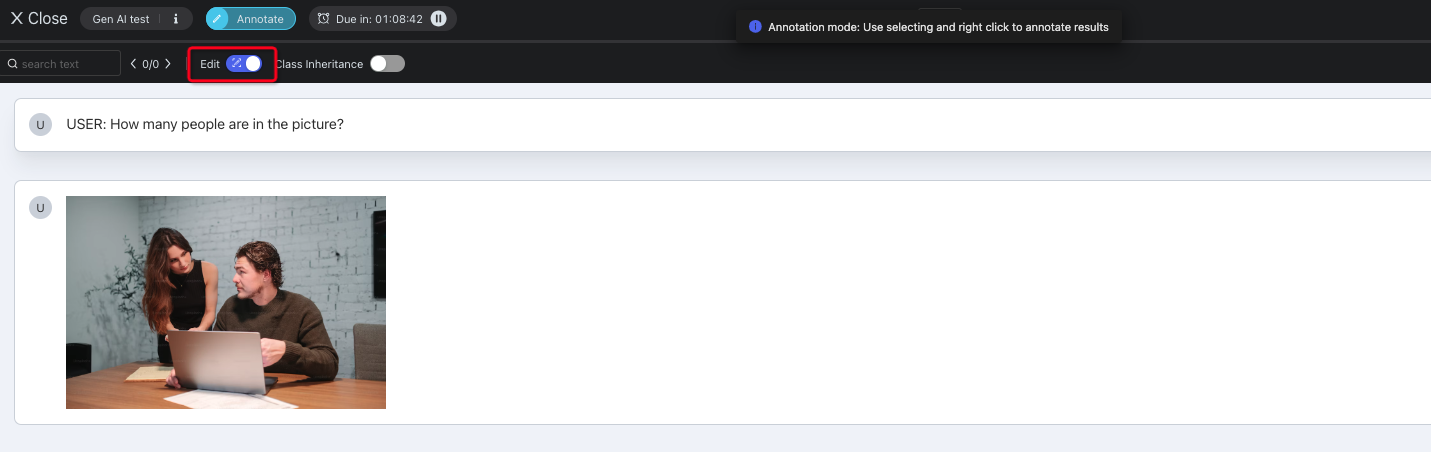
-
Hover on a conversation bubble of User or Bot, and then the class & attribute panel will automatically display on the right side. Hover on any class, and its attribute details will appear. Click on the class you want to choose and then select the attribute options (if any) to finish annotating the conversation bubble. If you would like to use the Class Inheritance function, please enable the
Class Inheritancebutton besideEditon the top left of the tool page (Instructions about Class Inheritance are explained above). FYI, you can press ↑ or ↓ on your keyboard to achieve faster switching between conversation bubbles.
Now our platform supports users to press number hotkeys from 0 to 9 (1 is the first default key) on your keyboard for smoother swtiching among different attribute radio options on the tool page.
-
Selecting a Class will generate a result. If you would like to delete a result, you can just click the
deleteicon on the top right corner of the class & attribute panel and then double confirm deleting.
-
All the created results with selected class/attribute options will display on the right side of the data canvas, forming a region of the Result Panel. Click
Saveto save the results, or clickSubmitto submit the data.
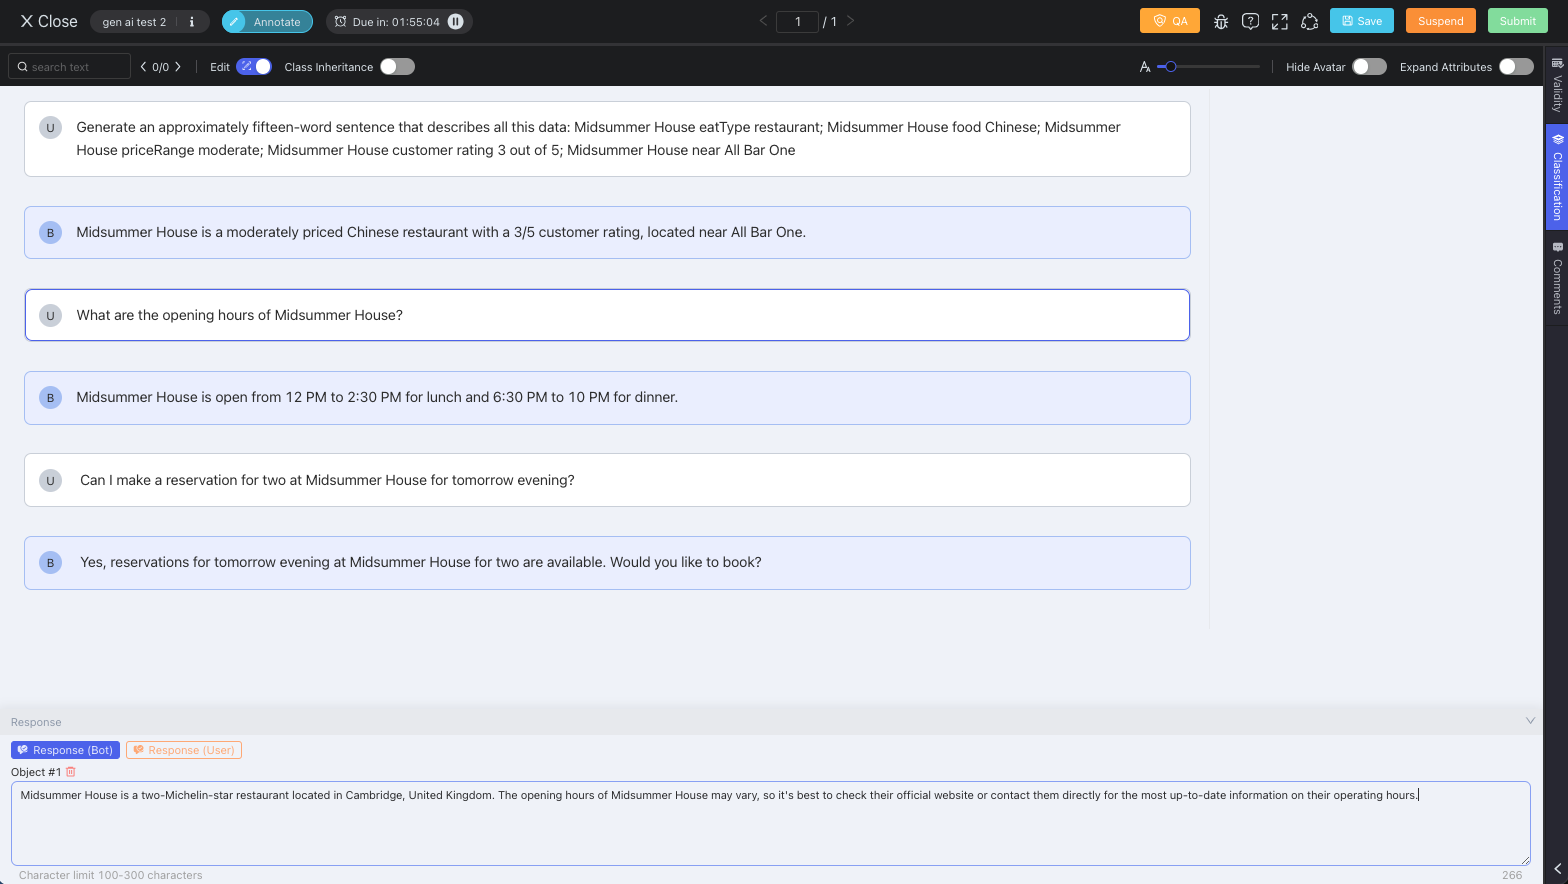
SFT Dialogue Response
In the real SFT Dialogue Response annotation scenario, it often involves one round of human-model dialogue with prompts and responses, or simply just one prompt. Annotators need to give their answers as response from the perspective of User or Bot, in order to fine-tune a model's responses. Please follow the instructions below for SFT Dialogue Response annotation.
-
The first step is still to check if the mode of the tool page you are on is Edit or View, same as what is explained above in the RLHF Dialogue Evaluation guide.
-
The classes are located at the bottom left of the tool page. Click on one class, and then you can type in your response in the text box without the need to select any conversation bubble on the data canvas. Please mind the character limits when typing. The total word count of your response appears at the bottom right corner. Click
Saveto save the results, or clickSubmitto submit the data.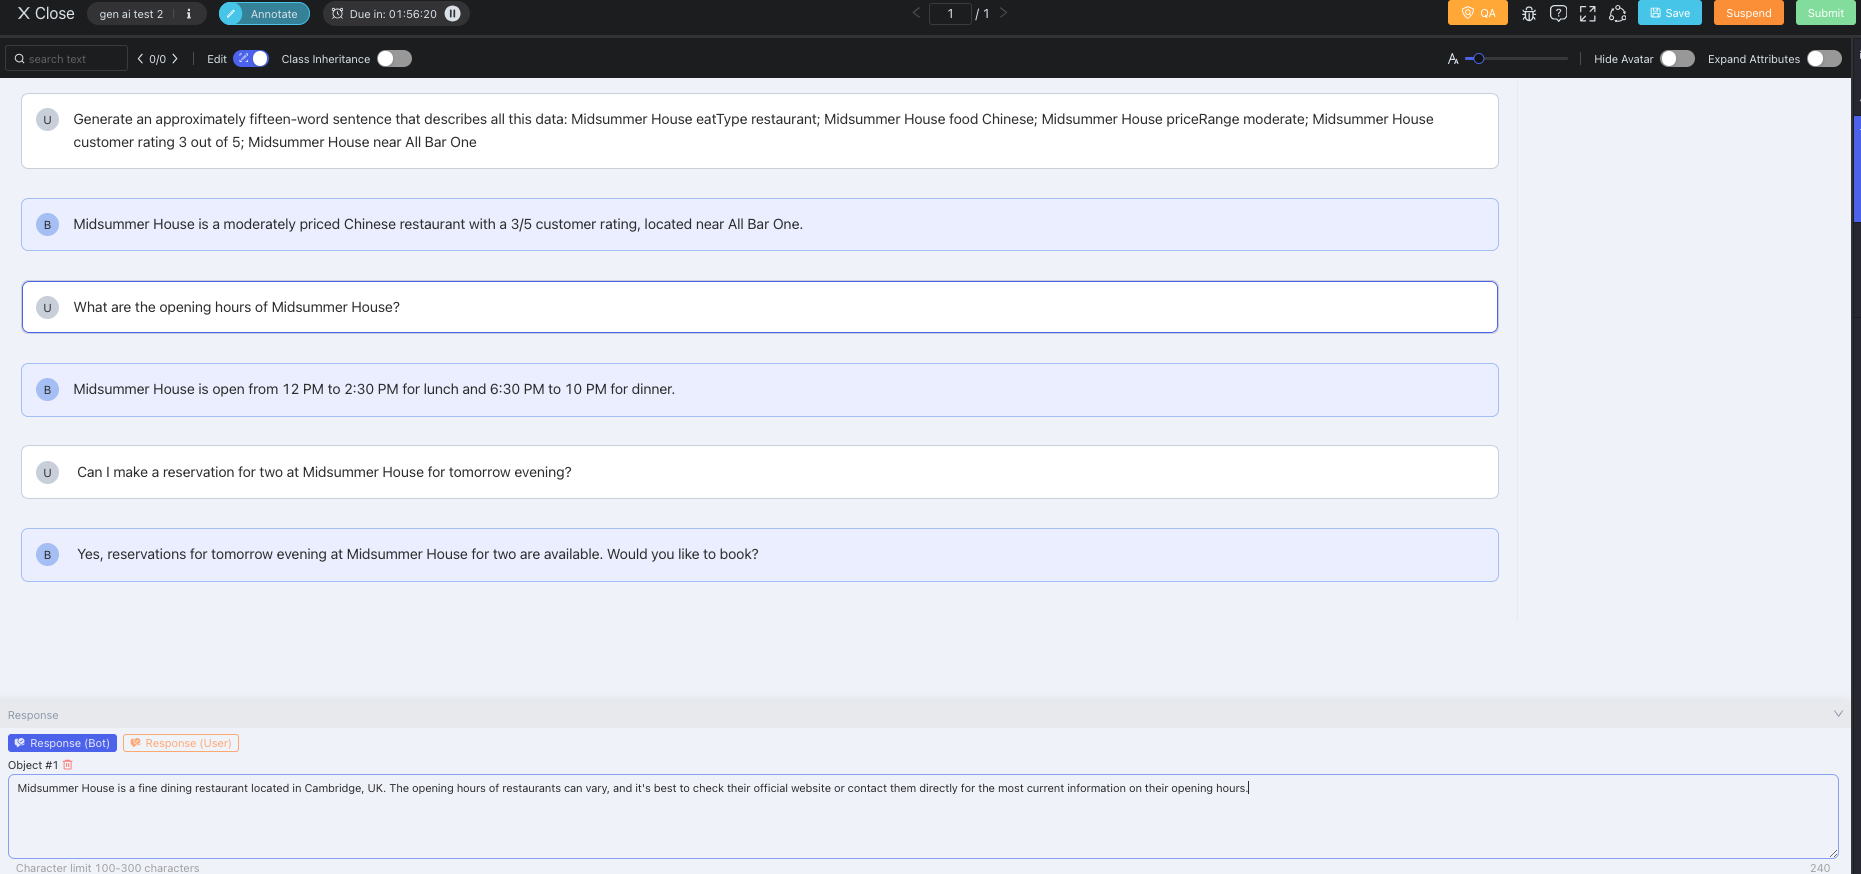
-
Clicking one class generates one result. One class has at most one result for the same data. Switching back to the class from other classes will not generate new results but just supports annotators to view the filled response. Deleting a result is also available by clicking the
Deleteicon above the text box and then double confirm deleting.
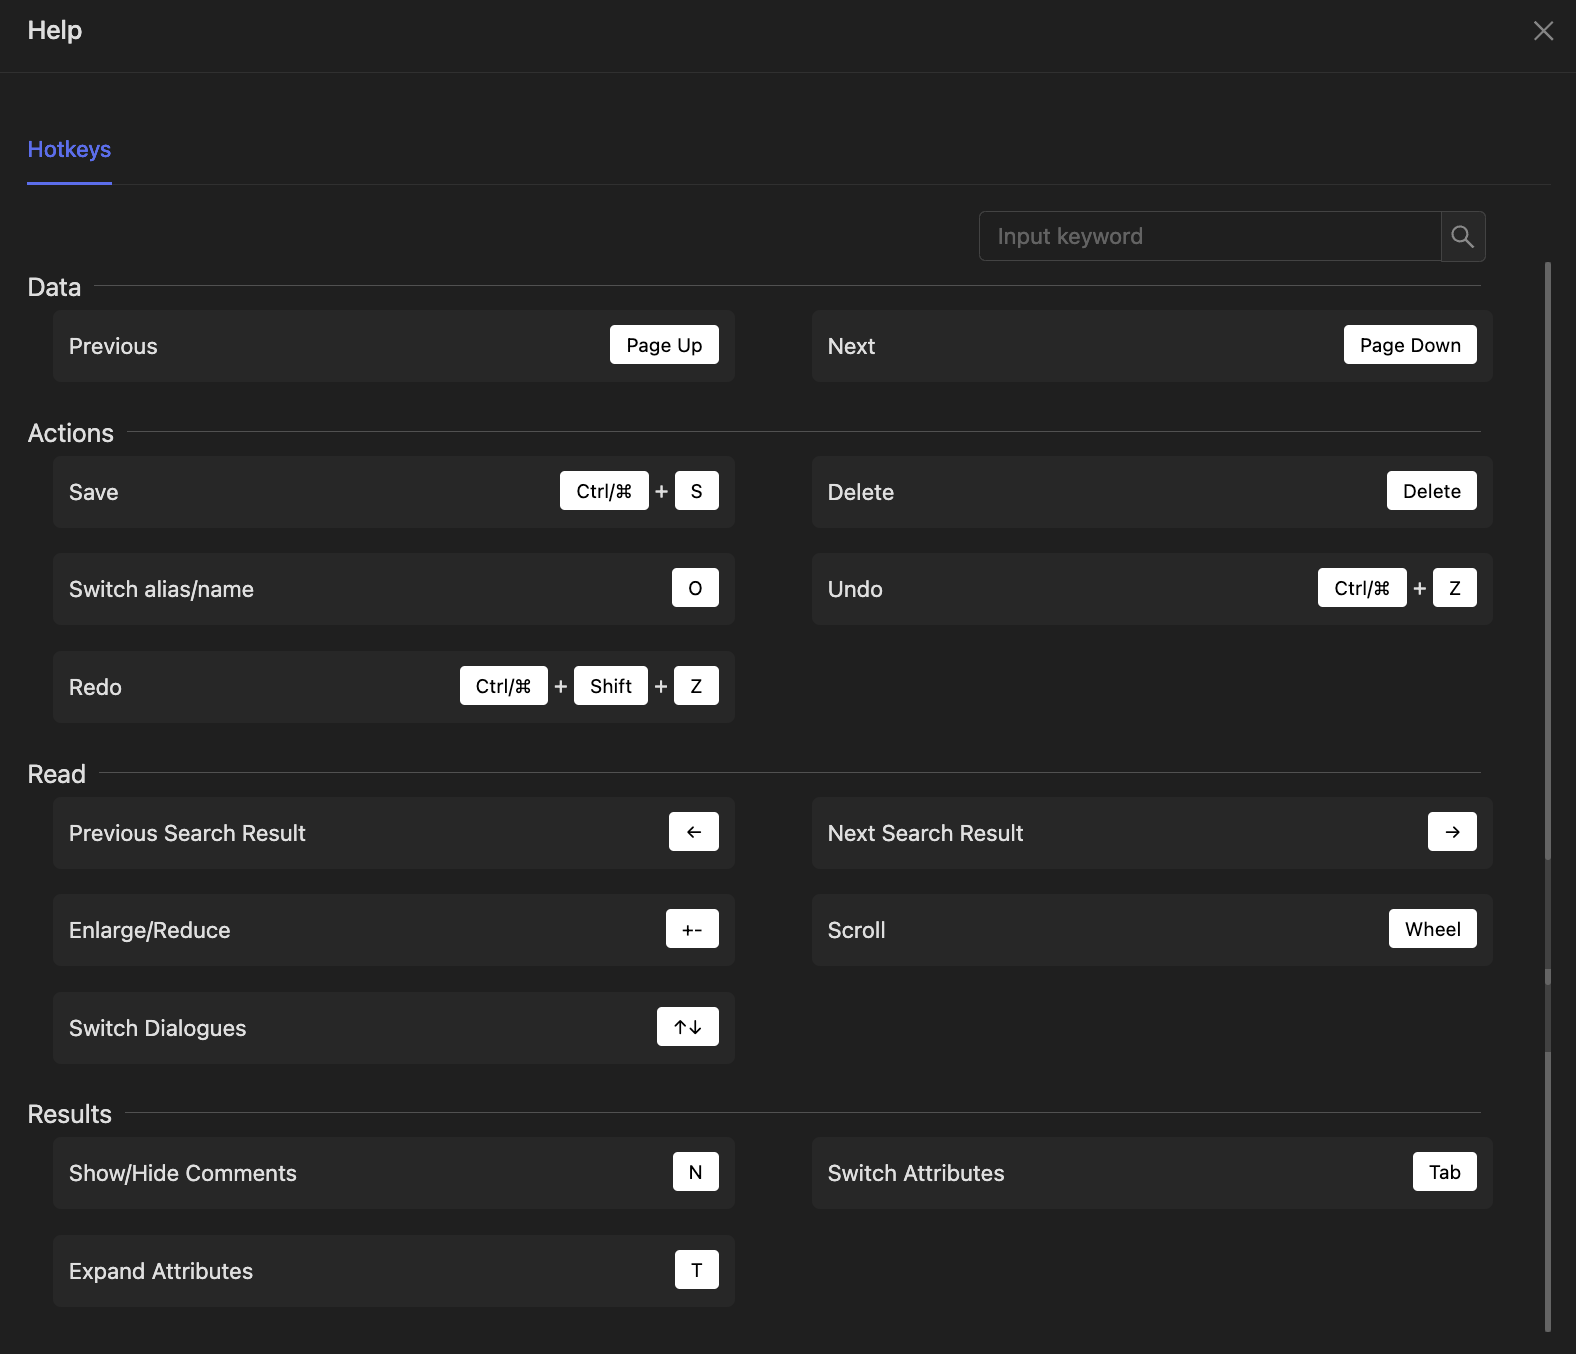
Short-cut Keys
Click the Help icon at the top right of the tool page to view all the shortcut keys:
Updated about 1 year ago