Ontology Creation
🔖 Guide to creating dataset ontology
In BasicAI, Ontology organizes the classes (labels), classifications, and their attributes and labeling tools for datasets, helping AI systems understand the domain and make inferences.
Feel free to check out Terms Dictionary to get a better grasp of these concepts.
There are several ways to create and manage ontologies on the BasicAI platform. We will explore each of them:
- Create in Datasets: Build customized ontologies from scratch for datasets, a widely used method.
- Copy from Ontology Center: Copy existing ontologies from the Ontology Center to enhance model training efficiency, especially when working across datasets.
- Map with Model Classes: Align customized dataset classes with preset classes of models before model execution.
- Import & Export: Import/export ontologies as JSON files or migrate from the O1 platform.
After annotation commences, any modifications, overrides, or deletions to the Ontology may result in inconsistencies or data loss.
Create in Datasets 
Open a dataset from the Datasets Tab on the sidebar, and go to the Ontology list. Here, we will configure the Class and Classification for this dataset.
The ontologies created in datasets are independent of each other.
1. Class
Under the Class category, click + Create to create a new class, or click the Edit button on an existing class card to make modifications.
Configure Basic Info:
| Option | Description | Required | Preview |
|---|---|---|---|
| Name | Name is the field used when exporting annotation results. Duplicated name is NOT allowed. | Y | 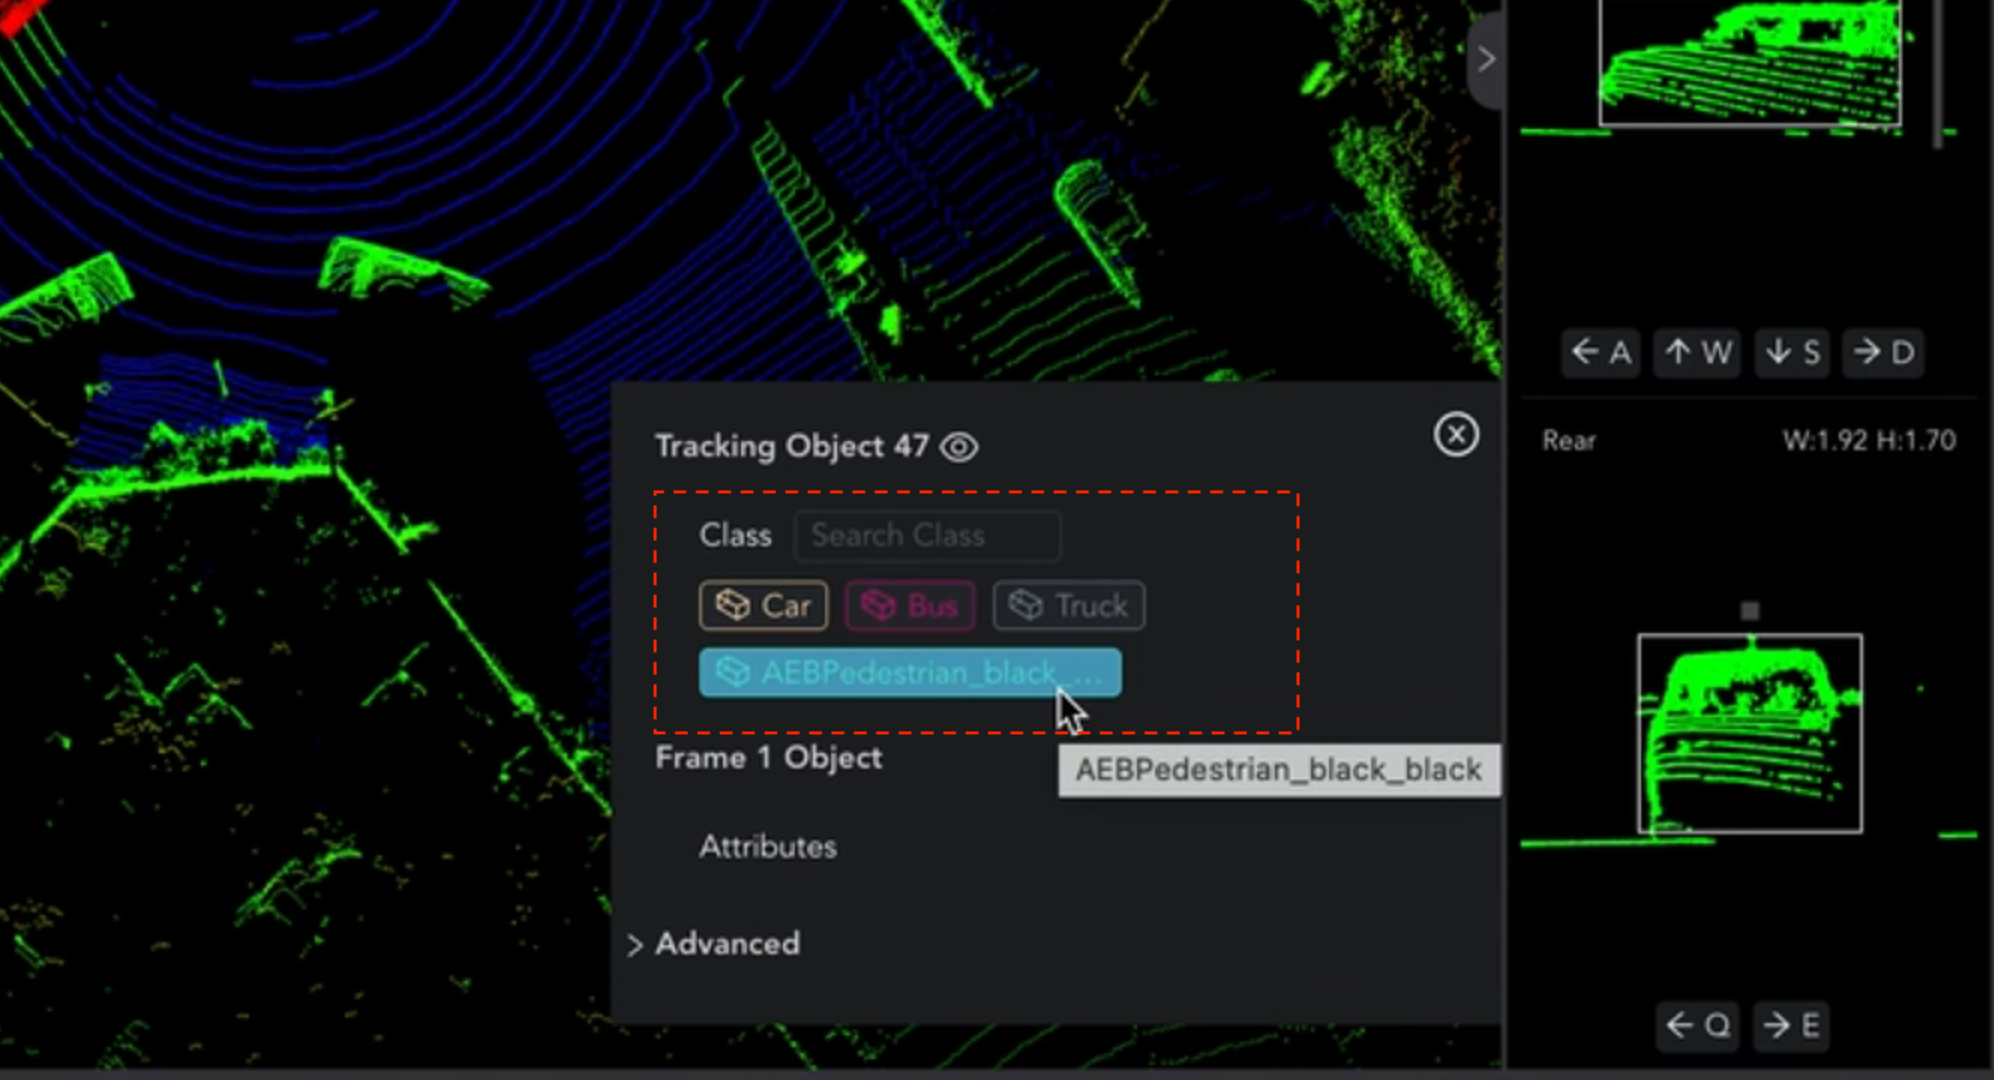 |
| Alias | Alias is the term visible to annotators in Tools. An alias can be used in certain circumstances, for example, when the name is unclear and difficult for annotators to comprehend. The alias will be displayed preferentially to the name. Annotators can switch alias/name by pressing the shortcut key O in Tools. | N |  |
| Class ID | Once a class is created, the platform will automatically generate an ID for it. You can view and copy it from the Edit panel. | / | 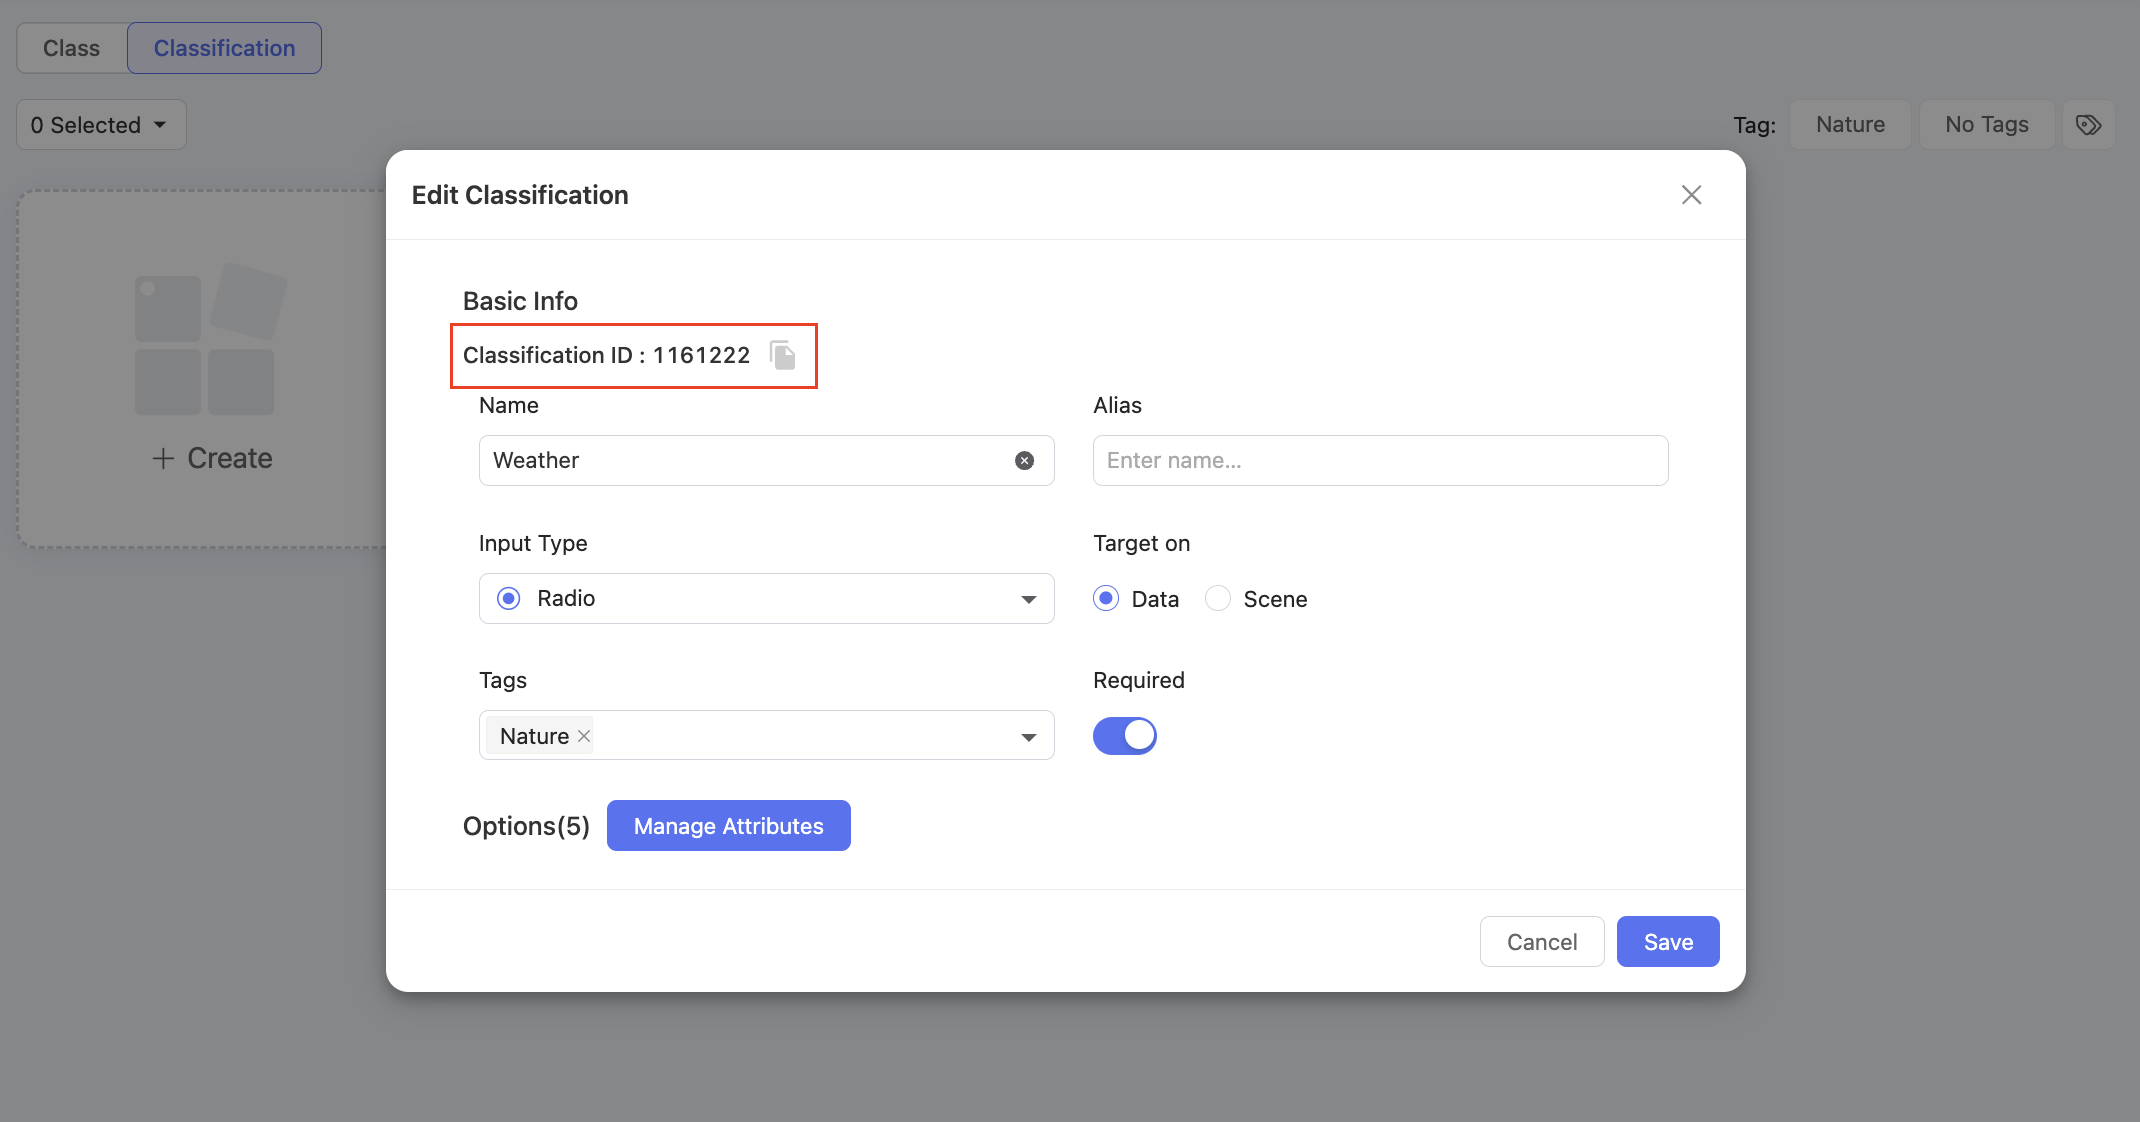 |
| Number | You can enter a custom number to represent the class and it will be exported. If the client uses a numerical ID, this number can be directly mapped to it. | N | 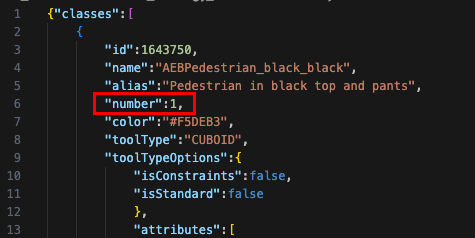 |
| Color | Set colors for the annotated objects to distinguish between different classes. You can keep the preset option, or choose one manually or randomly. | Y |  |
| Tags | Assign classes to specific tags for better organization as the same dataset may be used for multiple annotation tasks and the classes required may vary. You can create and manage tags by clicking on the tag icon. | N |  |
| Tool Type | Select the appropriate annotation tool for the class. Tool Types available for each type of dataset differ. Please refer to the Tool Type page for details. | Y |  |
Manage Attributes:
It is essential to manage the Attribute and options for the class.
Attribute Names are more like the questions you want to ask annotators, while Options are the responses they provide.
For example, when labeling a mobile vehicle, the annotator will select the option "Moving" for the attribute "Motion Type."
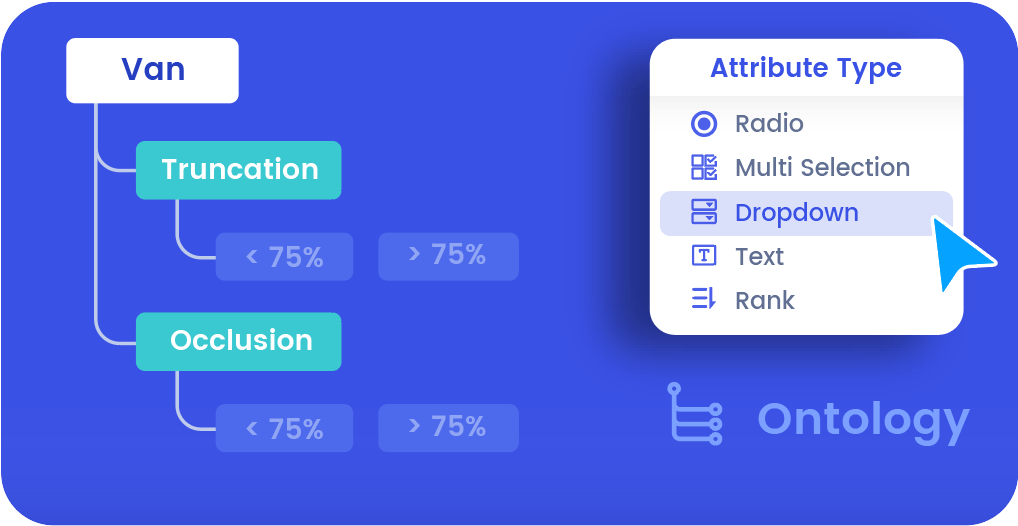
If additional details about "Moving" are needed, nested attributes should be set for this option. The annotator will indicate whether the speed of the vehicle in motion is "fast" or "slow". (as shown in the images below)
The image below on the left shows the interface for attribute management. The left panel displays the structure of attributes and options, while the right allows you to apply specific settings.
For
LiDAR Fusiondatasets, attribute directories are displayed at the top right. You can configure them separately to meet different project requirements. Please refer to the Attributes for LiDAR Fusion page for details.
The right image below demonstrates how class attributes appear in Tools.
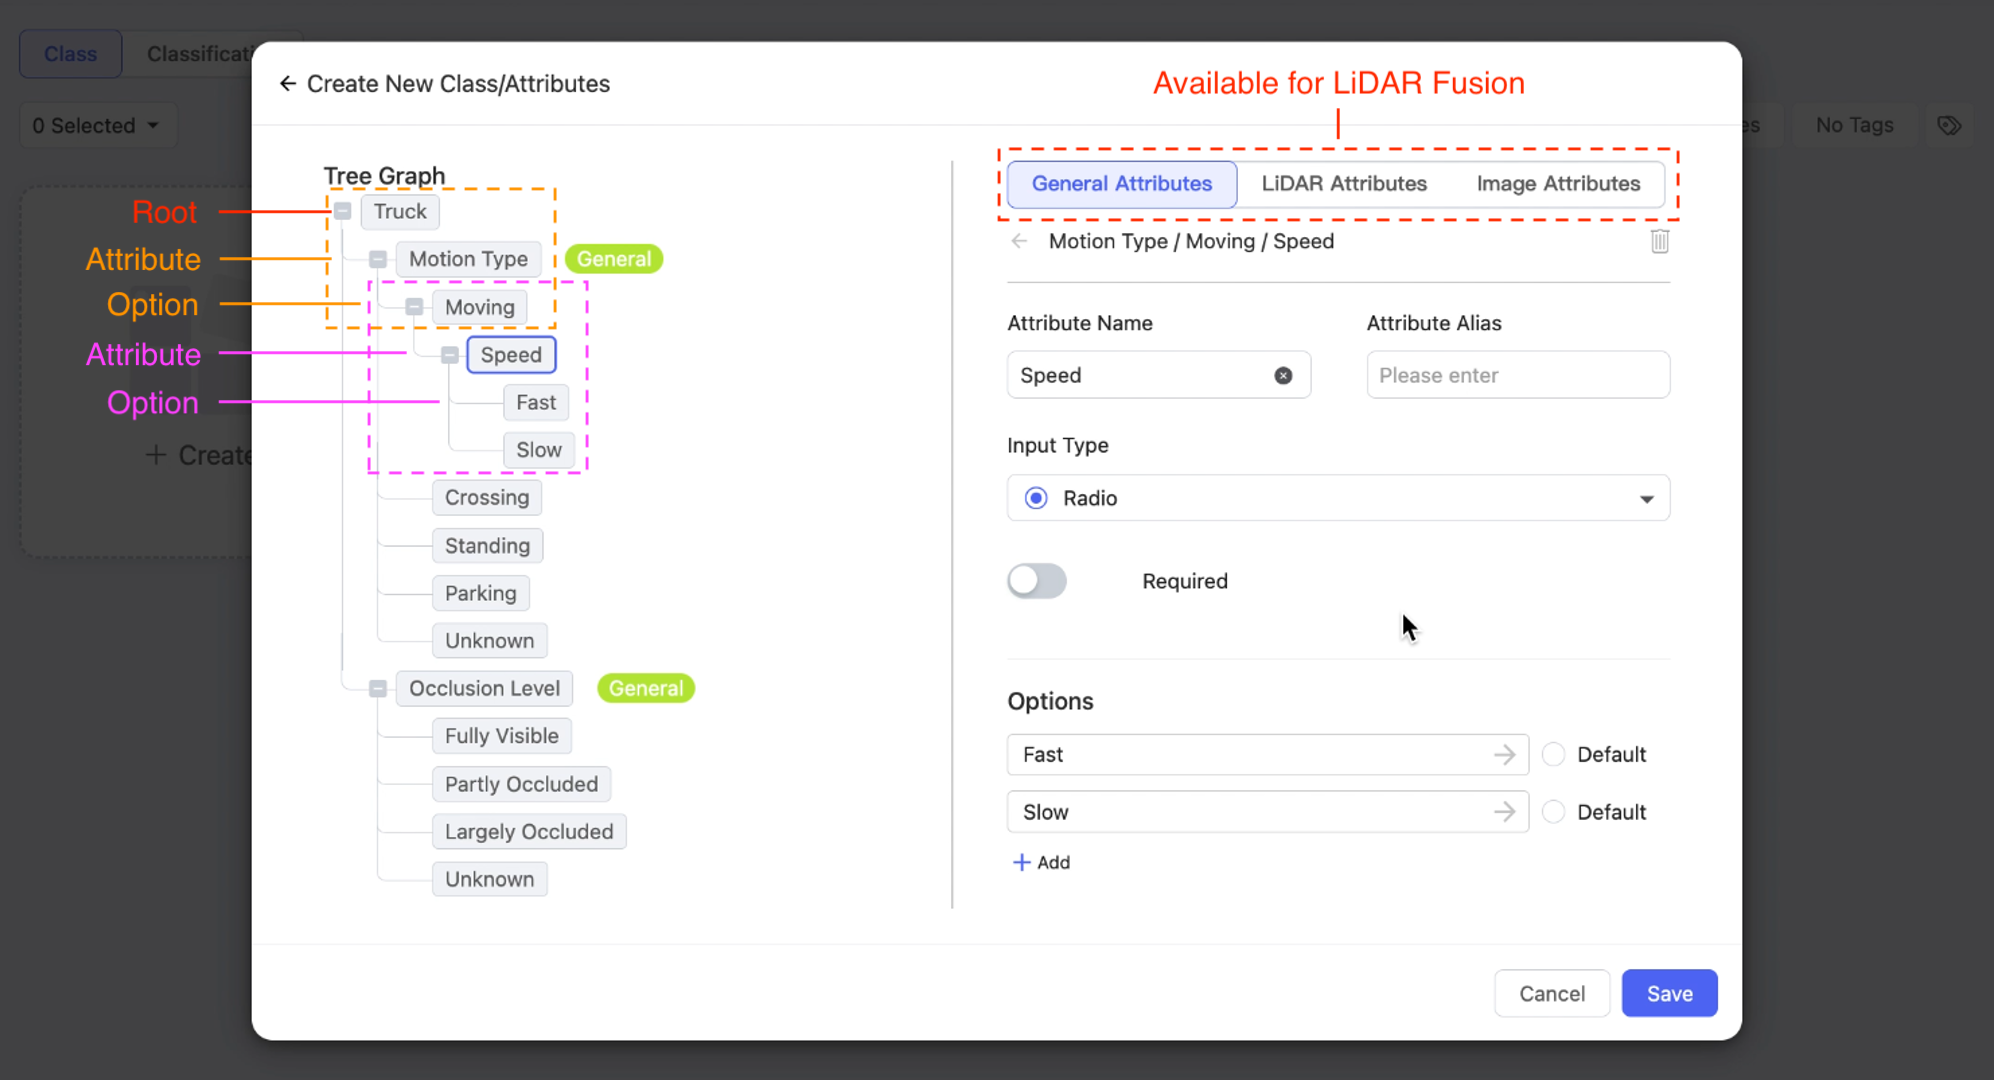
Attribute management interface
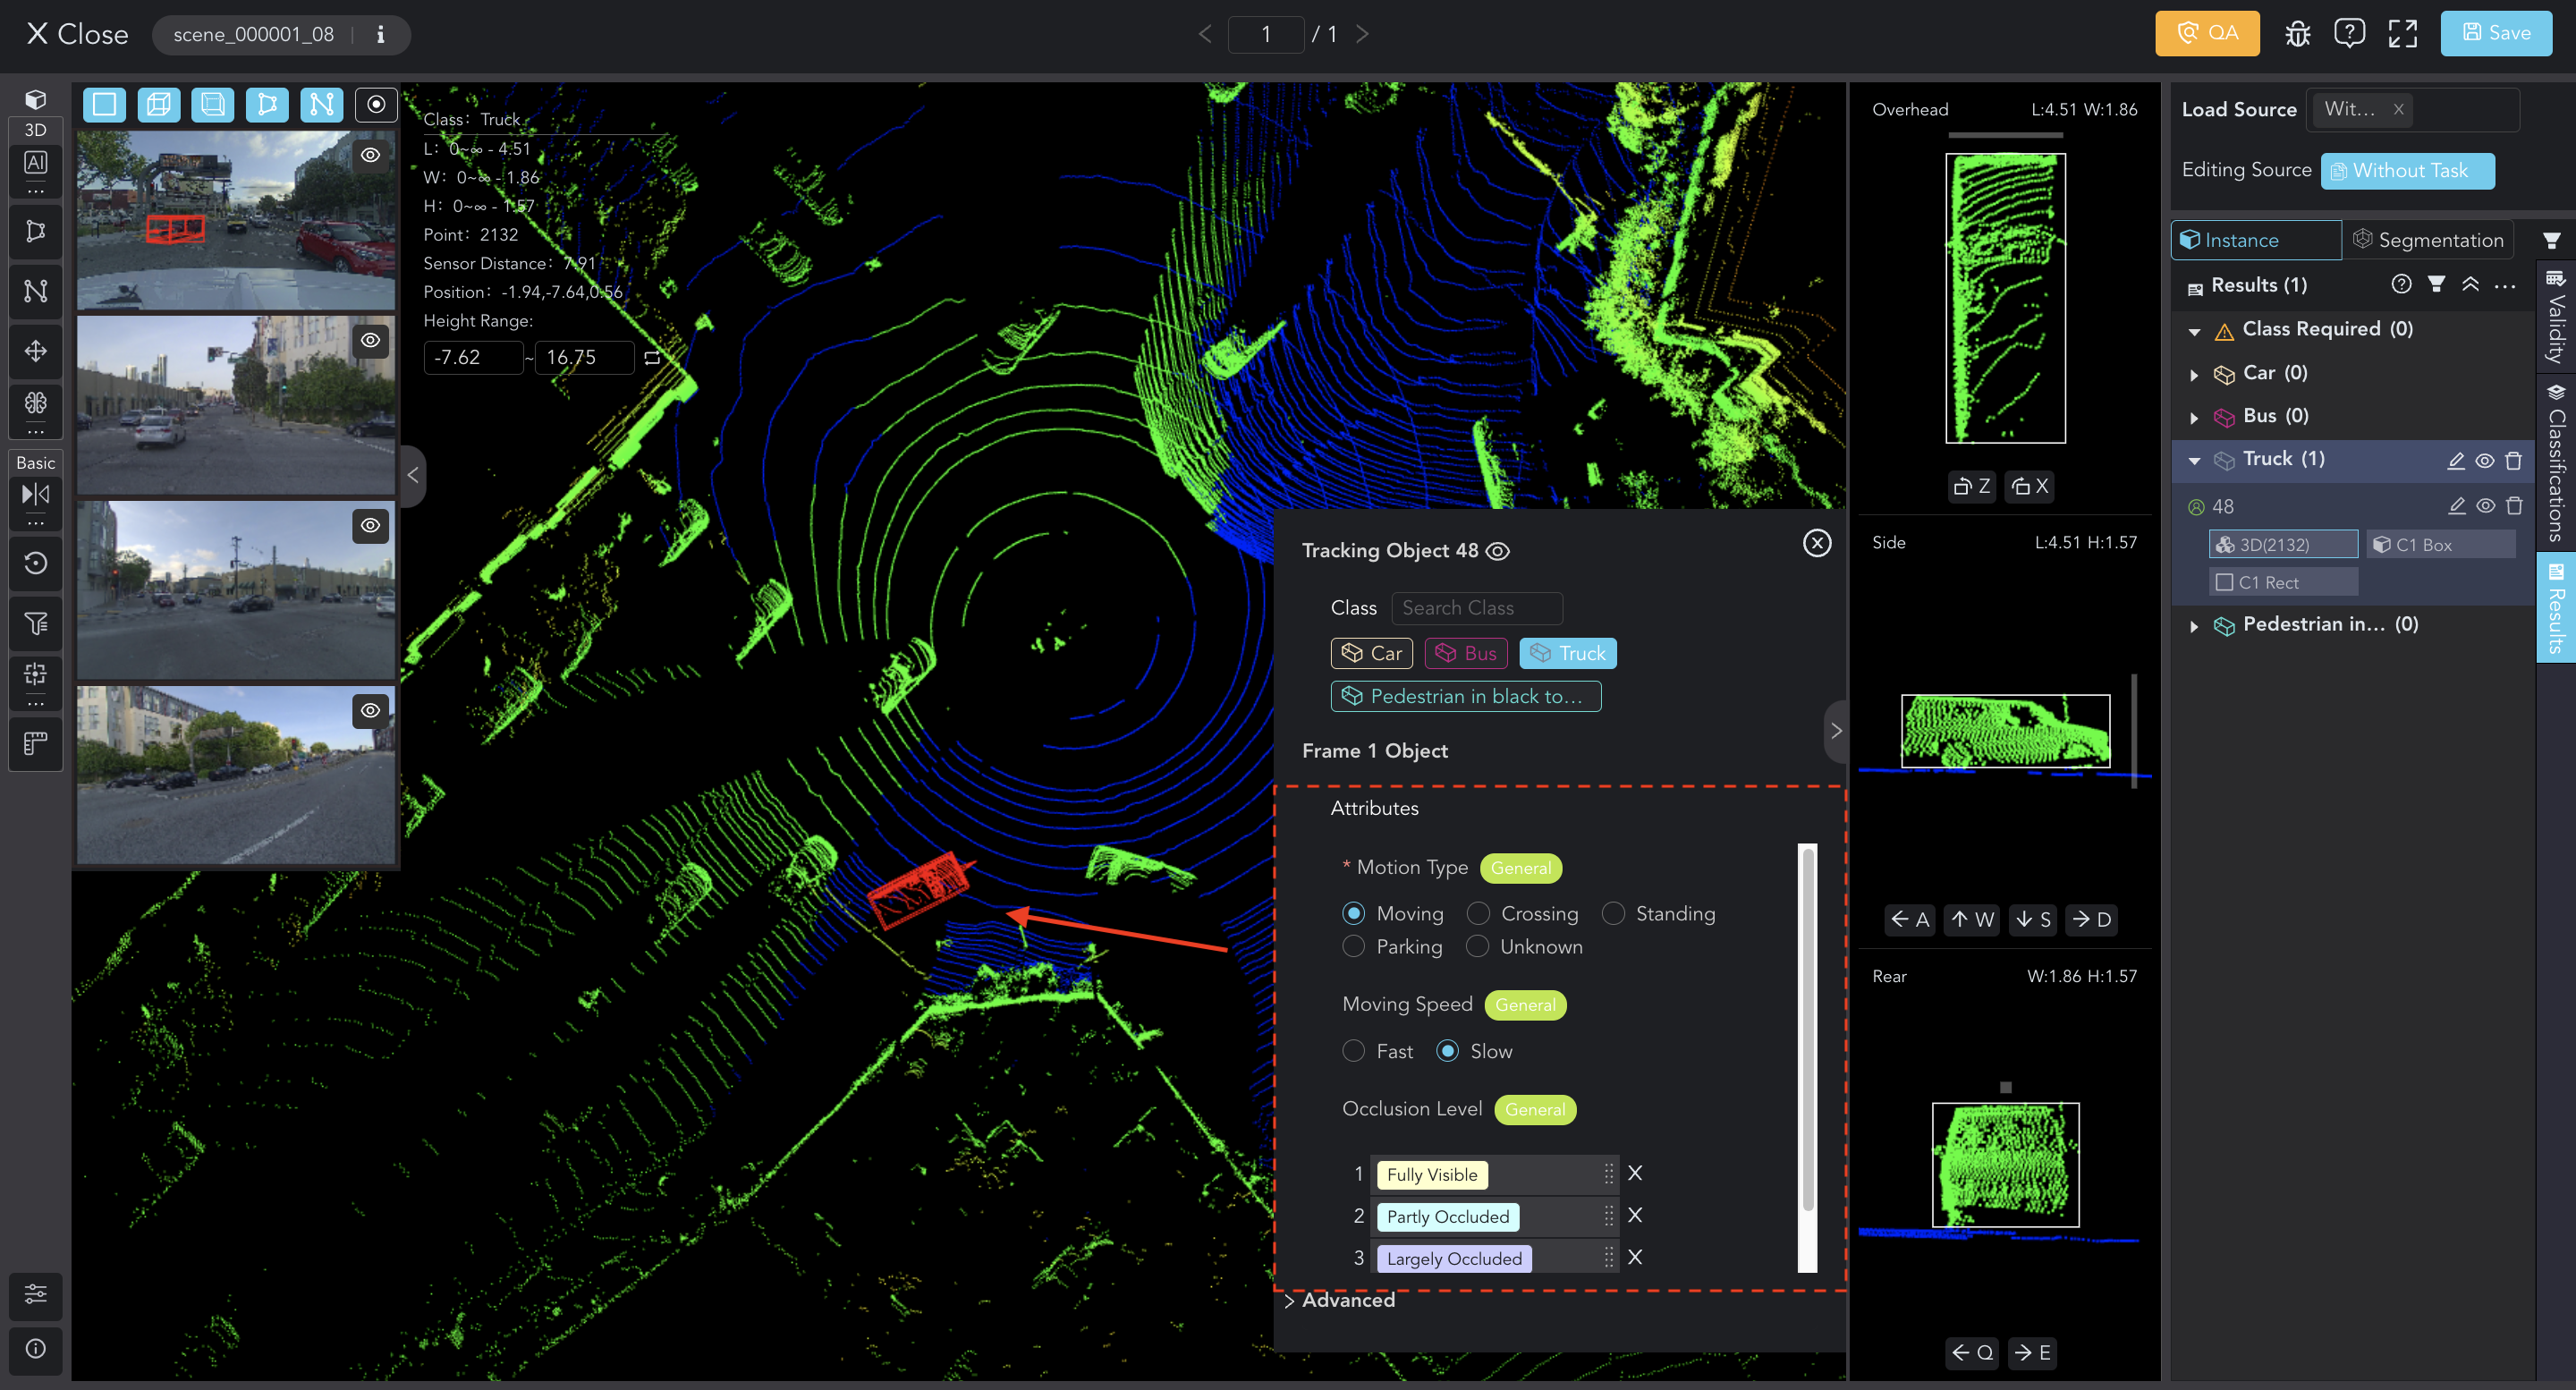
Preview in Tools
In the beginning, there is only a "root". Click + Add to add a new attribute and name it. Press the key Entr or click the ✓ icon to enter the configure page.
- Name and Alias: Enter the name (required) and alias (optional) for the new attribute. Please follow the rules consistent with the Class's.
- Input Type: Select the appropriate input type for the attribute.
- Required: You can switch on the
Requiredoption to ensure that annotators provide the necessary information. - Options: Click
+ Addand name options. You can optionally set one of them as default.
Don't forget to include options, otherwise, annotators can NOT set the necessary attributes for the class.

Click the ← button to return. Similarly, you can create and configure other attributes.
Clicking on the attributes and options in the tree graph enables quick access to their respective settings pages.
Additionally, BascAI supports multiple levels of nested attributes, which can enhance metadata during annotation. Select an option in the Tree Graph, and add attributes and options.
After setting up, remember to click Save and Create.
Copy:
Click the top right corner of a class to copy it. The information and attribute settings remain identical to the original class, except for the Class ID and Name. You can edit them as needed.

Copy Many:
To improve the efficiency of class creation, you can click on Copy Many to batch duplicate an existing class.
In the pop-up window, there is one default copy with all the details identical to the original. You can add or delete copies(rows) and quickly modify their names, aliases, numbers, colors, and tool types. The attributes and constraints of the copied class will be applied to others.
Additionally, you can batch duplicate classes by uploading an Excel. Click to download the Template. Fill it according to the instructions provided within and upload.
The template for each type of dataset is different. Please carefully follow the instructions to avoid parsing errors, particularly for the
NameandTool Type.

2. Classification
Now, let's go to the Classification category. Click the + Create button to configure a new Classification, or Edit an existing one.
Configure Basic Info:
- Name, Alias, Tags, Classification ID are similar to those for Class.
- Input Type: Select the appropriate input type for the classification.
- Target on: You can choose to apply this classification to individual Data or Scene.
- Required: You can switch on the
Requiredoption to ensure that annotators provide this classification.
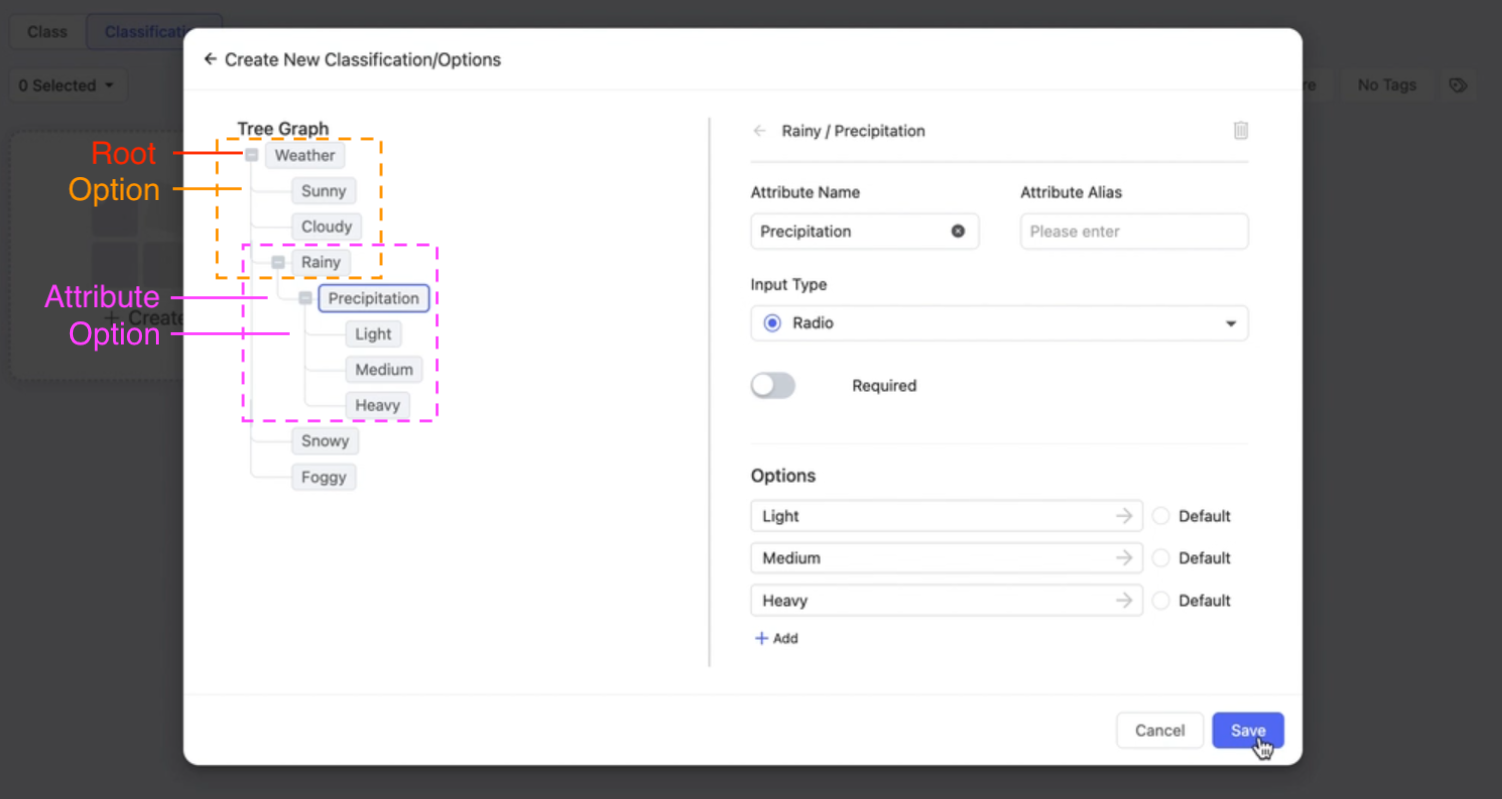
Manage Attributes:
The attributes interface is similar to that of classes. The left panel displays the structure of attributes and options, while the right allows you to apply specific settings.
A demonstration of how classifications appear in Tools is shown in the right image below.
Attribute management interface
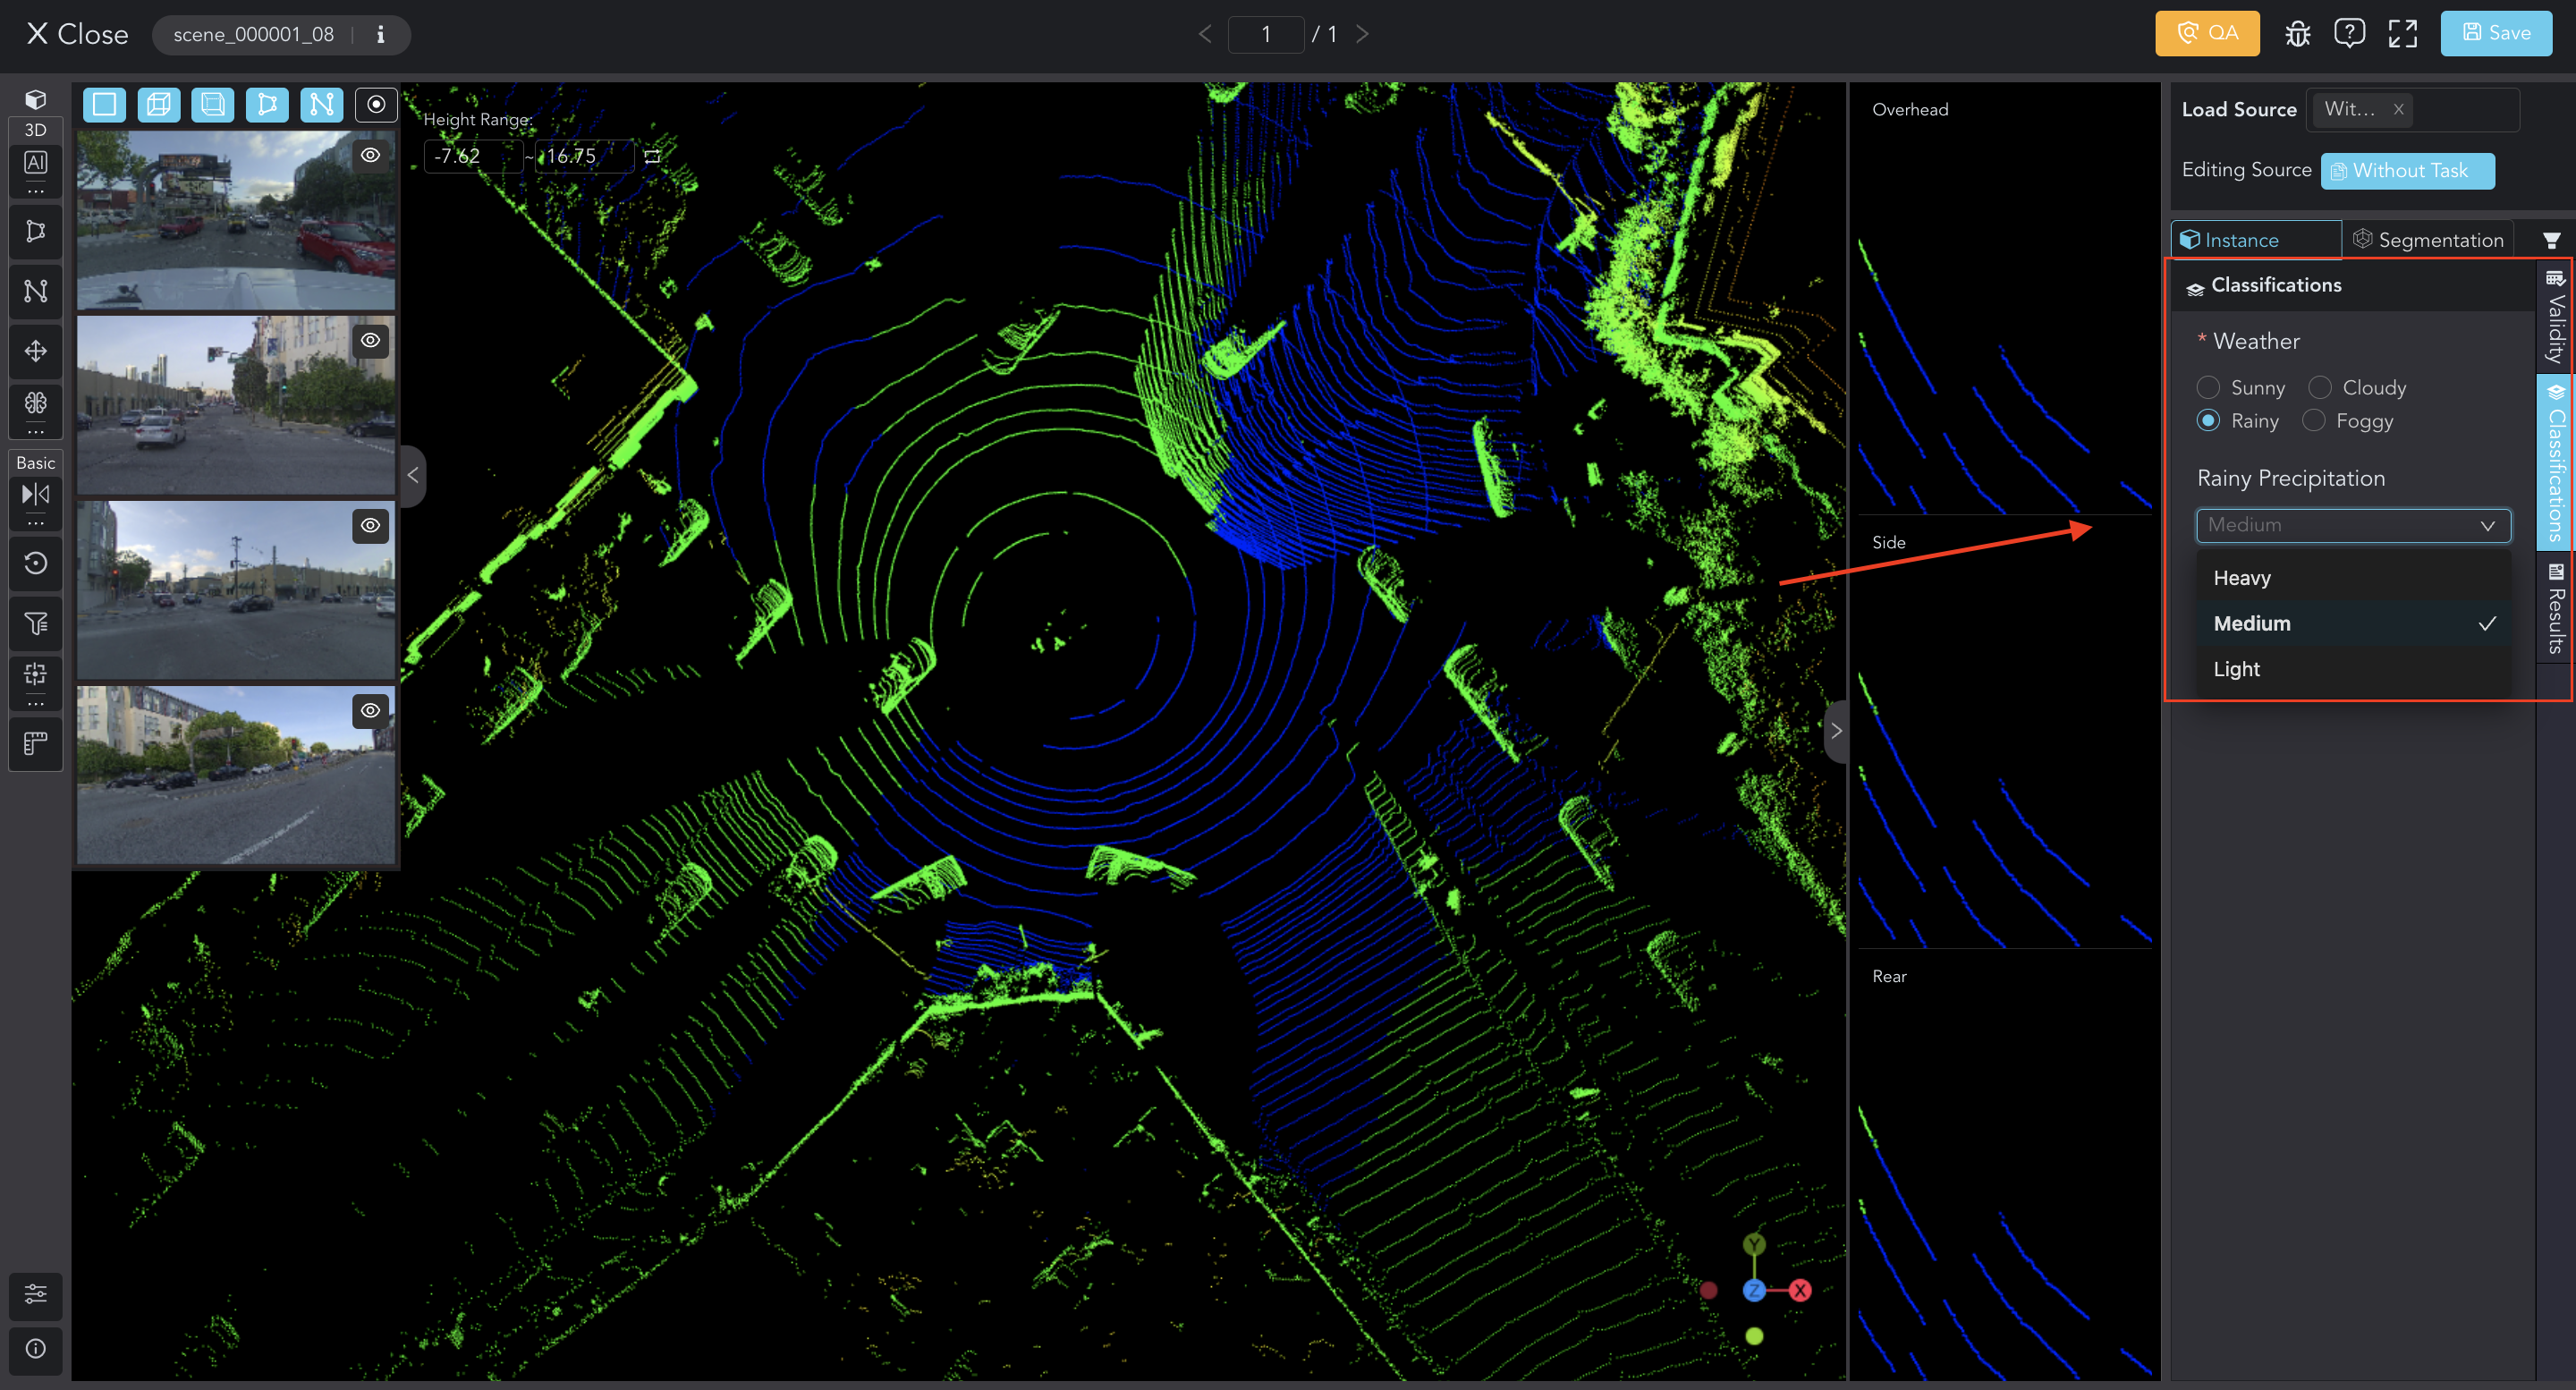
Preview in Tools
However, for classification, a special attribute that targets the data or scene itself, you can add options directly to the root. Click + Add and enter the name.
Still, you can create multiple levels of nested attributes.
Select an option in the Tree Graph, and add attributes on the right panel. Set up the Name, Input Type, Options. Remember to save.
3. Ontology Management
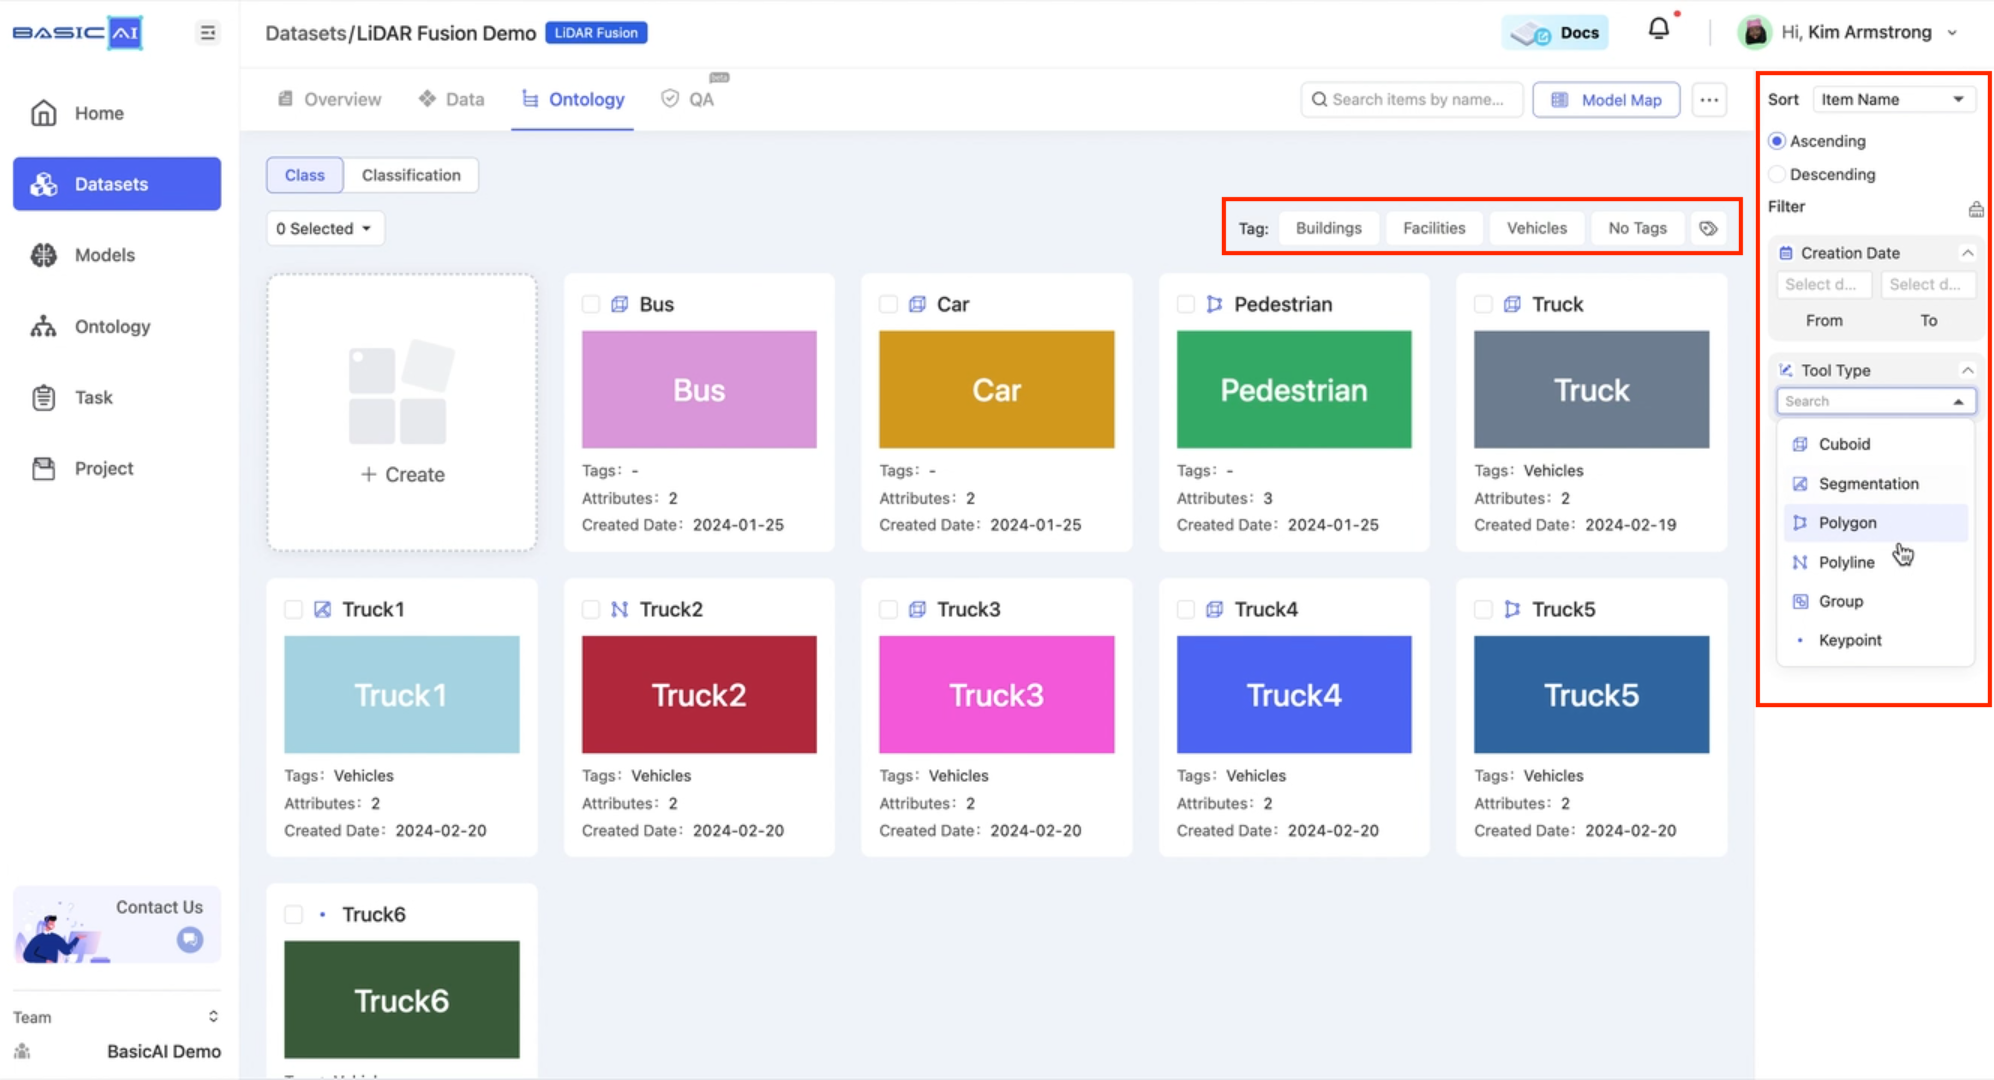
Sort and Filter
You can sort and filter classes and classifications by Creation Date, Name, Tool Type, or Input Type in the right toolbar, or by Tag at the top right of the list.
Batch Operations
By selecting all or part of class/classification cards, you can perform batch operations such as deleting, modifying tags, and adding them to the Ontology Center (ontology creation in the Ontology Center is required; view the steps).
Copy from Ontology Center 
Creating ontologies separately for each dataset can be time-consuming. Fortunately, in BasicAI, you can import ontologies directly from the Ontology Center to your datasets.
1. Create in Ontology Center
Let's head to the Ontology Center on the sidebar. Here, you can create and manage ontologies for different types of datasets.
+ Create a new Ontology, set up the Type and Name. Click on the card to access the class and classification list. The creation and management operations are the same as creating directly in datasets; view the steps.
2. Import into Datasets
Return to the Ontology list of the dataset from the Datasets Tab. Click the ... button in the top right corner and then Copy from Ontology Center.
Choose the Ontology from the Ontology Center and click Next. You can select part of classes and classifications or just copy the entire Ontology.

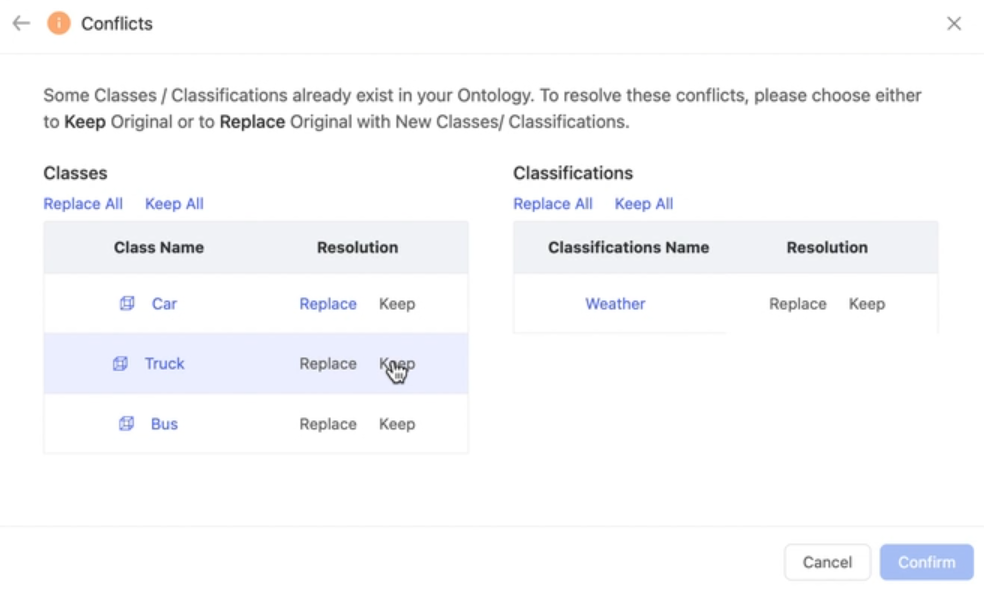
When conflicts occur between the copied classes/classifications and the original ones in the dataset, you can choose either to Keep Original or to Replace Original with New Classes/ Classifications.
Map with Model Classes 
When running a model to pre-annotate the dataset, classes from the model cannot automatically align with the classes in the dataset if they are named differently. In such cases, manual mapping of the classes is necessary.
Click Model Map in the top right corner of the ontology list. Select the Dataset Classes and the Model Classes (in the second and third columns) you wish to align. The fourth column provides detailed descriptions of the Model Classes for better understanding.
Tips:
Checking the model enables quick selection of all classes in it.
You can only configure one dataset class at a time. If you need to match multiple classes, click
confirmand then reopen the panel for further actions.
For example, we can map the dataset class Vehicle with multiple classes in the model Basic LiDAR Object Detection.
After configuration, run the model. The class results from the model will be automatically integrated with the dataset classes.

Without Model Map
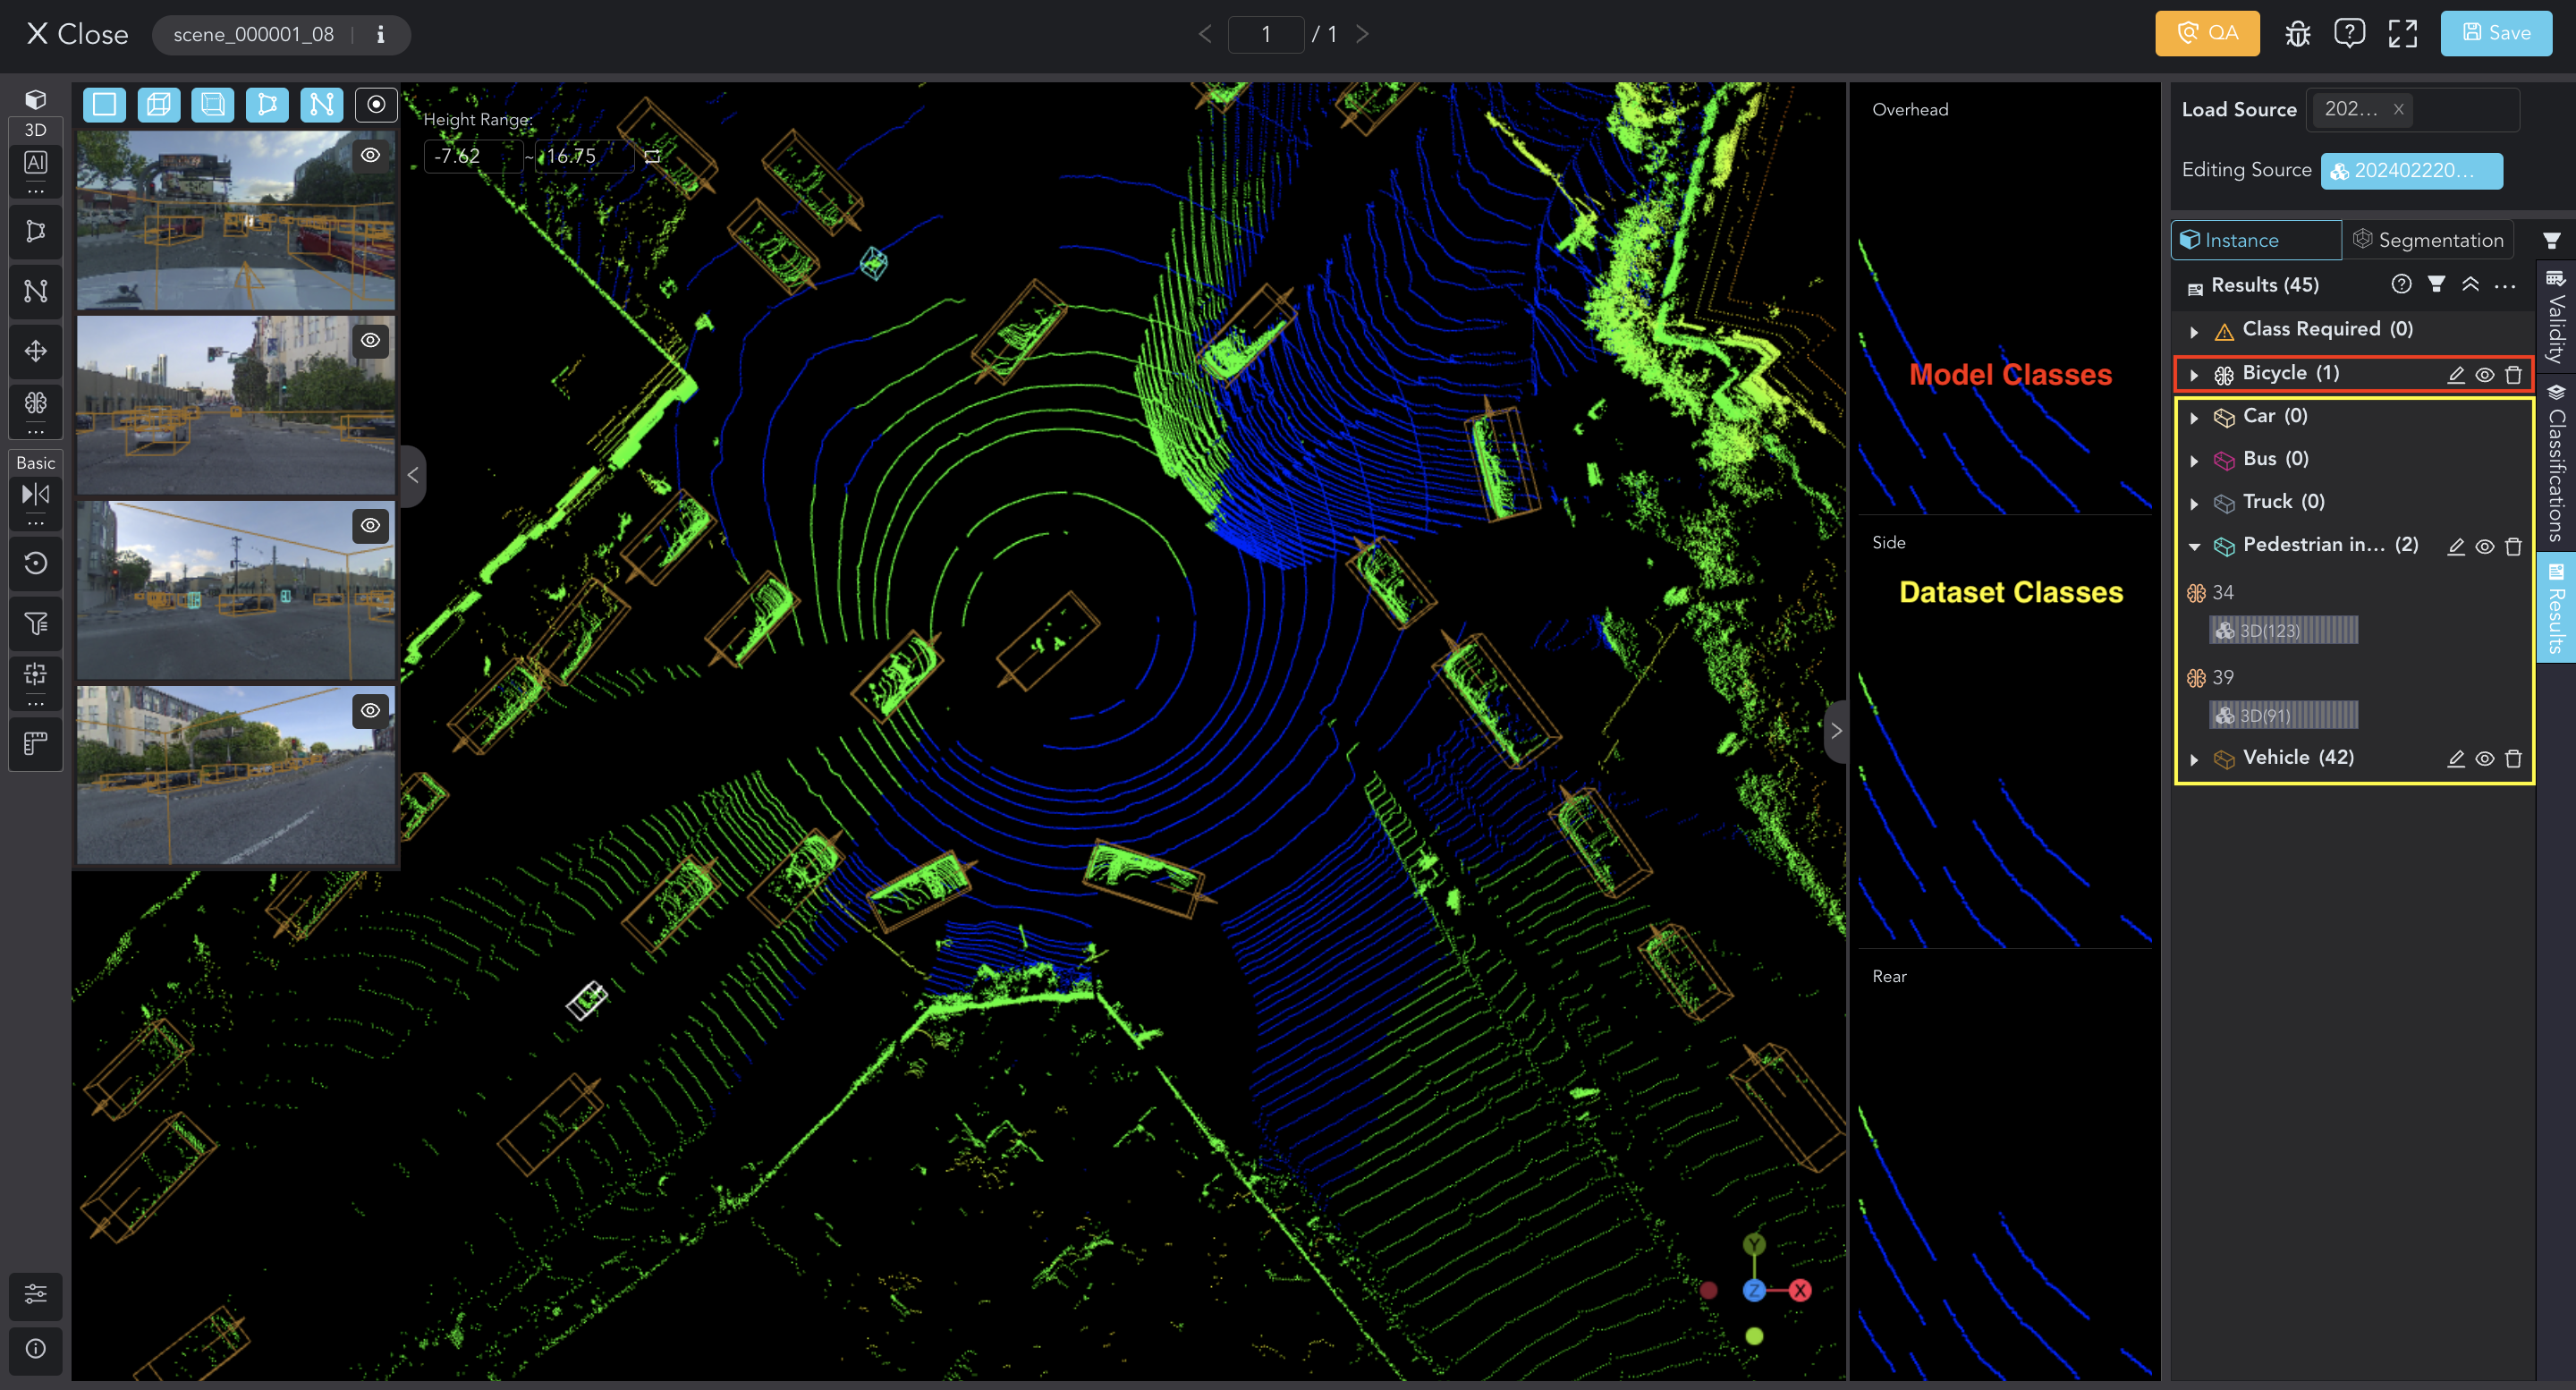
With Model Map
Import & Export 
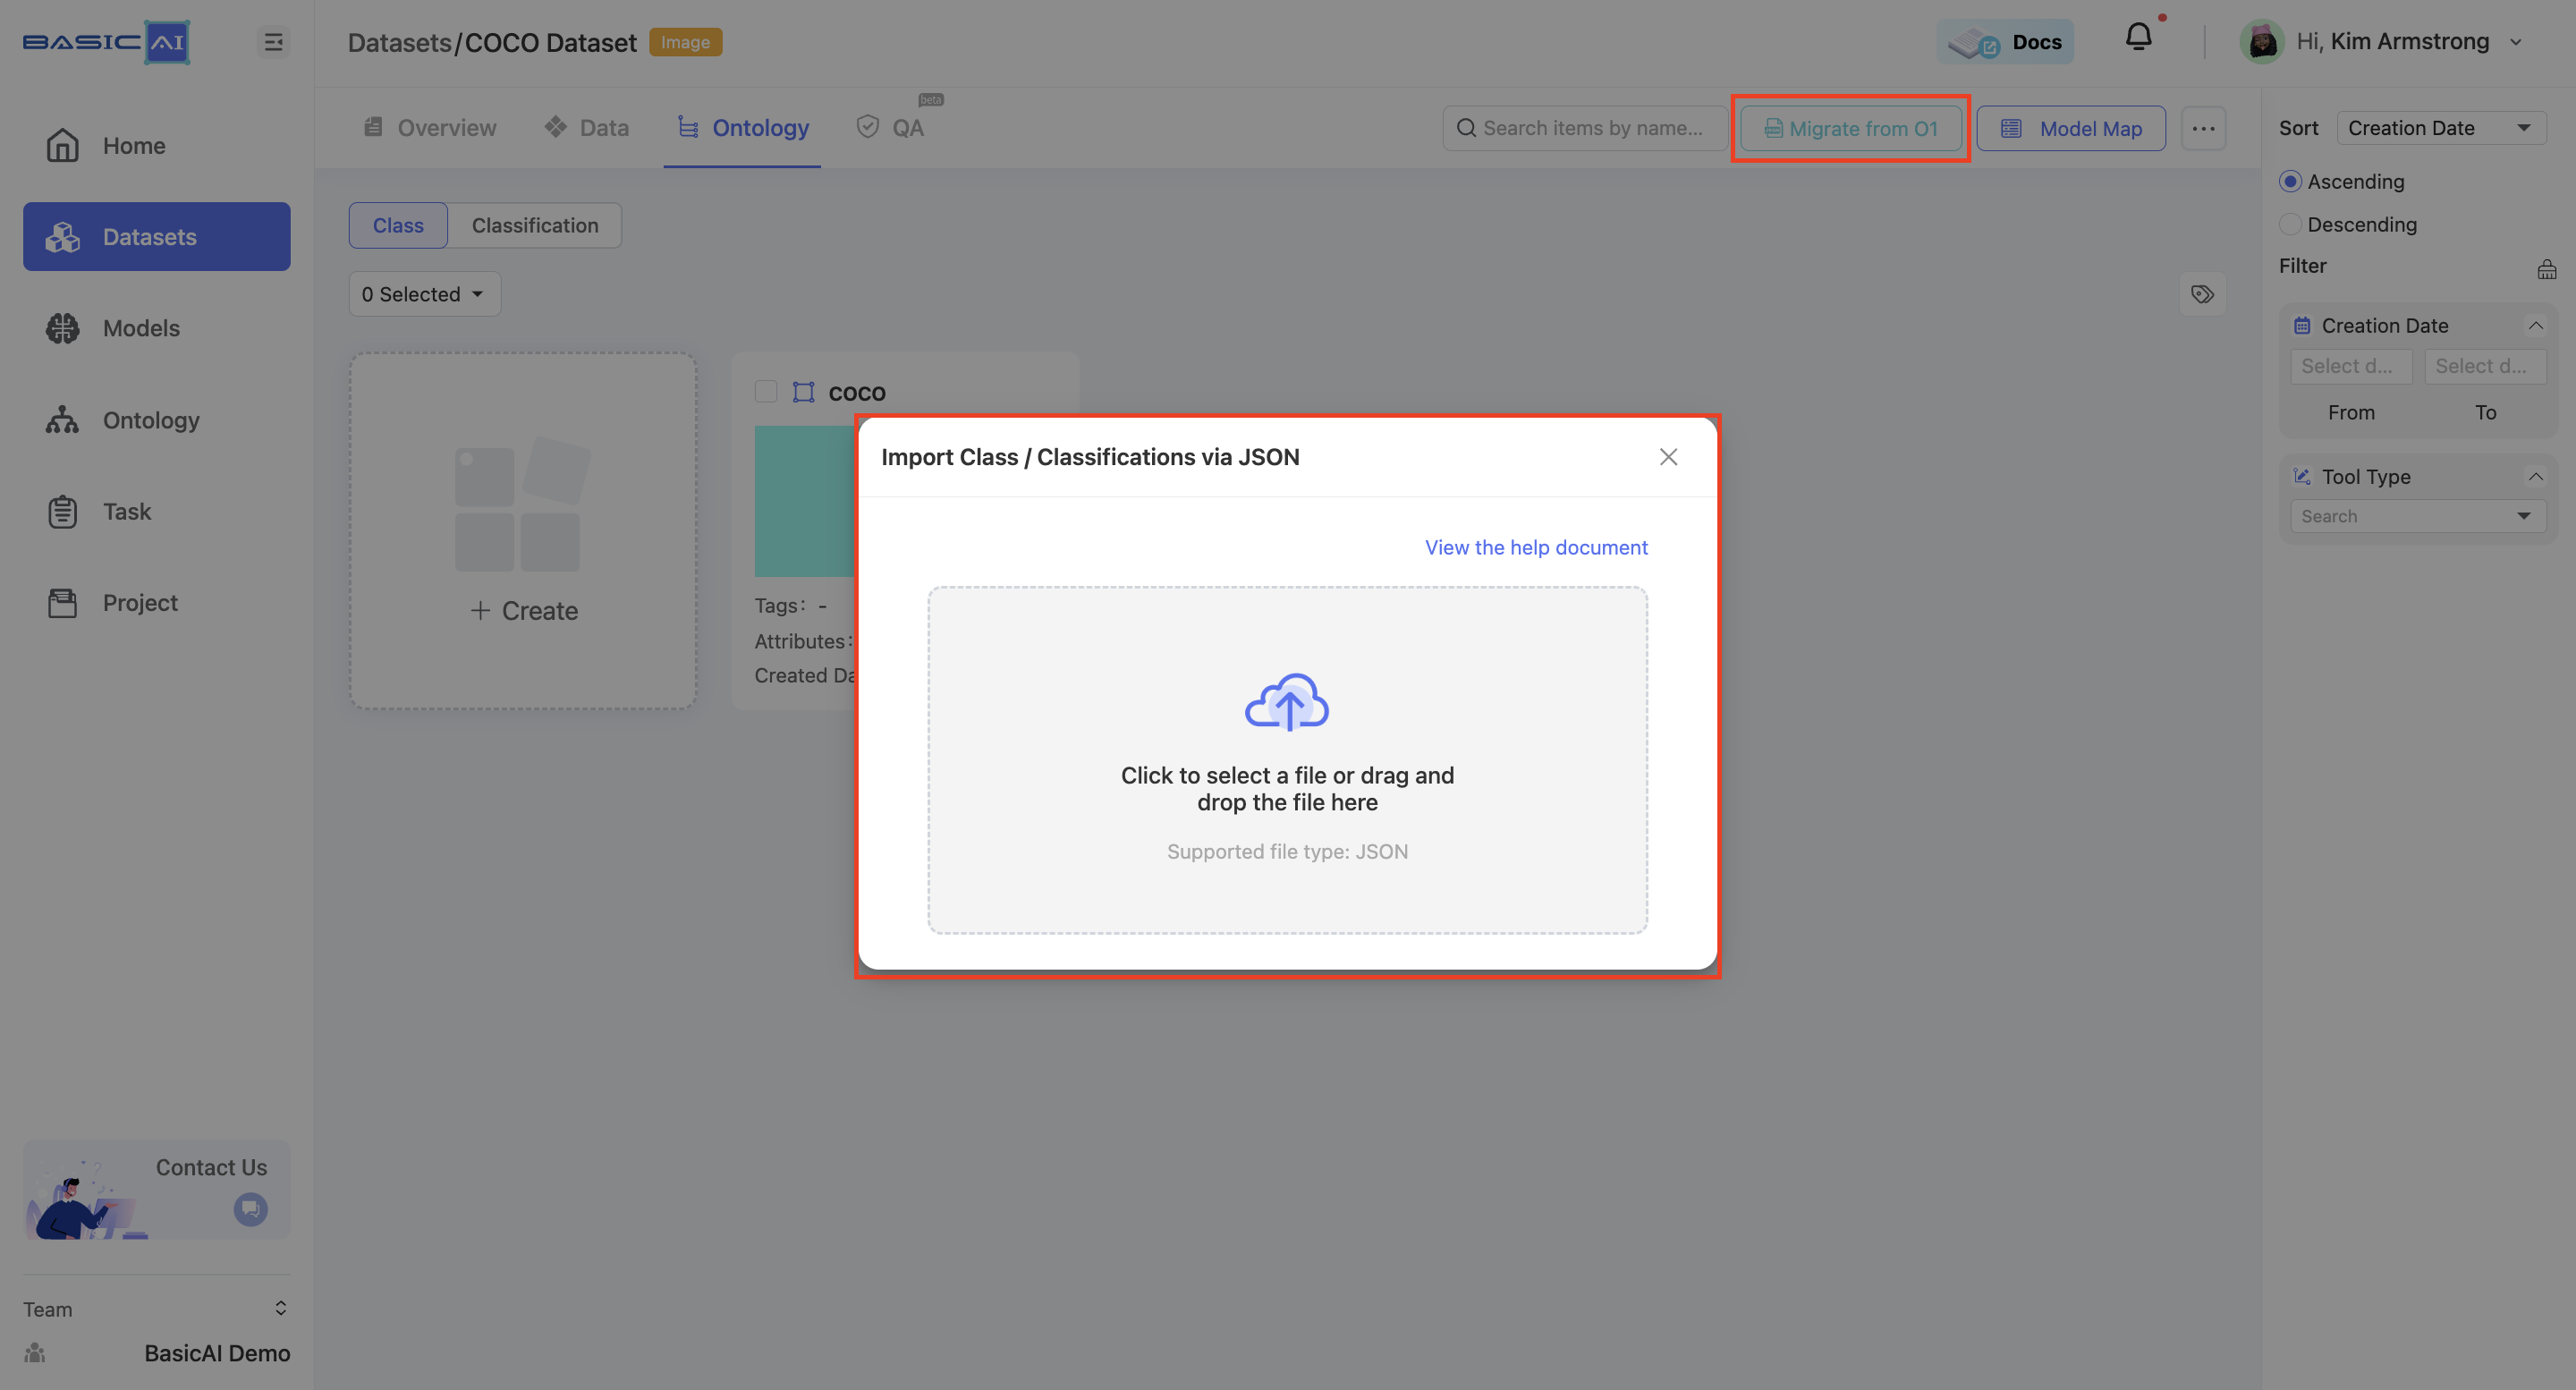
1. Import via JSON
You can import classes and classifications via JSON by clicking the ... button in the top right corner of the ontology list.
Feel free to download the JSON Template in BasicAI, or have a quickly look.
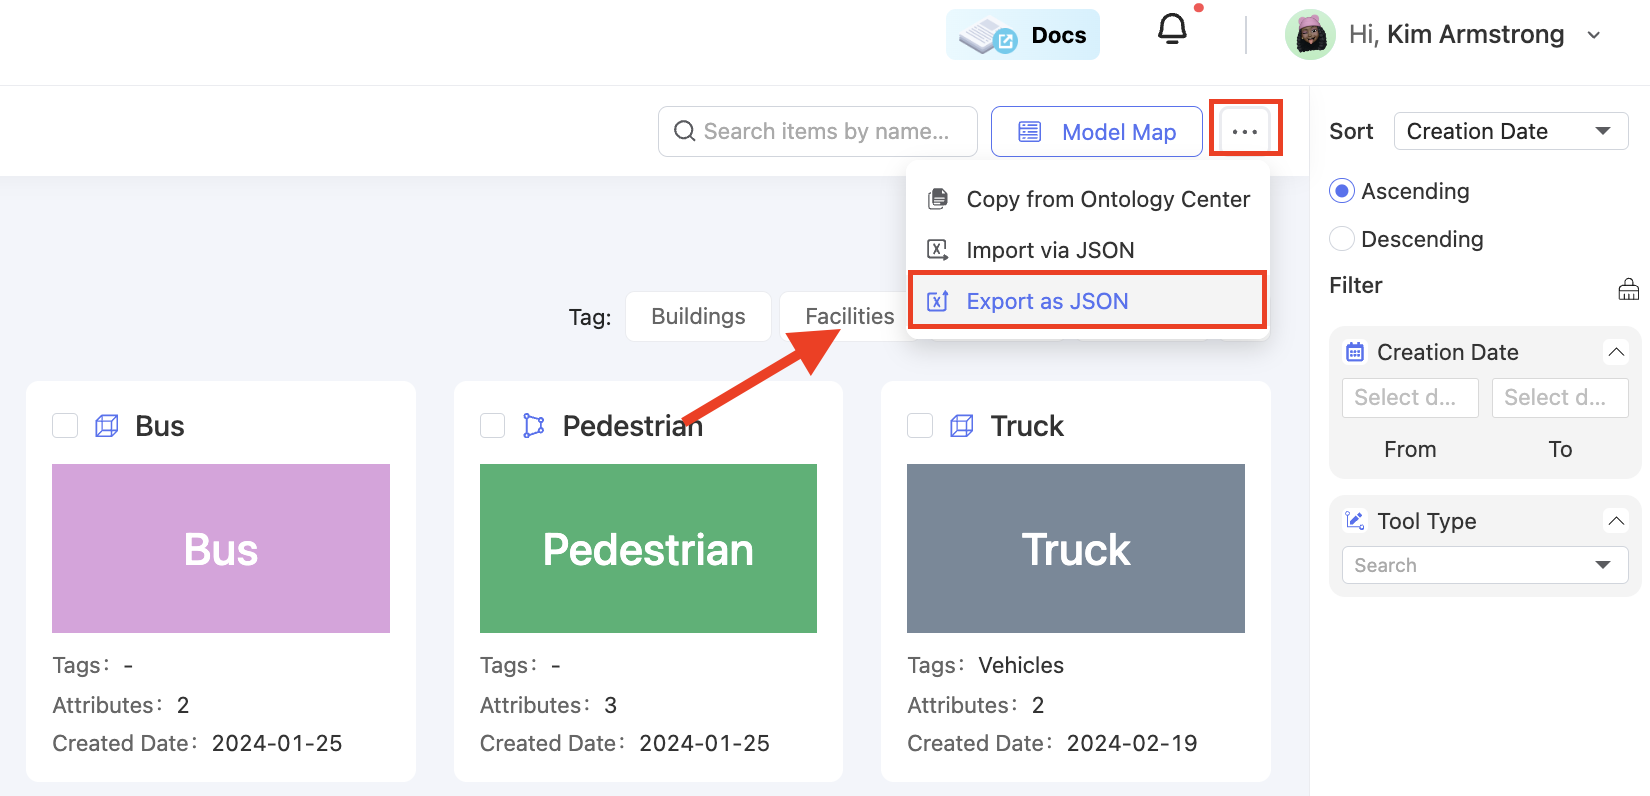
2. Export as JSON
The existing classes and classifications can be exported as a JSON file by clicking the ... button in the top right corner of the ontology list.
3. Migrate from O1
For Image and Audio & Video datasets, you can also migrate ontologies from the O1 platform as JSON files.
Updated 18 days ago